3-10
Installation and Configuration
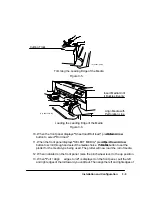
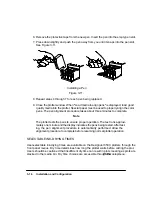
the media so that they are flush with the left and right edges of the roll. See
Figure 3-7.
Figure 3-7.
Aligning the Left and Right Edges of the Media
(C) C2847-97(UM)
(C) C2847-97a(UM)
14. When the front panel instructs you, lower the pinchwheel lever. The plotter checks
to make sure the roll is properly aligned.
15. When ªClose roll cover/Continue
º
is displayed,
rewind the media stop to take up
any slack in the roll. Make sure the leading edge of the media is outside the roll cov-
er, then close the roll cover. Press the
Down Arrow
button to continue. The plotter
trims off the first few inches of media. When roll loading is complete, the ªSTATUS
Ready to plotº message is displayed.
UNLOADING ROLL MEDIA
To unload roll media from the platen without removing the spindle from the plotter, do the
following steps:
1. Raise the pinchwheel lever to the up position.
2. Open the roll cover and turn the media stop to wind the media back onto the spindle.
3. Close the roll cover.
4. Lower the pinchwheel lever to the down position.
To remove the spindle with roll media, perform steps 1 and 2 above, then pull on both ends of
the spindle to remove it from the plotter.
Summary of Contents for 650c - DesignJet Color Inkjet Printer
Page 1: ...PrinterFAQ COM HP DesignJet650C User Guide ...
Page 126: ...7 10 Adjustments Calibrations Notes ...
Page 156: ...9 4 Product History Notes ...
Page 165: ...10 9 Parts and Diagrams Illustrated Parts Breakdown C2859A Electronics Enclosure C C2858 3 1 ...
Page 167: ...10 11 Parts and Diagrams Illustrated Parts Breakdown C2858A Electronics Enclosure C C2858 4 1 ...
Page 183: ...10 27 Parts and Diagrams Illustrated Parts Breakdown Paper Drive Assemblies C C2858 12 1 ...
Page 199: ......

