background image

maintain your hp digital copier

46

hp digital copier series

7

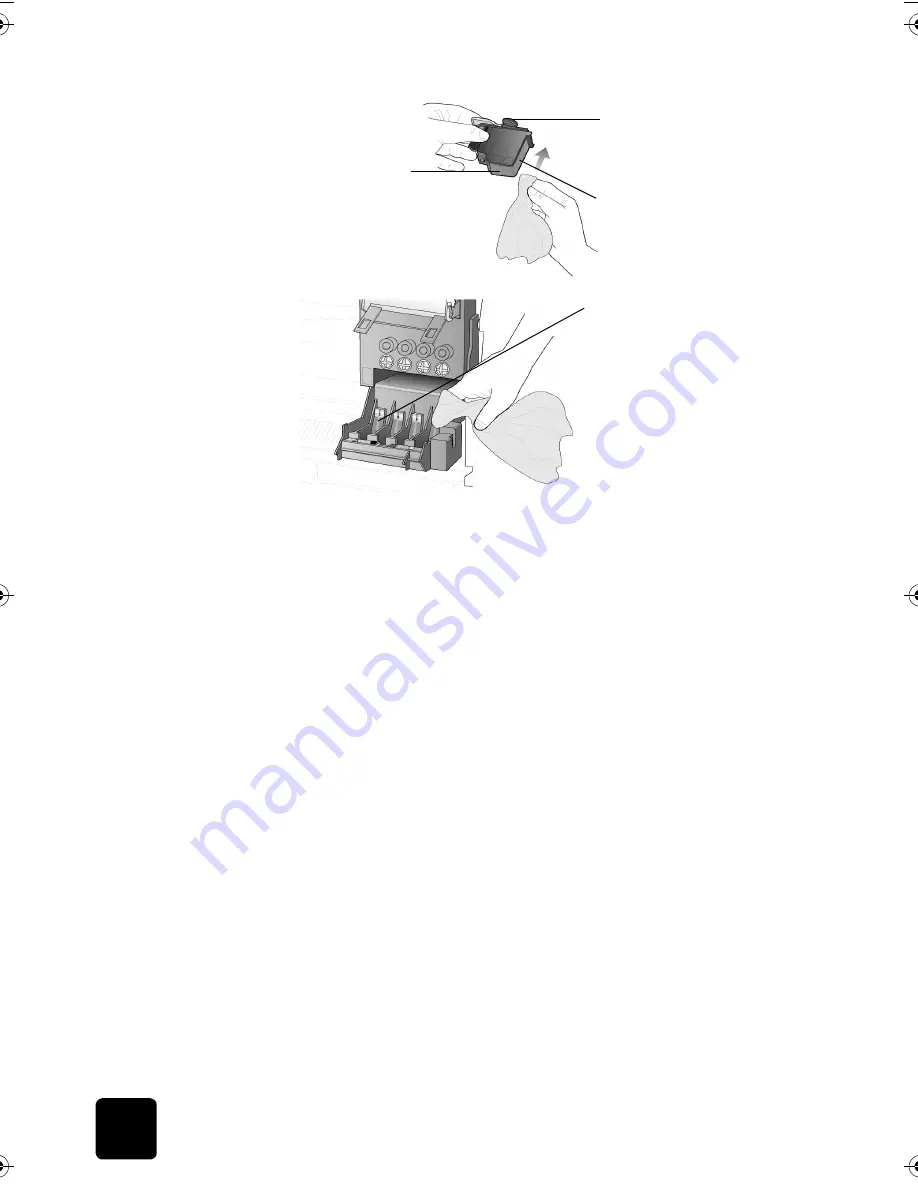
Place the printhead back into the holder.

8

Repeat cleaning of other printheads, if necessary.

9

Move the print carriage latch down, and make sure the loops catch 

the hooks. Snap the latch into place, then close the print-carriage 

access door.

10

Close the door and plug in the unit.
After cleaning the contacts, you should align the printheads.

11

Press 

Menu

.

12

Press 

3

, then press 

3

This selects the 

Status and Maintenance

 menu, then selects the 

Align 

PrintHeads 

option.

replacement 

alternatives

To get the best performance from your HP Digital Copier, we recommend 

using only genuine Hewlett-Packard supplies. For more information, see 

order printheads and ink cartridges

 on page 86.

Caution!

Damage that results from modifying or refilling HP 

ink cartridges or the use of non-HP ink is specifically excluded 

from the warranty coverage for the copier and copier 

supplies.

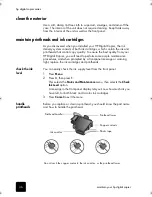
Do not touch the printhead 

tower.

Do not touch the 

ink nozzles on the 

underside of the 

printhead.

Clean only the copper 

contacts in the front of the 

printhead.

Clean only the copper 

contacts in the back of the 

print carriage.

GwenRG.book  Page 46  Thursday, January 31, 2002  5:20 PM

Summary of Contents for 510 - Notebook PC

Page 1: ...hp digital copier series reference guide 510 610 ...

Page 2: ...e Technical information section of the Support and Specifications Booklet It is not lawful in many places to make copies of the following items When in doubt check with a legal representative first Governmental paper or documents Passports Immigration papers Selective service papers Identification badges cards or insignias Governmental stamps Postage stamps Food stamps Checks or drafts drawn on Go...

Page 3: ...r tray 9 load the optional 250 sheet plain paper tray 11 recommended paper types 11 papers to avoid 12 tips for loading other types of paper in the main tray 12 choose the paper tray and set the paper type 13 set the paper size 13 4 use copier features 15 make copies 15 before you begin 15 make a copy 16 increase copy speed or quality 16 reduce or enlarge a copy 16 make copies lighter or darker 17...

Page 4: ... the ADF input tray 28 replace an existing ADF lid 29 use the ADF 29 two sided printing accessory 29 attach the two sided printing accessory 29 optional hp 250 sheet plain paper tray 30 assemble the 250 sheet plain paper tray 30 set the paper size 31 load paper in the optional 250 sheet plain paper tray 33 attach the optional 250 sheet plain paper tray to the unit 34 6 maintain your hp digital cop...

Page 5: ...l copier will not make copies 58 copies do not look right 59 copies are faded colors are incorrect or dull 59 entire copy is slanted or skewed 60 a blank page came out 60 orientation of copy is wrong 61 colors are bleeding into each other 61 copy has horizontal streaks 61 copy is fuzzy or blurry 62 copy has vertical streaks or is missing vertical lines 62 parts of the original are cut off 62 copie...

Page 6: ... hp distribution center 76 express service 76 limited warranty statement 77 environmental statement 79 hp printhead and ink cartridge limited warranty 79 warranty upgrades 80 limited global warranty statement for hp digital copier products 80 9 technical information 83 hp digital copier series specifications 83 margin specifications 83 paper specifications 84 additional specifications 86 order pri...

Page 7: ... and indicators that allow you to change settings and perform a wide range of copy functions front panel features The front panel is divided into the following main regions Keypad Shared buttons and front panel display Copy area On button The following page shows a close up of the front panel with the parts labeled ...

Page 8: ...py Setup Print Report and Status Maintenance 4 Arrows use to scroll through menu settings or options within settings 5 Enter use to select or save the displayed setting 6 Quality use to select the quality of the copy from Best Normal or Fast 7 Number of Copies use to change the number of copies for the active copy job This button can be used in conjunction with the arrow keys or the keypad to make...

Page 9: ...oll backward through numeric values 13 Two Sided Copy use to make hands free two sided copies This is available only if your copier includes the two sided printing accessory and the automatic document feeder ADF 14 Tray Select Paper Type use to select paper type The main paper tray supports plain paper and specialty papers If your HP Digital Copier has the optional 250 sheet plain paper tray use t...

Page 10: ...owing Menu functions are available 0 Collation model 610 only 1 Enhancements 2 Paper Size 3 Color Intensity 4 Set Copy Defaults 5 Restore Copy 1 Copy Setup Press Menu to display the Copy Setup options Press and to move to the setting you want Press Enter to select the displayed setting 1 Menu Settings 2 Report Self Test 2 Print Report 1 Check Ink Level 2 Clean PrintHeads 3 Align PrintHeads 4 Perfo...

Page 11: ...to know about using your HP Digital Copier The Reference Guide includes troubleshooting assistance instructions for ordering supplies and accessories technical specifications and information regarding support and warranty Internet help and technical support If you have Internet access you can get help from the HP website at www hp com go copiers The website also provides answers to frequently aske...

Page 12: ...get help 6 hp digital copier series ...

Page 13: ... the glass You can copy almost any type of original by placing it directly on the glass 1 Lift the lid and place the original face down on the glass positioning it in the bottom right corner with its sides touching the right and bottom edges It is important to place the original the bottom right corner Tip If your original is printed on transparency film place a blank piece of paper on top of the ...

Page 14: ...P Premium Inkjet Paper HP Bright White Inkjet Paper Caution Make sure you do not leave an original on the glass when you use the ADF This causes a paper jam You can also use the ADF to load the following types of originals but you must load them one sheet at a time Other specialty papers such as glossy paper Overhead transparencies such as HP Premium Inkjet Transparency Media Photo paper such as K...

Page 15: ...es For more information see choose the paper tray and set the paper type on page 13 If you have the optional 250 sheet plain paper tray you can load paper into both the main paper tray and the optional 250 sheet plain paper tray If you have the optional 250 sheet plain paper tray you should use it for plain paper only See load paper in the optional 250 sheet plain paper tray on page 33 for more in...

Page 16: ... print side down until it stops If you are using letterhead insert the top of the page first Be careful not to use too much or too little paper Check that the stack of paper contains several sheets but is no higher than the top of the paper length guide 7 Slide the paper width and paper length guides in until they stop at the edges of the paper Make sure that the paper stack lies flat in the main ...

Page 17: ...ron On T shirt Transfers can be used to transfer your designs or photos onto T shirts sweatshirts and fabric crafts HP Premium Inkjet Transparency Film makes your color presentations vivid and even more impressive This film is easy to use and handle and dries quickly without smudging HP Premium Inkjet Heavyweight Paper is matte coated on both sides for two sided copying It is the perfect choice fo...

Page 18: ... nonprinting side of the paper and then insert paper with the arrow side facing up HP Premium or Premium Plus Photo Paper Load the glossy print side down Always load at least five sheets of regular paper in the main tray first and then place the photo paper on top of the regular paper HP Premium Inkjet Transparency Film Insert the film so that the white transparency strip with arrows and the HP lo...

Page 19: ...gs are reset to the defaults two minutes after the unit completes the copy job HP recommends adjusting paper type settings for the type of paper you re using 1 Press Tray Select Paper Type 2 If you have both paper trays press Tray Select Paper Type until the desired paper tray is selected as indicated by the dot on the left 3 When copying from the main tray press until the appropriate paper type a...

Page 20: ...load originals and paper 14 hp digital copier series ...

Page 21: ...cial copying features to create a poster make many sizes of photos make high quality copies of photos using special photo paper or to create transparencies Make two sided copies or copy from two sided documents on some models make copies All copy settings that you select on the front panel are reset two minutes after the HP Digital Copier completes a copy unless you save the settings as the defaul...

Page 22: ...d is the recommended setting for most of your copying Normal copies faster than Best Fast copies faster than the Normal setting The text is of comparable quality to the Normal setting but the graphics may be of lower quality Using Fast also cuts down on the frequency of replacing your ink cartridges because it uses less ink to change the quality of your copy 1 Load your original on the glass or in...

Page 23: ... of the copies you make 1 Press Lighter Darker 2 Press to lighten the copy or to darken it The circle moves to the left or right depending on the button you press 3 Press Start Copy Black or Start Copy Color change color intensity You can adjust color intensity to make colors on your copy more vivid or more subtle 1 Press Menu 2 Press 1 and then press 3 This selects Copy Setup and then selects Col...

Page 24: ...opy Black or Start Copy Color set the number of copies You can set the number of copies using the front panel 1 Press Number of Copies 2 Do any one of the following to enter a number a Press until the desired number of copies appears b Enter a number with the keypad c Use the buttons until the desired number of copies appears 3 Press Enter 4 Press Start Copy Black or Start Copy Color change settin...

Page 25: ... 250 sheet plain paper tray the upper tray main tray is selected by default 4 When Upper Tray is selected press until the desired photo paper option appears then press Enter to select it Tip To enlarge a photo automatically to a full page press Special Features until Fit to Page appears then press Enter For more information see below 5 Press Menu 6 Press 1 then press 1 again This selects Copy Setu...

Page 26: ...tart Copy Black or Start Copy Color Tip To prevent the edges of a full page copy from being cut off when you copy select Fit to Page which will slightly shrink your full page copy to fit within the borders of a letter sized page print several copies on one page You can place multiple copies of an original on one page by selecting a photo size and then selecting the number of copies you want There ...

Page 27: ... of copies of the photo on a single page does not come out as expected try turning the original on the glass 90 degrees and start the copy again print two originals on one page You can print two different letter or A4 sized originals on one page using the 2 on 1 feature The copied images will appear side by side on the page in a landscape format You can use the automatic document feeder ADF to loa...

Page 28: ...ift 100 appears 3 Press or to shift the margin to the left or to the right Each step is a inch 6 35 mm shift 4 If you wish to change the reduction enlargement percentage as well enter a number using the keypad then press Enter Tip If you do not wish to change the reduction enlargement percentage press Enter after you have selected the amount of Margin Shift you want 5 Press Start Copy Black or Sta...

Page 29: ...es single sided copies of a two sided original 2 sided original 2 sided copy This option produces a two sided copy from a two sided original 3 Press Start Copy Black or Start Copy Color collate copies The collate feature lets you produce sets of copies in the exact order that the original is loaded into the ADF The collate feature is only available on a HP 610 Digital Copier that is equipped with ...

Page 30: ...the poster width the HP Digital Copier adjusts the length automatically to maintain the proportions of the original If the original cannot be enlarged to the selected poster size an error message appears that tells you the number of pages wide that are possible Select a smaller poster size and make the copy again prepare a color T shirt transfer Use the Iron On feature to reverse text and images s...

Page 31: ...copy to create a mirror image copy of an original 1 Place the first original on the glass If you are using the ADF load both originals there 2 Press Special Features until Mirror appears then press Enter 3 If you wish to change the reduction enlargement percentage as well enter a number using the keypad or press or to adjust 4 Press Enter Tip If you do not wish to change the reduction enlargement ...

Page 32: ...Collation 1 Enhancements 2 Paper Size 3 Color Intensity 4 Set Copy Defaults 5 Restore Copy Factory Settings 1 Copy Setup Press Menu to display the Copy Setup options Press and to move to the setting you want Press Enter to select the displayed setting ...

Page 33: ...opier models and is available as an accessory on the others You can use the ADF to perform unattended copying This means that you can load and copy a multi page document without raising the copier lid to individually position each page on the glass install the ADF It s easy to replace the standard flat lid with an ADF lid to remove the standard flat lid 1 Turn off the HP Digital Copier 1 Unplug th...

Page 34: ...on To prevent damaging the unit do not allow the ADF lid to fall onto the flatbed surface Always close the ADF lid when the product is not in use install the ADF input tray 1 Align the two tabs on the input tray with the two grooves in the ADF cover 2 Slide the tray into the grooves as shown until the tray snaps into place 3 Replug the power cord into a grounded AC outlet hinges tab above each hin...

Page 35: ...e appears on the display indicating that the originals are loaded two sided printing accessory This accessory can be used with or without the optional 250 sheet plain paper tray to provide dual sided copying capability and dual paper tray capacity The 250 sheet plain paper tray can handle 250 sheets of copier letterhead and bond paper You must use the main paper tray to load transparency film phot...

Page 36: ...e you must replace the rear access door for your HP Digital Copier to operate 2 Insert the two sided printing accessory into the back of the unit Tip Turn the two sided printing accessory so the button is on top optional hp 250 sheet plain paper tray assemble the 250 sheet plain paper tray 1 Unpack the accessory and the inner tray 2 Remove the inner tray ...

Page 37: ...gal and A4 paper To specify the paper size for the 250 sheet plain paper tray you must set all three size adjustments located on the inner tray the paper width guide the paper width fence the paper length guide Caution If you change the paper size for example from letter to A4 you must remove the inner tray completely and reset all three size adjustments ...

Page 38: ...et the width to LTR to use legal size paper 3 Set the paper width fence by carefully snapping it into the slots for the paper size Tip The slots for letter width paper are in the sides of the inner tray Use the LTR setting for legal size paper also 4 Set the paper length guide by pulling it until the arrow lines up with the paper size ...

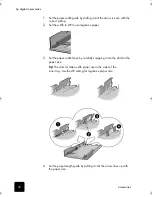
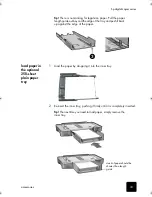
Page 39: ... push it back up against the edge of the paper load paper in the optional 250 sheet plain paper tray 1 Load the paper by dropping it into the inner tray 2 Re insert the inner tray pushing it firmly until it is completely inserted Tip The next time you need to load paper simply remove the inner tray stack of paper should be shorter than length guide ...

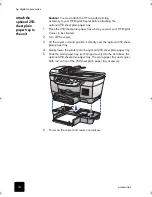
Page 40: ... where you want your HP Digital Copier to be situated 2 Turn off the copier 3 Lift the copier unit and position it directly over the optional 250 sheet plain paper tray 4 Gently lower the printer onto the optional 250 sheet plain paper tray 5 Slide the main paper tray with hinged cover into the slot above the optional 250 sheet plain paper tray The main paper tray and copier both rest on top of th...

Page 41: ...n the glass these can damage it Do not place liquids directly on the glass They may seep under it and damage the unit 3 Dry the glass with a chamois or cellulose sponge to prevent spotting clean the lid backing Minor debris can accumulate on the white document backing that is located underneath the unit s lid 1 Turn off the unit unplug the power cord and raise the lid 2 Clean the white document ba...

Page 42: ...o perform some simple maintenance procedures and when prompted by a front panel message or warning light replace the ink cartridges and printheads check the ink level You can easily check the ink supply level from the front panel 1 Press Menu 2 Press 3 then press 1 This selects the Status and Maintenance menu then selects the Check Ink Level option A message in the front panel display lets you kno...

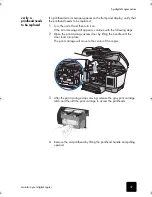
Page 43: ...rn it on If the error message still appears continue with the following steps 2 Open the print carriage access door by lifting the handle until the door locks into place The print carriage will move to the center of the copier 3 After the print carriage stops moving release the gray print carriage latch and then lift the print carriage to access the printheads 4 Remove the old printhead by lifting...

Page 44: ...gain and close the print carriage access drawer 9 If the error message still appears replace the printhead as described in the following section replace the printheads If you experience problems with that quality of your copies that cannot be resolved by cleaning your printheads you may need to replace them You may also see front panel display messages that indicate when an individual printhead ne...

Page 45: ...o avoid damaging the copier remove a printhead only when a replacement is available If a printhead is removed without being replaced Close the print carriage and the print carriage access door Replace the printhead within 24 hours Never remove an ink cartridge and a printhead at the same time 3 Remove the old printhead by lifting the printhead handle and pulling upward Pull the printhead handle up...

Page 46: ...ead carriage 6 Push the new printhead firmly down into the appropriate slot using the printhead handle Do not touch the printhead tower and do not remove the printhead handle 7 Move the print carriage latch down and make sure the loops catch the hooks Snap the latch into place then close the print carriage access door 8 After the message appears in the front panel display press Enter to align the ...

Page 47: ...ads To determine the expiration date of a cartridge print a Self Test Report For more information see create a self test report for cartridges and printheads on page 67 See order printheads and ink cartridges on page 86 for information on ordering replacement ink cartridges 1 Turn on the unit then open the print carriage access door by lifting the handle until the door locks into place The print c...

Page 48: ... the ink cartridge within 24 hours Never remove an ink cartridge and a printhead at the same time 3 Remove the new ink cartridge from its packaging and being careful to touch only the black plastic gently remove the plastic tape Caution Hold the cartridge away from you as you remove the plastic tape so the ink does not spill on you or your clothing Caution Do not touch the copper contacts 4 Push t...

Page 49: ...tus and Maintenance menu then selects the Align PrintHeads option clean the printheads If you notice streaking or white lines through any colored areas on your copies you may need to clean the printheads Do not clean printheads unnecessarily This wastes ink and shortens the life of your printheads 1 Press Menu 2 Press 3 then press 2 This selects the Status and Maintenance menu then selects the Cle...

Page 50: ...and the contacts inside the ink cartridge socket for ink and debris buildup 5 Clean any visible ink deposits with a clean soft lint free cloth If necessary moisten the cloth with one drop of water 6 Place the ink cartridge back into the holder 7 Repeat if necessary for the other ink cartridge 8 Close the door and plug in the unit Because you removed an ink cartridge from its holder the HP Digital ...

Page 51: ...m the back of the unit 3 Release the gray print carriage latch and then lift the print carriage to access the printheads 4 Remove the printhead by lifting the printhead handle and pulling upward 5 Inspect the copper contacts and the contacts inside the printhead socket for ink and debris buildup 6 Clean any visible ink deposits with the clean soft lint free cloth If necessary moisten the cloth wit...

Page 52: ...enance menu then selects the Align PrintHeads option replacement alternatives To get the best performance from your HP Digital Copier we recommend using only genuine Hewlett Packard supplies For more information see order printheads and ink cartridges on page 86 Caution Damage that results from modifying or refilling HP ink cartridges or the use of non HP ink is specifically excluded from the warr...

Page 53: ...ty of Hewlett Packard refilled ink cartridges To install a refilled HP ink cartridge you must override the Ink Level Gauge For more information see override the ink level gauge on page 48 perform color calibration The Color Calibration option prints out a report that lets you manually improve your color printing or copying You should perform this procedure only if you see problems with color tints...

Page 54: ...rintheads Damage that results from continued use of an ink cartridge with a disabled Ink Level Gauge is not the responsibility of Hewlett Packard Damage that results from the use of non HP ink is not the responsibility of Hewlett Packard The Ink Level Gauge is automatically reset when a different ink cartridge is installed in the copier Overriding the Ink Level Gauge does not affect ink cartridge ...

Page 55: ...ect the language you can do the following Press until the desired language appears Wait until the desired language appears on the front panel display 4 Enter the two digit number corresponding to the language on the keypad For example for English enter 11 5 After entering the language you are prompted to confirm that the language you selected is the one you want 6 Press 1 for Yes and 2 for No 7 Af...

Page 56: ... panel Your unit is automatically set to enter power save mode after 12 hours Follow these steps if you want the HP Digital Copier to enter this mode earlier 1 Press Menu 2 Press 3 then press 6 This selects the Status and Maintenance menu then selects the Set Power Save Mode Time option 3 Press until the desired time appears then press Enter set the ring and beep volume The volume of the button be...

Page 57: ...intenance menu options Press and to move to the setting you want Press Enter to select the displayed setting 1 Check Ink Level 2 Clean PrintHeads 3 Align PrintHeads 4 Perform Color Calibration 5 Restore Factory Defaults 6 Set Power Save Mode Time 7 Set Country and Language 8 Ring and Beep Volume 3 Status and Maintenance ...

Page 58: ...maintain your hp digital copier 52 hp digital copier series ...

Page 59: ...more information see load the main paper tray on page 9 paper jams check all paths main paper tray or optional 250 sheet plain paper tray automatic document feeder ADF tray and cover two sided printing accessory back of unit paper tray jams 1 Always start by removing the back access door or the two sided printing accessory Gently remove any paper jams from the back of the unit 2 If this does not w...

Page 60: ...ers 3 Replace and lock the back door 4 Remove the back door If the paper has jammed where it exits the HP Digital Copier grasp the leading edge of the paper and pull the paper out through the output tray two sided printing accessory jams You may need to remove the two sided printing accessory 1 Press the button on top of the accessory to open the accessory door and check for paper 2 Press the side...

Page 61: ...he tray If there is paper in the tray remove it tap the stack against an even surface and reload it To continue your job press Enter on the front panel of the HP Digital Copier For more information see load paper on page 9 do you have the correct tray selected If you have an optional 250 sheet plain paper tray the paper is picked from there first Make sure you have the correct tray selected On the...

Page 62: ...elected paper tray If you have a 250 sheet plain paper tray the paper is picked from there first Make sure you have the correct tray selected On the front panel press the Tray Select Paper Type button Make sure to select the correct tray is the back door or the two sided printing accessory off If you have removed either the back door or the two sided printing accessory to clear a paper jam replace...

Page 63: ...iginal in the bottom right corner of the glass is original placed correctly in the automatic document feeder ADF Make sure the original is loaded as far is it can go into the ADF so that it can be grabbed by the feeding mechanism did you load the correct paper type in the input tray Do not use the HP Digital Copier to copy onto envelopes or other small papers is the main tray inserted properly Mak...

Page 64: ...Digital Copier still does not power on there may be a mechanical failure Unplug the HP Digital Copier from the power outlet and contact HP See hp customer support on page 71 did you press the On button too quickly The HP Digital Copier may not respond if you press the On button too quickly Press the On button once slowly hp digital copier will not make copies have your ink cartridges expired When ...

Page 65: ...s rather than flesh tones then you may need to perform a color calibration However do not perform a color calibration unless necessary For more information see perform color calibration on page 47 do you need to replace an ink cartridge or printhead Print a Self Test Report to make sure all six colors are available If a color is missing try cleaning the ink cartridge contacts After cleaning try pr...

Page 66: ...duce moiré patterns try placing one or more clear plastic sheet protectors directly on the glass and then place the original face down on top of the plastic sheet do you need to clean the unit Debris may be stuck on the glass or document lid backing which causes poor copy quality and slows down processing Unplug the unit before cleaning Use a soft cloth to wipe the glass and document lid backing F...

Page 67: ... main tray on page 12 colors are bleeding into each other is the setting correct for the type of document you are printing Color documents can use excess ink Try using the Normal setting or use HP Premium Papers is the paper type suitable for this unit For more information see recommended paper types on page 11 copy has horizontal streaks are you using the highest possible print quality Use a high...

Page 68: ...through the lists of paper types 3 Press Enter to select a paper type copy has vertical streaks or is missing vertical lines does the unit need to be cleaned Debris may be stuck on the glass or document lid backing causing a vertical white streak through the image Unplug the unit before cleaning Use a soft cloth to wipe the glass and document lid backing For more information see clean the glass on...

Page 69: ...e the Fit to Page feature For more information see fit a copy to the page on page 19 is the original larger than the paper size in the tray Verify that you are copying to the same size paper as the original This problem is most common when copying a legal size paper onto letter size paper Verify that you have selected the proper paper size for your project Make sure that you have loaded the correc...

Page 70: ... old If copies are too light you may need to replace the ink cartridges are you copying a photo For more information see copy a photo on page 19 ink is not filling the text or graphic completely is the paper type set correctly When using transparencies or other special papers make sure the unit has set the correct paper type On the front panel press the Tray Select Paper Type button Use the arrow ...

Page 71: ...than a few minutes The HP Digital Copier is designed to prevent nozzles from drying out under normal use Caution Be sure to turn the HP Digital Copier off from the front panel and not from a power strip A printhead that is not used for a long time can also clog This causes a noticeable decrease in print quality To unclog the nozzles clean the printhead Caution Do not clean the printhead unnecessar...

Page 72: ...artridges Do not leave ink cartridges out for an extended time If you continue to receive this error your ink cartridge is probably defective If this is a new ink cartridge return it in the original packaging to the store where it was purchased Replace the ink cartridge Do not use the defective cartridge For more information see replace the ink cartridges on page 41 Warning To avoid damaging the H...

Page 73: ...r can cause the unit to mis align the printheads create a self test report for cartridges and printheads The Self Test Report provides detailed information concerning the status of the ink cartridges and printheads Print a Self Test Report when you Encounter print quality problems Want to view information about printheads and ink cartridges Want to check ink levels Want to see the expiration dates...

Page 74: ... ink carriage is stalled is the hp digital copier on Look on the HP Digital Copier display If the display is blank the HP Digital Copier is turned off Check the connections are you using the hp digital copier for the first time Make sure that you have removed all packing materials from the HP Digital Copier are you using the ink cartridge for the first time Make sure that you have removed the prot...

Page 75: ...age 11 cover or door will not close Make sure the HP Digital Copier is on an even surface Make sure there is nothing blocking the door from closing copier is in factory mode The settings on your HP Digital Copier are not correct Call HP for instructions copier is initializing If you see this message on the front panel wait until the HP Digital Copier finishes its start up routine improper power of...

Page 76: ...r unit Check each cartridge and printhead and remove the tape if it is still covering the ink nozzle Do not touch the copper contacts For more information see handle printheads on page 36 and handle ink cartridges on page 40 do you have a paper jam Clear the paper jam Turn HP Digital Copier off and then on again For more information see avoid paper jams on page 9 is the print carriage blocked Remo...

Page 77: ... your HP product allows HP to provide you with the best possible service To register please go to www register hp com support from the internet If you have Internet access you can get help from the following HP website http www hp com go copiers The website offers technical support supplies and ordering information hp customer support If you need to contact HP Customer Support do the following bef...

Page 78: ...ar your unit when you call returning your hp digital copier for service Before returning your HP Digital Copier for service you must call HP Customer Support See hp customer support on page 71 for steps to take before calling Customer Support If HP Customer Support asks you to send in your unit for service please follow the power off and rebox steps below to avoid further damage to the HP product ...

Page 79: ...ive 7 Close the access door 8 Turn off the unit 9 If available pack the unit for shipment using the original packaging materials If you do not have the original packaging materials you can request a replacement package set from HP Customer Support Shipping damage caused by improper packaging is not covered under the warranty 10 Place the return shipping label on the outside of the box 11 Include t...

Page 80: ...rt service is free during the warranty period however your standard long distance phone charges will apply In some cases a flat fee per single incident will also apply For phone support in Europe please check for the details and conditions of phone support in your country or region by consulting the following website http www hp com 1 Select the Country Region 2 Select Contact HP Alternatively you...

Page 81: ...3623434 South Africa RSA 086 000 1030 Germany 0 24 DM min 49 0 180 52 58 143 South Africa Outside Republic 27 0 11 258 9301 Greece 30 1 60 73 603 Spain 34 902 321 123 Guatemala 999 5305 Sweden 46 0 8 619 2170 Hong Kong 852 300 28 555 Switzerland French 41 0 84 880 1111 Hungary 36 0 1 382 1111 Switzerland German 41 0 84 880 1112 India 91 11 682 6035 Taiwan 886 2 2717 0055 Indonesia 62 21 350 3408 T...

Page 82: ...r Canada dial 661 257 5565 In Europe dial 49 180 5 290220 Germany or 44 870 606 9081 U K For other countries regions call the following express service To obtain HP express repair service the customer must contact an HP service offic0e or an HP Customer Support Center for basic troubleshooting first See hp customer support on page 71 for steps to take before calling Customer Support Malaysia 03 29...

Page 83: ... begins on the date of purchase by the customer Customer is responsible for maintaining proof of date of purchase 2 For software products HP s limited warranty applies only a failure to execute programming instructions HP does not warrant that the operation of any product will be uninterrupted or error free 3 HP s limited warranty covers only those defects which arise as a result of normal use of ...

Page 84: ... ITS THIRD PARTY SUPPLIERS MAKE ANY OTHER WARRANTY OR CONDITION OF ANY KIND WHETHER EXPRESS OR IMPLIED WITH RESPECT TO THE HP PRODUCTS AND SPECIFICALLY DISCLAIM THE IMPLIED WARRANTIES OR CONDITIONS OF MERCHANTABILITY SATISFACTORY QUALITY AND FITNESS FOR A PARTICULAR PURPOSE Limitations of Liability 1 To the extent allowed by local law the remedies provided in this Warranty Statement are the custom...

Page 85: ...PLICABLE TO THE SALE OF HP RPOODUCTS TO SUCH CUSTOMERS environmental statement These products were designed to be environmentally friendly hp printhead and ink cartridge limited warranty digital copier supplies limited warranty All HP Digital Copier supplies are warranted to be free from defects in material and workmanship during the warranty period warranty period Each HP Digital Copier product i...

Page 86: ...lated software if applicable accessories media and supplies shall be free from defects in material and workmanship for the duration which duration begins on the date of purchase by the Customer For each hardware Product the duration of HP s limited warranty is one year for parts and one year for labor For all other Products the duration of HP s limited warranty for both parts and labor is ninety d...

Page 87: ...to local standards HP shall have no obligation to alter the form fit or function of the Product in order to make it operate in a country or locality for which the Product was never intended to operate limitations of warranty TO THE EXTENT ALLOWED BY LOCAL LAW NEITHER HP NOR ITS THIRD PARTY SUPPLIERS MAKE ANY OTHER WARRANTY OR CONDITION OF ANY KIND WHETHER EXPRESS OR IMPLIED WITH RESPECT TO THE COV...

Page 88: ...imitations in this Statement from limiting the statutory rights of a consumer e g the United Kingdom Otherwise restrict the ability of a manufacturer to enforce such disclaimers or limitations or Grant the Customer additional warranty rights specify the duration of implied warranties which the manufacturer cannot disclaim or not allow limitations on the duration of implied warranties FOR CONSUMER ...

Page 89: ...ck 16 cpm color Copy speeds vary according to the complexity of the document speed mode speed from the glass ppm Best Black 1 3 Color 1 3 Normal Black 7 0 Color 7 0 Fast Black 18 0 Color 16 0 Black text document Document with mixed text and color graphics margin specifications top leading edge bottom trailing edge left right sheet paper U S Letter 07 in 1 8 mm 44 in 8 7 mm 25 in 6 4 mm 25 in 6 4 m...

Page 90: ... 50 black 20 color Labels N A 30 sheets Transparencies Photo media N A 30 sheets 30 sheets automatic document feeder ADF Paper 16 to 24 lb 60 to 90 gsm 50 sheets 50 sheets Transparencies Photo media and Photos Not Supported two sided printing accessory available as an optional accessory on some models Plain paper 16 to 24 lb 60 to 90 gsm 150 sheets 50 black 20 color 250 sheet plain paper tray avai...

Page 91: ... sizes continued type size phycical specifications hp digital copier with automatic document feeder ADF hp digital copier with an ADF and a two sided printing accessory hp digital copier with an ADF a two sided printing accessory and a 250 sheet plain paper tray Height 13 3 in 33 8 cm 13 3 in 33 8 cm 15 8 in 40 0 cm Width 21 85 in 55 5 cm 21 85 in 55 5 cm 21 85 in 55 5 cm Depth 16 3 in 41 5 cm 16 ...

Page 92: ...p com go copiers Storage conditions 40º to 158º F or 40º to 60º C environmental specifications temperature humidity additional specifications sound level copy color copy b w Sound Power LwAd 1B 10dB 5 3 B A 5 9 B A Sound Pressure LpAm bystander positions 44 3 dB A 50 5 dB A printheads hp reorder number HP black printhead 14 C4920A HP cyan printhead 14 C4921A HP magenta printhead 14 C4922A HP yello...

Page 93: ...TAR guidelines for energy efficiency For more information on ENERGY STAR guidelines visit the following website http www epa gov energystar paper use This product is suited for the use of recycled paper according to DIN 19309 plastics Plastic parts over 25 grams are marked according to international standards that enhance the ability to identify plastics for recycling purposes at the end of the pr...

Page 94: ...technical information 88 hp digital copier series ...

Page 95: ...6 reduce enlarge 2 16 special features 3 21 22 23 tray select paper type 3 24 two sided copy 22 C cancel button 3 copy 25 cancel color calibration 48 cartridge check ink level 36 clean contacts 43 replace ink cartridges 41 change paper tray 13 clean ink cartridge contacts 43 printhead contacts 45 printheads 43 the exterior 36 the glass 35 the lid backing 35 clean the lid backing on page 31 7 colla...

Page 96: ...copy quality 16 fit to page 19 fit to page feature 3 flat lid 27 front panel overview 2 front panel display 1 2 set language 49 front panel features 1 G glass cleaning 35 greeting cards load 12 H help 5 hp Customer Support 71 hp distribution center 76 hp papers tips on loading 12 hp two sided printing accessory 22 I image shift 22 ink cartridges check ink level 36 clean 43 expired 58 low 66 refill...

Page 97: ...2 set 18 O on button 1 order print cartridges 86 originals 7 how to place in the ADF 8 multiple copies 20 print two on one page 21 output tray extender 10 P paper adjust size 31 change default size for copy 13 change the type 13 load 9 recommended 8 9 set the size 13 specifications 84 tips on loading 12 wrong size 56 paper jams 56 ADF 54 back of unit 54 how to avoid 54 two sided printing accessory...

Page 98: ...op copy 25 streaks 61 62 supply check ink level 36 support services 71 T telephone numbers 71 text enhance 18 transparency film recommend choices 9 tips on loading 12 troubleshoot paper jams 53 paper not feeding correctly 55 troubleshoot ink cartridges and printheads 65 troubleshoot paper types 56 troubleshooting blurred copy 62 color are bleeding 61 copies do not look right 59 copy color 59 copy ...

Page 99: ...93 hp digital copier warranty on copier 80 warranty upgrades 80 ...

Page 100: ...index 94 hp digital copier ...

Page 101: ......

Page 102: ...t the most value from your HP Digital Copier Technical Support Supplies and Ordering Information Project Tips Ways to Enhance Your Product www hp com go copiers 2002 Hewlett Packard Company Printed in the U S A Mexico Germany Singapore or China C7296 90280 C7296 90280 C7296 90280 ...

Reviews: