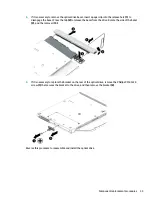
a.
Remove the four Phillips PM2.0×3.0 screws (1) that secure the display panel to the top of the
enclosure.
b.
Rotate the display panel onto the keyboard (2) to gain access to the display cable connection on
the back of the panel.
c.
On the back of the display panel, release the adhesive strip that secures the display panel cable to
the display panel, and then disconnect the cable (1).
Component replacement procedures
39
Summary of Contents for 14-BS0 Series
Page 1: ...HP 14 Laptop PC Intel HP 14g Laptop PC HP 14q Laptop PC Maintenance and Service Guide ...
Page 4: ...iv Safety warning notice ...
Page 8: ...viii ...
Page 14: ...Category Description AC adapter Battery Optical drive 6 Chapter 1 Product description ...
Page 34: ...26 Chapter 3 Illustrated parts catalog ...
Page 44: ...36 Chapter 5 Removal and replacement procedures for Customer Self Repair parts ...
Page 86: ...78 Chapter 6 Removal and replacement procedures for Authorized Service Provider parts ...
Page 94: ...86 Chapter 8 Backing up restoring and recovering ...
Page 102: ...94 Chapter 10 Specifications ...
Page 106: ...98 Chapter 11 Power cord set requirements ...
Page 108: ...100 Chapter 12 Recycling ...
Page 112: ...104 Index ...


