


39 of 43
Service Manual UK
Whirlpool UK Appliances Ltd
English
6)
Cooling Fan
a)
Remove the oven from the cabinet (see 2).
b)
Remove the top panel, 4 screws.
c)
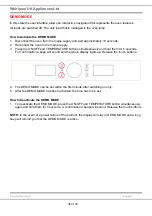
Remove the single fixing screw (Fig. 2). It may be necessary to remove the two front top fixing
screws for the rear panel also to enable easier access.
d)
Using a small flat bladed screwdriver, lift the securing tab and turn the complete fan assembly
clockwise to release.
e)
Note and transfer the wires to the new cooling fan.
f)
Reassemble in reverse order, refitting the securing screw.
7)
Grill Element c/w Oven Temperature Sensor
a)
Remove the oven from the cabinet (see 2).
b)
Remove the rear panel (8 screws).
c)
Remove the 7 mm nuts (quantity 2).
d)
At this stage the oven temperature sensor can be removed from the left hand grill securing shaft
by sliding it off.
e)
Note and disconnect the wiring to the grill element.
f)
From inside the oven cavity, withdraw the element out from its securing clip at the front.
g)
Reassemble in reverse order.
8)
Lower Oven Element
a)
Remove the oven from the cabinet (see 2).
b)
Remove the rear panel (4 screws).
c)
Carefully manoeuvre the lagging wrap away from the vicinity of the lower heating element.
d)
Note and disconnect the wiring to the element.
e)
Remove the single screw securing the element and withdraw.
f)
Reassemble in reverse order.
Fig. 2
Lift Tab
Remove
Screw