background image

5 - 20

PEAP/MSCHAP

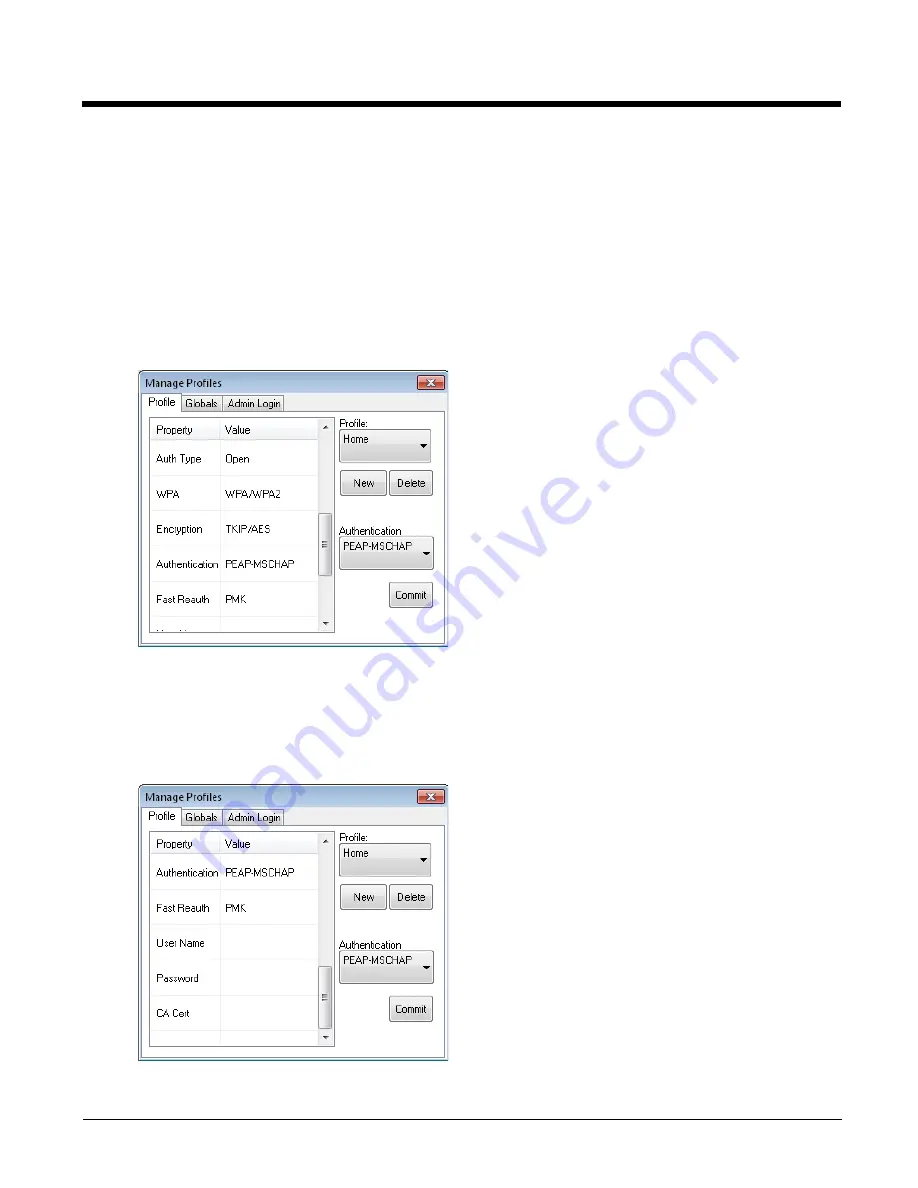
To use PEAP/MSCHAP, make sure the following profile options are used.

1.

Enter the 

SSID 

of the Access Point assigned to this profile

2.

Set 

Auth Type

 to 

Open

3.

Set 

WPA

 as follows:

Select 

WPA/WPA2

 to use either TKIP/AES or AES-CCMP

Select 

WPA2

 to use AEX-CCMP

4.

Set 

Encryption 

to either 

TKIP/AES

 or 

AES-CCMP

 depending on WPA type selected

5.

Set 

Authentication 

to 

PEAP-MSCHAP

See 

Sign-On vs. Stored Credentials

 (page 5-13) for information on entering credentials.

Scroll down to enter credentials:.

No entries except the CA Certificate Filename are necessary for Sign-On Credentials as the user will be prompted 
for the User Name and Password when connecting to the network.

For Stored Credentials, User, Password and the CA Certificate Filename must be entered.

Enter these items as directed below.

Enter the Domain\Username (if the Domain is required), otherwise enter the Username.

Summary of Contents for Thor VX9

Page 1: ... Vehicle Mount Computer with Microsoft Windows Embedded Standard 2009 Operating System with Microsoft Windows 7 Professional Operating System with Microsoft Windows XP Professional Operating System User s Guide ...

Page 2: ...rademarks of Laird Technologies Inc Laird Technologies the Laird logo Summit Data Communications the Summit logo and Connected No Matter What are trademarks of Laird Technologies Inc Atheros and the Atheros logo are registered trademarks of Atheros Communications Inc Broadcom and the Broadcom logo are registered trademarks of Broadcom Corporation Wi Fi WMM Wi Fi Mutlimedia Wi Fi Protected Access W...

Page 3: ...1 Out of the Box 2 1 Initial Setup for Thor VX9 2 2 Hardware Setup 2 2 Software 2 2 First Boot 2 2 Software setup 2 2 Components 2 3 Connector Panel 2 3 Inside the Thor VX9 2 3 Buttons and LEDs 2 3 LED Indications 2 4 Power LED 2 4 UPS Mode LED 2 4 COM Port LEDs 2 4 Tapping the Touch Screen with a Stylus 2 5 Setup Terminal Emulation Parameters 2 5 Cleaning the Touch Screen 2 6 Data Entry 2 6 Keybo...

Page 4: ...r 3 4 Audio and Microphone Connectors 3 5 Antenna Connectors 3 5 Multipurpose Connector 3 6 Multipurpose Dongle Cables 3 6 Keyboards 3 7 95 key Keyboard 3 7 Key Maps 3 7 NumLock 3 7 CapsLock and Scroll Lock 3 7 Keyboard Backlight 3 8 60 key Keyboard 3 8 Key Maps 3 8 Unused Key Functions 3 8 NumLock 3 8 Keyboard Backlight 3 9 Control Keys 3 9 Keyboard LEDs 3 10 CAPS LED 3 10 Secondary Keys LED 3 10...

Page 5: ...4 2 Identifying Drives in the Thor VX9 4 2 AMI BIOS 4 2 Phoenix BIOS 4 2 Integrated Devices 4 2 AMI BIOS 4 2 Phoenix BIOS 4 2 Boot Priority 4 3 AMI BIOS 4 3 Phoenix BIOS 4 3 PXE Pre Boot Execution 4 3 AMI BIOS 4 3 Phoenix BIOS 4 3 Exit BIOS Configuration 4 4 AMI BIOS 4 4 Phoenix BIOS 4 4 Microsoft Windows Setup and Configuration 4 5 Microsoft Windows License Agreement First Boot 4 5 Drive C Direct...

Page 6: ... 16 Configuration 4 16 Loading an Operating System on the Thor VX9 4 17 Thor VX9 Recovery DVD 4 17 Using the Recovery DVD 4 17 Launching the RS2 Wizard 4 18 Using the RS2 Wizard 4 18 Thor VX9 Drivers CD ROM 4 18 Startup Problems 4 19 Bypassing Microsoft Windows Startup 4 19 Verifying Boot Order 4 19 Setting System Time and Date 4 19 Chapter 5 Wireless Network Configuration Introduction 5 1 Laird W...

Page 7: ...uring the Profile 5 16 No Security 5 17 WEP 5 18 LEAP 5 19 PEAP MSCHAP 5 20 PEAP GTC 5 22 WPA LEAP 5 24 EAP FAST 5 26 EAP TLS 5 28 EAP TTLS 5 30 PEAP TLS 5 32 WPA PSK 5 34 Summit Wireless Network Configuration 5 35 Important Notes 5 35 Summit Client Utility 5 35 Help 5 35 Summit Tray Icon 5 36 Wireless Zero Config Utility 5 37 Switch Control to Wireless Zero Config Utility 5 37 Switch Control to S...

Page 8: ...EAP FAST 5 59 EAP TLS 5 61 WPA PSK 5 63 Certificates 5 64 Generate a Root CA Certificate 5 64 Install a Root CA Certificate 5 66 Manual Launch 5 67 Certificate Wizard 5 67 Complete the Root CA Certificate Installation 5 68 Generate a User Certificate 5 68 Export a User Certificate 5 70 Install a User Certificate 5 70 Manual Launch 5 71 Certificate Wizard 5 71 Complete User certificate Installation...

Page 9: ... Using Option GlobeTrotter Connect 5 99 OneClick Internet 5 100 Preparing for Initial Use on the Thor VX9 5 100 Install SIM Card 5 100 Load Firmware 5 100 Activation 5 101 Using OneClick Internet 5 103 Connection Management 5 103 Menu Buttons 5 103 Radio Button 5 103 Statistics Button 5 103 Update Button 5 104 Help Button 5 104 Settings Button 5 104 Profile 5 105 Buttons 5 105 Parameters 5 105 Net...

Page 10: ...valencies 6 1 60 key Standard Keypad 6 2 60 Key KeyMap 101 Key Equivalencies 6 2 IBM Terminal Emulation 6 6 IBM 3270 Keypad Overlay 6 6 IBM 5250 Keypad Overlay 6 7 Chapter 7 Specifications and Reference Material Physical Specifications 7 1 Environmental Specifications 7 2 Display Specifications 7 2 Operating System 7 2 Radio Options 7 2 Port and Connector Pinouts 7 3 Power Supply Connector 7 3 COM...

Page 11: ...9 Technical Assistance 8 1 Limited Warranty 8 1 ...

Page 12: ...10 ...

Page 13: ...ital apparatus meets all requirements of the Canadian Interference Causing Equipment Regulations Operation is subject to the following two conditions 1 this device may not cause harmful interference and 2 this device must accept any interference received including interference that may cause undesired operation Cet appareil numérique de la classe A respecte toutes les exigences du Règlement sur le...

Page 14: ...ve Dealer License Republic of Singapore Li Ion Battery When disposing of the Thor VX9 UPS battery the following precautions should be observed The battery should be disposed of properly The battery should not be disassembled or crushed The battery should not be heated above 212 F 100 C or incin erated Vehicle Power Supply Connection Safety Statement Vehicle Power Supply Connection If the supply co...

Page 15: ...t Win dows operating system The Thor VX9 is capable of wireless data com munications from a fork lift truck or any properly configured vehicle The unit uses an 802 11radio for wireless data communications The Thor VX9 is a tablet style computer and features a color display The touch screen display supports graphic features and Microsoft Win dows icons that the Windows operating system supports An ...

Page 16: ...r safe vehicle operation Can be easily accessed by anyone seated in the driver s seat Software This section only applies if the Thor VX9 was ordered with an operating system For a Thor VX9 ordered without an oper ating system see Loading an Operating System on the Thor VX9 page 4 17 First Boot If your Thor VX9 is shipped with a Microsoft Windows operating system pre installed it may be necessary t...

Page 17: ... 0 port 8 Multipurpose Connection provides USB COM4 or both with optional cable 9 Audio Out 3 5 mm 10 Mic In 3 5 mm 1 Torx 20 Screws 2 PCMCIA Card Slots optional 3 PCMCIA Card Ejection Buttons 1 Power Button 2 Power LED 3 Decrease Display Brightness 4 UPS LED 5 Increase Display Brightness 6 COM2 LED Yellow light indicates 12V from pin 9 7 COM1 LED Green light indicates 5V from pin 9 ...

Page 18: ... not powered Off no light Off but powered Green flash very slow Operating normally Green on Suspend Green flashing slow Black out Screen Green flashing fast Over voltage shutdown Red on Over temperature Red flashing Function UPS Mode LED UPS battery powered Green flashing fast UPS battery charging Green on or flashing slow UPS battery charged Off no light Function Hard Drive LED COM1 has 5V on pin...

Page 19: ...e you make a host connection you will at a minimum need to know the alias name or IP address Host Address and the port number Telnet Port of the host system to properly set up your host session 1 Make sure the mobile client network settings are configured and functional If you are connecting over wireless LAN 802 11x make sure your mobile client is communicating with the Access Point 2 From Start ...

Page 20: ...character i e 2nd F1 toggles the CAPS Lock function The specific 2nd character is printed above the corresponding key Bar Code Data Entry The Thor VX9 supports an accessory bar code label reading device Keyboard data entries can be mixed with bar code data entries Any scanner that decodes the bar code internally and outputs an RS 232 data stream may be used COM port 1 is designed to be used with a...

Page 21: ...Please refer to Disabling the Touch Screen page 4 8 Soft Keyboard Entry The optional software keyboard provides a virtual keyboard on the touch screen The soft keyboard is orderable in several configurations Note When the virtual keyboard is displayed the physical keyboard is still active if attached Therefore it is possible to input data from both keyboards ...

Page 22: ...2 8 ...

Page 23: ...ort PS 2 ports available via adapter cable Multipurpose Connector USB and or COM4 via cable Audio Out Microphone In Ethernet Port RJ 45 10 100 Note Using the VMT Manager page 4 10 Pin 9 of COM1 may be configured to provide 5 volts DC to power a bar code scanner or RI for serial transfer Pin 9 of COM2 and CAM 4 may be configured to provide 12 volts DC System Memory Depending on the option ordered s...

Page 24: ...ay operating system controls the PCMCIA cards These cards are hot swappable per the Card Bus PCMCIA specifications PCMCIA slots are optional Power Management The Thor VX9 uses Microsoft Windows Power Management The Thor VX9 has two operating modes Normal and Standby In Normal operating mode all systems are powered up and the video display is on The RS 232 ports any installed PCMCIA cards are activ...

Page 25: ...igured in the Windows Control Panel Pressing and holding the power button for approximately five seconds Any open programs and the Windows operating system are shut down before power off Note that this option must be used to shut down when the operating system is not responding The VMT Manager can be configured so that an extended touch on the touch screen initiates the shut down process For more ...

Page 26: ...his assembly provides for input for the screen blanking feature if desired The Thor VX9 is designed to Connect an External AC Power Supply page 4 27 or Connect Vehicle Power page 4 14 using a DC DC power supply delivering conditioned DC power Serial Connector COM1 The serial connector with a 1 label configured as COM1 is industry standard RS 232 The connector includes a PC AT standard 9 pin D male...

Page 27: ...vides 5V for an active microphone Antenna Connectors The Thor VX9 has up to four antenna connectors depending on the options ordered Two antenna connectors are located on the top of the Thor VX9 If the Thor VX9 contains an 802 11 radio these connec tors provide diversity antennas for the radio The connectors can also be used to connect a remote antenna Two antenna connectors are located on the bot...

Page 28: ...port or both See Multipurpose Connector page 7 5 for port and cable pinout information Multipurpose Dongle Cables COM4 provides 12v on pin 9 when enabled Do not connect a serial bar code scanner to COM4 as this may damage the scanner the Thor VX9 or both 1 To D15 Connector on Thor VX9 2 D9 Serial Connector COM4 3 USB Connector ...

Page 29: ...evice and left and right mouse buttons However because the keyboard only has 95 keys all functions are not visible or printed on the keyboard Therefore the Thor VX9 keyboard supports what is called hidden keys keys that are accessible but not visible on the keyboard As with a standard keyboard many keys are found in the Alphanumeric section as well as on the Numeric keypad i e the 1 key is found o...

Page 30: ... the codes sent when the alphanumeric key is pressed the hidden keystroke must be used The hidden keys supported by the Thor VX9 are listed in Key Maps page 6 1 Unused Key Functions There are several key functions on the 60 key keyboard that are not used on the Thor VX9 These include 2nd F3 The Resume Suspend function is not used as Microsoft Windows controls all power management modes 2nd F4 and ...

Page 31: ...2nd functions of the F6 and F7 keys are not used as the Thor VX9 has TFT LCD screen with no provision for con trast adjustments The 2nd functions of the F8 and F9 keys are not used as the sound volume on the Thor VX9 is controlled with the Sound icon in the Microsoft Windows System Tray The F10 key is used to toggle the backlight as part of the keypress sequence 2nd CTRL F10 This key sequence imme...

Page 32: ...on the keyboard keys The secondary keys are accessible by using two 2 keystrokes the 2nd key followed by the superscripted key Once the 2nd state is enabled by pressing the 2nd key the Secondary Mode LED is illuminated and the 2nd state is enabled until another key is pressed The 2nd key is toggled on with a 2nd keypress and then immediately off with another 2nd keypress For example Press 2nd and ...

Page 33: ...an IBM 3270 overlay designed to allow the user to enter terminal emulator com mands when running RFTerm IBM 5250 Keypad Overlay The 60 key keypad is available with an IBM 5250 overlay designed to allow the user to enter terminal emulator com mands when running RFTerm ...

Page 34: ...e mouse icon in the system tray After tapping the mouse icon highlights the right button of the icon in red The next touch screen tap is treated as a right click The mouse icon then returns to the left button highlighted in red so subsequent taps are treated as left clicks Press these keys To CTRL C Copy CTRL X Cut CTRL V Paste CTRL Z Undo DELETE Delete SHIFT with any of the arrow keys Select more...

Page 35: ...r more information on configuring the soft keyboard click on the Tools down arrow Options Opening on the soft keyboard or Start Control Panel Tablet PC Settings Other Go to Input Panel options Disable the Soft Keyboard Windows 7 Professional only Open the on screen Tablet PC Input Panel see previous figure Soft Keyboard Typical Configuration Click the Tools down arrow Options Opening tab Disable u...

Page 36: ...r mouse Only Delrin or plastic styluses should be used The touch screen is available in standard hardened and defroster versions Note Always use the point of the stylus for tapping or making strokes on the display Never use an actual pen pencil or sharp object to write on the touch screen An extra or replacement stylus may be ordered from Honeywell Please refer to Touch Screen page 4 8 for more in...

Page 37: ...ure the antenna cables are not pinched 6 Re connect the power cord cable and turn the Thor VX9 on PCMCIA Pinout Pin Signal Pin Signal Pin Signal 1 GND 24 A5 47 A18 2 D3 25 A4 48 A19 3 D4 26 A3 49 A20 4 D5 27 A2 50 A21 5 D6 28 A1 51 SLOT_VCC 6 D7 29 A0 52 SLOT_VPP 7 CE1 30 D0 53 A22 8 A10 31 D1 54 A23 9 OE 32 D2 55 A24 10 A11 33 WP A_ IOIS16 56 A25 11 A9 34 GND 57 n c or VS2 12 A8 35 12V_RF_POWER 5...

Page 38: ...evel Please review the installation cautions and warnings contained in Connect Vehicle Power page 4 14 Uninterruptible Power Supply Battery Pack An Uninterruptible Power Supply UPS is built into the Thor VX9 to provide power for short periods of time when vehicle power is unavailable such as when vehicle batteries are swapped The UPS when enabled can be used to power the Thor VX9 for a specified p...

Page 39: ...hat you have the power switch in the On position Make sure the wall outlet for AC DC adapter is working or the vehicle battery is charged Check all inline fuses and replace if blown Make sure the vehicle battery is connected properly to the Thor VX9 power cable Problem Solution No characters generated on keypress Verify that all keyboard cables are securely attached and that any set screws on the ...

Page 40: ...y error refer to the documentation for that program Problem Solution The display is unreadable Verify the Display setting in the Microsoft Windows Control panel The display settings should be set to High Color 16 bit and 800 by 600 pixel resolution It may be necessary to reboot in Safe Mode to change the display settings if the screen is unreadable See Bypassing Microsoft Windows Startup page 4 19...

Page 41: ...lled for the device based on the version of Microsoft Windows operating system you are using Check the documentation for the device or the device manufacturer s website for an updated driver For information adding or deleting devices or updating drivers please refer to Help and Support on the Windows Start menu or commercially available Windows guides The following table provides some solutions to...

Page 42: ...3 20 ...

Page 43: ...ed on the Thor VX9 before shipping The default BIOS parameters are configured at that time In most cases it is unnecessary to modify the BIOS parameters Generally it is only necessary to enter the BIOS setup to change the boot order of the drives This section is not intended to detail all features of the BIOS instead it is intended to cover the most commonly used setup options Note Some BIOS param...

Page 44: ...he unit starts to boot Watch the bootup sequence and when the following is displayed Press F2 to Enter Setup Press the F2 key Follow the on screen prompts for cursor movement allowable values etc Identifying Drives in the Thor VX9 AMI BIOS The IDE Configuration menu identifies the drives detected in the Thor VX9 The default is for all drives to be automat ically detected Phoenix BIOS The Main menu...

Page 45: ...rom boot order The default boot order is USB HDD USB CD ROM USB Key IDE 0 hard drive IDE 1 IDE 2 IDE 3 IDE CD Devices excluded from boot order are USB FDC USB ZIP USB LS120 PCI BEV PCI SCSI Bootable add in cards PXE Pre Boot Execution AMI BIOS Onboard Lan Boot Rom must be enabled see Onboard Device Configuration menu Network must be set in the boot order before any other available options see Boot...

Page 46: ... reboot Phoenix BIOS Pressing the ESC key immediately brings up the Exit menu The choices are Exit Saving Changes Use this option to immediately save current Setup settings to CMOS RAM and into the Flash Boot Device FBD When this option is highlighted press Enter to save When the saving process is complete the Thor VX9 reboots with the current values Exit Discarding Changes Use this option when an...

Page 47: ...drivers Drive C Directory Structure The drive C directory structure is the same for all media types Microsoft Windows is installed in the Windows directory In addition Microsoft Windows creates other directories and several subdirectories For more information on the directories Microsoft Windows uses please refer to commercially available Windows reference guides Depending on the option ordered dr...

Page 48: ... refer to commercially available Win dows guides Radio Software The Thor VX9 is delivered with the radio software installed Because the Thor VX9 uses a Microsoft Windows operating system the radio installation includes Windows device drivers Touch Screen Software UPPD software is installed for calibrating the Thor VX9 s touch screen Please see Touch Screen page 4 8 for more information RFTerm Soft...

Page 49: ...el Date and Time Classic view Start Control Panel Date Time Language and Regional Options Change the Date and Time Category view Windows 7 Professional Start Control Panel Hardware and Sound Power Options Category view Start Control Panel Power Options Classic view Windows Embedded Standard XP Professional XP Embedded Start Control Panel Power Options Classic view or tap Start Control Panel Perfor...

Page 50: ...w sec onds Release and repeat with the next cross After all locations have been touched the calibration utility automatically closes If no input is received the calibration utility times out Press ESC to exit the calibration utility without saving any changes Disabling the Touch Screen If desired the touch screen can be disabled in the Windows control panel Once disabled the touch screen remains d...

Page 51: ...r When the Thor VX9 is networked using the Ethernet connector the Thor VX9 s networking options are set via the Microsoft Windows Control Panel The same networking configuration options are available as in a standard PC For more information on configuring the Microsoft Windows network settings please refer to Help and Support on the Win dows Start menu or commercially available Windows networking ...

Page 52: ... using Category view for the control panel click on Other Control Panel Options and then the VMT Manager icon to launch the VMT Manager application Main Tab The Main tab shows the embedded controller s firmware version and build date as well as the Thor VX9 computer manager application version and build date There are no user configurable options on this tab ...

Page 53: ...or connecting serial bar code scanners COM2 Power Enable 12VDC power on COM2 pin 9 to power external 12V devices with a maximum power consumption of 6W 500mA Options are the same as for COM1 Only COM1 should be used for connecting serial bar code scanners Multi Purpose Connector Enable 12VDC power on Multi Purpose Connector COM4 pin 9 to power external 12V devices Same power consump tion and optio...

Page 54: ...button configuration The default value in a Thor VX9 Windows image is shutdown Defroster Enable defroster heated touch panel This option is only relevant if the Thor VX9 is equipped with an optional heated touch panel The default value is defroster enabled The defroster will turn off when the temperature goes above 40 C inside the Thor VX9 and turn on again below 39 C default values Note Before ma...

Page 55: ...to confirm your changes UPS Battery Enable disable the internal UPS battery The UPS battery protects the Thor VX9 from being shutdown if there s a loss of input power Configuration Configure how the Thor VX9 should react when if the input power is lost by enabling UPS functionality reduce backlight to a certain level after a specified timeout when to safely shutdown the system UPS Battery Status M...

Page 56: ...een cable in the power cord See Connect Vehicle Power page 4 14 for wiring information If the input signal is inverted enable Active at input signal low level Time delays for backlight on and off is configurable and you can also setup the backlight to come on again when the signal goes off AND the user taps the touch panel The touch panel will not send any coordinates to its driver during blackout...

Page 57: ...ions There are no user configurable options on this tab On the Advanced tab you can Monitor the latest POST code sent from the CPU Module BIOS Monitor driver independent touch panel functionality Monitor the internal temperature at carrier board level Monitor input and battery power ...

Page 58: ... to be treated as keyboard input by applications WLinq can create multiple profiles which can be important if more than one scanner or type of scanner may be used with the Thor VX9 Important If you experience trouble with processed bar code data set the Inter character Delay on the Keyboard tab to a value greater than 0 milliseconds There are many other options available in WLinq To learn more sel...

Page 59: ...ing system installation media Contact Technical Assistance page 8 1 for information on the Recovery DVD and the Drivers CD Thor VX9 Recovery DVD Thor VX9 B VX9480WESRECOV Windows Embedded Standard for Thor VX9 with Intel Atom CPU VX9481WESRECOV Windows Embedded Standard for Thor VX9 with Intel Core2Duo CPU VX9482XPPRRECOV Windows XP Professional for Thor VX9 with Intel Atom CPU VX9483XPPRRECOV Win...

Page 60: ... button you are asked to confirm that you want to start the RS2 process This is the last chance to abort RS2 4 The fourth screen of the Wizard shows the status of the process This process could take 30 minutes or more depending on the size of the operating system image USB or network transfer speed etc 5 The last screen of the Wizard shows the result of the RS2 process 6 When prompted click Finish...

Page 61: ...nu 3 Verify that the desired devices are searched in the desired order 4 For AMI BIOS change the selection for 1st Boot Device Second Boot Device etc to arrange items in the boot order 5 For Phoenix BIOS use the plus key to move an item up in the boot order and the minus key to move an item down the list Press SHIFT 2nd 1 to enable or disable a device on the search list If the Thor VX9 is still un...

Page 62: ... Save Changes and Exit or Save and Exit depending on BIOS type to save the changes Press Enter If the Thor VX9 does not automatically reboot turn the Thor VX9 off and then on again Note The date and time may also be set using the Windows interface Click on the time in the system tray or select Date and Time from the Windows control panel to open the Date Time control panel ...

Page 63: ...ation restart the Thor VX9 Laird Connection Manager Note When making changes to profile or global parameters the device should be restarted afterwards Start All Programs Laird Laird Connection Manager or Laird Connection Manager Icon on Desktop The Status page 5 3 tab contains information on the current connection The Configuration page 5 4 tab is used to configure radio parameters The Diagnostics...

Page 64: ...iguration Manage Profiles Globals 2 Change the value for the Supplicant property value to Laird 3 A message appears that a Power Cycle is required to make settings activate properly 4 Tap Commit 5 Restart the Thor VX9 Radio control is passed to the LCM The WZC utility has an icon in the toolbar indicating the Wireless Zero Config application is enabled but the connection is inactive at this time t...

Page 65: ...de a connection to an access point but has not EAP authenticated If the encryption type is set to WEP or None the radio can communicate in the associated state Otherwise the radio cannot communicate unless it is associated and EAP authenticated Connected to SSID The radio is connected to the specified SSID IP address Signal strength RSSI displayed in dBm and graphically There are no user entries o...

Page 66: ...ting profile create a new profile delete a profile edit global parameters or login as an admin Profile Profile Use the pull down list to select a previously created profile to edit or delete The Default profile is created automatically New Tap the New button to create a new profile Each profile must have a unique name Enter the name and tap OK to create a new profile or tap Cancel to exit without ...

Page 67: ...setting for the current regulatory domain Options are Maximum 10 25 50 75 Power Save Fast Power save mode Options are Constantly Awake Mode CAM Maximum power saving mode and Fast power saving mode When using power management use FAST for best throughput results Radio Mode BGA Rates Full Specify 802 11a 802 11b and or 802 11g rates when communicating with the AP The options displayed for this param...

Page 68: ... a roaming decision is made Options are 5 10 15 20 25 30 35 40 45 50 55 60 seconds or Custom BG Channel Set Full Defines the 2 4GHz channels to be scanned for an AP when the radio is contemplating roaming By specifying the channels to search roaming time may be reduced over scanning all channels Options are Full all channels 1 6 11 the most commonly used channels 1 7 13 for ETSI and TELEC radios o...

Page 69: ...nal AP The client and the AP use the cached information to perform the four way handshake to exchange keys Opportunistic PMK OPMK is used when there are controllers The reauthentication information cached on the controllers The client and the controller behind the AP use the cached in formation to perform the four way handshake to exchange keys If the selected PMK caching method is not supported b...

Page 70: ...rected credentials is displayed If the authentication credentials are not stored in the active profile and the authentication times out the user is again prompted to enter the credentials Options are An integer from 3 to 60 Certs Path C Program Files Laird Certs A valid directory path of up to 64 characters where WPA Certificate Author ity and User Certificates are stored on the mobile device when...

Page 71: ...hanged on the tab The end user can Turn the radio on or off on the Configuration tab Select an active Profile on the Configuration tab View the current parameter settings for the profiles on the Profile tab View the global parameter settings on the Globals tab View the current connection details on the Status tab View radio status software versions and regulatory domain on the Diagnostics tab Acce...

Page 72: ...g network traffic and radio connectivity issues This screen displays the status of the Wi Fi radio About Use this button to view the version of the LCM and other software information Advanced Use this to access details status information ping tools and other utilities Status The Status screen shows the active profile and connection details ...

Page 73: ...rough release and renew All activity is logged in the output box If a fixed IP address has been assigned to the radio this is also noted in the Diagnostic Output box Note that the current IP address is displayed above this button Reconnect Use this button to apply or reapply the current profile and attempt to associate or authenticate to the wireless LAN All activity is logged in the output box Pa...

Page 74: ... 2 Text 3 Text High 4 Serial Low 5 Serial 6 Serial High Dump Location Tap this button and browse to save the log files Using a standard Windows explorer interface a file name and location can be specified The default is to save the log file as sdc_diags txt in the Windows Docu ments Library Import Export Use this option to import radio configuration from or export radio configuration to a file Use...

Page 75: ...als click Commit to save those changes before making any additional changes to the profile or global parameters 13 Verify the device is authenticated by reviewing the Status tab When the device is property configured the Status tab indicates the device is Authenticated and the method used Note See Configuring the Profile page 5 16 for more details Note If invalid credentials are entered into the s...

Page 76: ...d 11 The sign on screen is displayed after a reboot Note See Configuring the Profile page 5 16 for more details If a user enters invalid credentials and clicks OK the device associates but does not authenticate The user is again prompted to enter credentials If the user clicks the Cancel button the device does not associate The user is not prompted again for credentials until the device is reboote...

Page 77: ...directory on the mobile device The default location for Certs Path is C Pro gram Files Laird certs A different location may be specified by using the Certs Path global variable 3 On the Profile tab select File Name for the CA Cert property 4 Enter the certificate name in the pop up window and tap OK 5 Tap Commit to save the profile changes Windows Certificate Store 1 See Generate a Root CA Certifi...

Page 78: ...Admin Login Enter the password and tap Login If using a single profile edit the default profile with the parameters for your network Select the Default profile from the pull down menu Make any desired parameter changes as described in the applicable following section determined by network security type and click the Commit button to save the changes IMPORTANT Remember to click the Commit button af...

Page 79: ...ter the SSID of the Access Point assigned to this profile 2 Set Auth Type to Open 3 Set WPA to None 4 Set Encryption to None 5 Set Authentication to None Once configured click the Commit button Ensure the correct Active Profile is selected on the Configuration tab and restart The Status tab shows the device is connected ...

Page 80: ... Set Encryption to WEP 5 Set Authentication to None Scroll down to enter the WEP key s Valid keys are 10 hexadecimal or 5 ASCII characters for 40 bit encryption or 26 hexadecimal or 13 ASCII characters for 128 bit encryption Enter the key s and click Commit Ensure the correct Active Profile is selected on the Configuration tab and restart The Status tab shows the device is connected ...

Page 81: ...ne 4 Set Encryption to WEP 5 Set Authentication to LEAP See Sign On vs Stored Credentials page 5 13 for information on entering credentials To use Stored Credentials scroll down to enter the User Name and Password No entries are necessary for Sign On Credentials as the user will be prompted for the Username and Password when connecting to the network Enter the Domain Username if the Domain is requ...

Page 82: ...e selected 5 Set Authentication to PEAP MSCHAP See Sign On vs Stored Credentials page 5 13 for information on entering credentials Scroll down to enter credentials No entries except the CA Certificate Filename are necessary for Sign On Credentials as the user will be prompted for the User Name and Password when connecting to the network For Stored Credentials User Password and the CA Certificate F...

Page 83: ...e the Full Trusted Store 2 To select an individual certificate click on the Browse button 3 Uncheck the Use full trusted store checkbox 4 Select the desired certificate and click Select You are returned to the Credentials screen 5 Click OK then click Commit If using the Certs Path option 1 Leave the Use MS store box unchecked 2 Enter the certificate filename in the CA Cert text box 3 Click OK then...

Page 84: ...or AES CCMP depending on WPA type selected 5 Set Authentication to PEAP GTC See Sign On vs Stored Credentials page 5 13 for information on entering credentials Scroll down to enter credentials No entries except the CA Certificate Filename are necessary for Sign On Credentials as the user will be prompted for the User Name and Password when connecting to the network Enter these items as directed be...

Page 85: ...box and proceed with the certificate process below If using the Windows certificate store 1 Check the Use MS store checkbox The default is to use the Full Trusted Store 2 To select an individual certificate click on the Browse button 3 Uncheck the Use full trusted store checkbox 4 Select the desired certificate and click Select You are returned to the Credentials screen 5 Click OK then click Commi...

Page 86: ...Set WPA as follows Select WPA WPA2 to use either TKIP AES or AES CCMP Select WPA2 to use AEX CCMP 4 Set Encryption to either TKIP AES or AES CCMP depending on WPA type selected 5 Set Authentication to LEAP See Sign On vs Stored Credentials page 5 13 for information on entering credentials Scroll down to enter credentials No entries are necessary for Sign On Credentials as the user will be prompted...

Page 87: ...5 25 Enter the password Click the Commit button Ensure the correct Active Profile is selected on the Configuration tab and restart The Status tab shows the device is connected ...

Page 88: ...ver must have auto provisioning enabled to send the PAC provisioning credentials to the Thor VX9 For automatic PAC provisioning once a username password is authenticated the PAC information is stored on the Thor VX9 The same username password must be used to authenticate each time See the note below for more details For manual PAC provisioning the PAC filename and Password must be entered See Sign...

Page 89: ...se manual PAC Provisioning Enter the PAC Filename and PAC Password The PAC file must be copied to the directory specified in the Certs Path global variable The PAC file must not be read only Ensure the correct Active Profile is selected on the Configuration tab and restart The Status tab shows the device is connected Note When using Automatic PAC Provisioning once authenticated there is a file sto...

Page 90: ...uthentication to EAP TLS See Sign On vs Stored Credentials page 5 13 for information on entering credentials Scroll down to enter credentials No entries except the User Certificate Filename and the CA Certificate Filename are necessary for Sign On Credentials as the user will be prompted for the User Name when connecting to the network For Stored Credentials User Certificate Filename and the CA Ce...

Page 91: ...ate server checkbox If using the Windows certificate store 1 Check the Use MS store checkbox The default is to use the Full Trusted Store 2 To select an individual certificate click on the Browse button 3 Uncheck the Use full trusted store checkbox 4 Select the desired certificate and click Select You are returned to the Credentials screen 5 Click Commit If using the Certs Path option 1 Leave the ...

Page 92: ... selected 5 Set Authentication to EAP TTLS See Sign On vs Stored Credentials page 5 13 for information on entering credentials Scroll down to enter credentials No entries except the CA Certificate Filename are necessary for Sign On Credentials as the user will be prompted for the User Name and Password when connecting to the network For Stored Credentials User Password and the CA Certificate Filen...

Page 93: ...e the Full Trusted Store 2 To select an individual certificate click on the Browse button 3 Uncheck the Use full trusted store checkbox 4 Select the desired certificate and click Select You are returned to the Credentials screen 5 Click OK then click Commit If using the Certs Path option 1 Leave the Use MS store box unchecked 2 Enter the certificate filename in the CA Cert text box 3 Click OK then...

Page 94: ...uthentication to PEAP TLS See Sign On vs Stored Credentials page 5 13 for information on entering credentials Scroll down to enter credentials No entries except the User Certificate Filename and the CA Certificate Filename are necessary for Sign On Credentials as the user will be prompted for the User Name when connecting to the network For Stored Credentials User Certificate Filename and the CA C...

Page 95: ...te server checkbox If using the Windows certificate store 1 Check the Use MS store checkbox The default is to use the Full Trusted Store 2 To select an individual certificate click on the Browse button 3 Uncheck the Use full trusted store checkbox 4 Select the desired certificate and click Select You are returned to the Credentials screen 5 Click Commit If using the Certs Path option 1 Leave the U...

Page 96: ... AES CCMP Select WPA2 to use AEX CCMP 4 Set Encryption to either TKIP AES or AES CCMP depending on WPA type selected 5 Set Authentication to PSK Click the WEP keys PSKs button This value can be 64 hex characters or an 8 to 63 byte ASCII value Enter the key and click OK Once configured click the Commit button Ensure the correct Active Profile is selected on the Configuration tab and restart The Sta...

Page 97: ...he SCU The Status page 5 41 tab contains information on the current connection The Diags page 5 42 tab provides utilities to troubleshoot the radio Global parameters are found on the Global page 5 43 tab The values for these parameters apply to all profiles This tab was labeled Global Settings in early versions of the SCU Help Help is available by clicking the icon in the title bar on most SCU scr...

Page 98: ...Professional The Windows Wireless icon located in the taskbar or Notification bar may not display a successful wireless connec tion The SCU Main tab should be used to verify the success of the connection instead The radio is not currently associated or authenticated to an Access Point The signal strength for the currently associated authenticated Access Point is less than 90 dBm The signal strengt...

Page 99: ...ears that a Power Cycle is required to make settings activate properly 3 Tap OK 4 Restart the Thor VX9 The Summit Client Utility passes control to Wireless Zero Config and the WZC Wireless Information control panel Using the options in the Wireless Zero Config panels set up radio and security settings There may be a slight delay before the Wireless Zero Config icon indicates the status of the conn...

Page 100: ... client and security settings for the network module The Disable Radio button can be used to disable the network card Once disabled the button label changes to Enable Radio By default the radio is enabled The Admin Login button provides access to editing wireless parameters Profile and Global may only be edited after enter ing the Admin Login password The password is case sensitive Once logged in ...

Page 101: ...he Global tab Enable disable the Summit tray icon in the taskbar Profile Start All Programs Summit Summit Client Utility Profile tab Note Tap the Commit button to save changes before leaving this panel or the SCU If the panel is exited before tapping the Commit button changes are not saved Factory Default Settings When logged in as an Admin use the Profile tab to manage profiles When not logged in...

Page 102: ...can finds more than one AP with the same SSID the list displays the AP with the strongest RSSI and the least security If you are logged in as an Admin tap an SSID in the list and tap the Configure button you return to the Profile window to recreate a profile for that SSID with the profile name being the same as the SSID or the SSID with a suffix such as _1 if a profile with the SSID as its name ex...

Page 103: ...tion to be used to protect transmitted data Available options may vary by SCU version Options are None WEP or Manual WEP WEP EAP or Auto WEP WPA PSK WPA TKIP WPA CCKM WPA2 PSK WPA2 AES or WPA2 CCKM CKIP is not supported in the Thor VX9 The Encryption type chosen determines if the WEP Keys PSK Keys button is active and also determines the available entries in the WEP or PSK pop up win dow Radio Mod...

Page 104: ...an be used for troubleshooting network traffic and radio connectivity issues Re connect Use this button to apply or reapply the current profile and attempt to associate or authenticate to the wireless LAN All activity is logged in the Diagnostic Output box on the lower part of the screen Release Renew Obtain a new IP address through release and renew All activity is logged in the Diagnostic Output...

Page 105: ...rigger 65 dBm Roam Delta 5 dBm Roam Period 10 sec BG Channel Set Full DFS Channel Off DFS Scan Time 120 ms Ad Hoc Channel 1 Aggressive Scan On CCX Optimized WMM On Windows 7 Professional Off all other operating systems Auth Server Type 1 TTLS Inner Method Auto EAP PMK Caching Standard WAPI Off dimmed TX Diversity On RX Diversity On Start on Main Frag Threshold 2346 RTS Threshold 2347 LED Off Tray ...

Page 106: ...he radio collects Received Signal Strength Indication RSSI scan data before a roaming decision is made Options are 5 sec 10 15 20 25 30 35 40 45 50 55 60 seconds or Custom BG Channel Set Full Defines the 2 4GHz channels to be scanned for an AP when the radio is contemplating roaming By specifying the channels to search roaming time may be reduced over scanning all channels Options are Full all cha...

Page 107: ...ed up roaming between APs by allowing the client and the AP to cache the results of 802 1X authentications elimi nating the need to communicate with the ACS server Standard PMK is used when there are no controllers The reauthentication information is cached on the original AP The client and the AP use the cached informa tion to perform the four way handshake to exchange keys Opportunistic PMK OPMK...

Page 108: ... number of seconds the Summit software waits for an EAP au thentication request to succeed or fail If the authentication credentials are stored in the active profile and the au thentication times out the association fails No error message or prompting for corrected credentials is displayed If the authentication credentials are not stored in the active profile and the authentication times out the u...

Page 109: ...e profile Instead the username and password used for Windows logon is used Any certificates needed for authentication must still be specified in the profile Click OK then click Commit Pre Logon Connection To use the Pre logon connection select the checkbox for Enable pre logon connection This option is designed to be used when EAP authentication is required for a WLAN connection Single Signon is c...

Page 110: ...redentials 1 After completing the other entries in the profile click on the Credentials button 2 Enter the Username and Password on the Credentials screen and click the OK button 3 Click the Commit button 4 For LEAP and WPA LEAP configuration is complete 5 For PEAP MSCHAP and PEAP GTC importing the CA certificate into the Windows certificate store is optional 6 For EAP TLS import the CA certificat...

Page 111: ...s screen again Make sure the Validate server and Use MS store checkboxes are checked 5 The default is to use the entire certificate store for the CA certificate Alternatively use the Browse button next to the CA Cert CA Certificate Filename on the Credentials screen to select an individual certificate 6 For EAP TLS also enter the User Cert User Certificate filename on the credentials screen by usi...

Page 112: ...ts Path is C Program Files Summit certs A different location may be specified by using the Certs Path global variable 3 When completing the Credentials screen for the desired authentication do not check the Use MS store checkbox after checking the Validate server checkbox 4 Enter the certificate name in the CA Cert textbox 5 Click OK to exit the Credentials screen and then Commit to save the profi...

Page 113: ...he parameters for your network Select the Default profile from the pull down menu Make any desired parameter changes as described in the applicable following section determined by network security type and click the Commit button to save the changes IMPORTANT Remember to click the Commit button after making changes to ensure the changes are saved Many ver sions of the SCU display a reminder if the...

Page 114: ...Set Auth Type to Open Click the WEP keys PSKs button Valid keys are 10 hexadecimal or 5 ASCII characters for 40 bit encryption or 26 hexadecimal or 13 ASCII characters for 128 bit encryption Enter the key s and click OK Once configured click the Commit button Ensure the correct Active Profile is selected on the Main tab and restart The SCU Main tab shows the device is asso ciated after the radio c...

Page 115: ... the AP is configured for network EAP only set the Auth Type radio parameter to LEAP See Sign On vs Stored Credentials page 5 48 for information on entering credentials To use Stored Credentials click on the Credentials button No entries are necessary for Sign On Credentials as the user will be prompted for the Username and Password when connecting to the network Enter the Domain Username if the D...

Page 116: ...for Sign On Credentials as the user will be prompted for the User Name and Password when connecting to the network For Stored Credentials User Password and the CA Certificate Filename must be entered Enter these items as directed below Enter the Domain Username if the Domain is required otherwise enter the Username Enter the password Leave the CA Certificate File Name blank for now Click OK then c...

Page 117: ...als screen If using the Certs Path option Leave the Use MS store box unchecked Enter the certificate filename in the CA Cert textbox Click OK then click Commit The device should be authenticating the server certificate and using PEAP MSCHAP for the user authentication Ensure the correct Active Profile is selected on the Main tab and restart The SCU Main tab shows the device is asso ciated after th...

Page 118: ...Enter these items as directed below Enter the Domain Username if the Domain is required otherwise enter the Username Enter the password Leave the CA Certificate File Name blank for now Click OK then click Commit Ensure the correct Active Profile is selected on the Main Tab See Windows Certificate Store vs Certs Path page 5 50 for more information on certificate storage Once successfully authentica...

Page 119: ...ials screen If using the Certs Path option Leave the Use MS store box unchecked Enter the certificate filename in the CA Cert textbox Click OK then click Commit The device should be authenticating the server certificate and using PEAP GTC for the user authentication Ensure the correct Active Profile is selected on the Main tab and restart The SCU Main tab shows the device is asso ciated after the ...

Page 120: ...e another encryption type select WPA CCKM WPA2 AES or WPA2 CCKM for encryption and complete other entries as detailed in this section See Sign On vs Stored Credentials page 5 48 for information on entering credentials To use Stored Credentials click on the Credentials button No entries are necessary for Sign On Credentials as the user will be prompted for the Username and Password when connecting ...

Page 121: ...rname password is authenticated the PAC information is stored on the Thor VX9 The same username password must be used to authenticate each time See the note below for more details For manual PAC provisioning the PAC filename and Password must be entered See Sign On vs Stored Credentials page 5 48 for information on entering credentials The entries on the Credentials screen are determined by the ty...

Page 122: ... in the Certs Path global variable The PAC file must not be read only Tap OK then click the Commit button Ensure the correct Active Profile is selected on the Main tab and restart The SCU Main tab shows the device is asso ciated after the radio connects to the network Note When using Automatic PAC Provisioning once authenticated there is a file stored in the Program Files Summit cert folder with t...

Page 123: ...te Filename and the CA Certificate Filename must be entered Enter these items as directed below Enter the Domain Username if the Domain is required otherwise enter the Username Select a user certificate from the Windows certificate store Use the Browse button to locate the User Cert from the certificate store Highlight the desired certificate and press the Select button The name of the certificate...

Page 124: ...ials screen If using the Certs Path option Leave the Use MS store box unchecked Enter the certificate filename in the CA Cert textbox Click OK then click Commit The Thor VX9 should be authenticating the server certificate and using EAP TLS for the user authentication Ensure the correct Active Profile is selected on the Main tab and restart The SCU Main tab shows the device is asso ciated after the...

Page 125: ...ption to WPA PSK or WPA2 PSK Set Auth Type to Open Click the WEP keys PSKs button This value can be 64 hex characters or an 8 to 63 byte ASCII value Enter the key and click OK Once configured click the Commit button Ensure the correct Active Profile is selected on the Main tab and restart The SCU Main tab shows the device is asso ciated after the radio connects to the network ...

Page 126: ...5 70 and copy the certificate to the Thor VX9 3 Install a User Certificate page 5 70 Generate a Root CA Certificate Note It is important that all dates are correct on the Thor VX9 and host computers when using any type of certificate Certificates are date sensitive and if the date is not correct authentication will fail The easiest way to get the root CA certificate is to use a browser on a PC to ...

Page 127: ...ownload a CA certificate certificate chain or CRL link Make sure the correct root CA certificate is selected in the list box Click the DER button To download the CA certificate click on the Download CA certificate link ...

Page 128: ...ate to the C Program Files Summit certs folder or other path specified in the Summit Certs global parameter Copy the certificate file to the Thor VX9 The certificate file has a CER extension Locate the file and double click on it Follow the Certificate Wizard instructions below Troubleshooting If the Certificate Wizard does not start automatically when you double tap the certificate CER file follo...

Page 129: ...orities and select All Tasks Import 4 The Certificate Import Wizard starts 5 Tap Next and use the Browse button to locate the Root certificate copied to the Thor VX9 then tap Open 6 The certificate filename and path are displayed Tap Next 7 Skip to Complete the Root CA Certificate Installation page 5 68 Certificate Wizard 1 Click the Install Certificate button 2 The certificate import wizard start...

Page 130: ...ere is no separate private key file as used on Windows CE devices For Windows 7 Professional Select Place all certificates in the following store Tap Browse and select Trusted Root Certification Authorities Tap OK then tap Next and Finish If presented with a security warning confirm that you want to install this certificate An import successful message is displayed For Windows XP and Windows Embed...

Page 131: ...message box asking if you want to confirm the request click Yes The User Certificate is issued Install the user certificate on the requesting computer by clicking the Install this certificate link If the requesting computer is the Thor VX9 then the process is finished otherwise export the certificate as described below ...

Page 132: ...te copy it from the PC to the Thor VX9 Locate the certificate file it has a PFX extension and double click on it Follow the Certificate Wizard instructions below Select Yes export the private key and click Next Uncheck Enable strong protection and check Next The certificate type must be PKCS 12 PFX When the private key is exported you must enter the password con firm the password and click Next Be...

Page 133: ...ing the PFX file tap Open 6 The certificate filename and path are displayed Tap Next 7 Skip to Complete User Certificate Installation below Certificate Wizard 1 After tapping clicking on the certificate file the certificate import wizard starts Tap Next 2 Confirm the certificate file name and location Tap Next 3 Skip to Complete User Certificate Installation below Complete User certificate Install...

Page 134: ...manage your wireless networks Click OK The Windows WZC utility can now be used to configure the radio Please refer to the Help function in Microsoft Windows for more information on using Windows to configure the wireless network connection To return radio control to the ACU uncheck the checkbox Using the ACU There are many features contained in the ACU that are not covered in this document For mor...

Page 135: ...curity 1 Select None from Set Security Options 2 Click OK to save the profile 3 Make sure the desired profile is selected on the Profile Management screen Double clicking on any profile makes that profile active ...

Page 136: ...figure button 3 Enter the WEP key The key can be in Hexadecimal or ASCII format 4 Click OK to save the WEP key s then click OK again to save the profile 5 Make sure the desired profile is selected on the Profile Management screen Double clicking on any profile makes that profile active ...

Page 137: ...ure button 4 Make sure Use Saved User Name and Password is selected 5 Enter the user credentials 6 Click OK to save the credential information and then click OK again to save the profile 7 Make sure the desired profile is selected on the Profile Management screen Double clicking on any profile makes that profile active ...

Page 138: ...ns 2 Click the Configure button 3 Enter the passphrase 4 Click OK to save the passphrase and then click OK again to save the profile 5 Make sure the desired profile is selected on the Profile Management screen Double clicking on any profile makes that profile active ...

Page 139: ...3 Click the Configure button 4 Make sure User Name and Password is selected 5 Enter the user credentials 6 Click OK to save the credential information and then click OK again to save the profile 7 Make sure the desired profile is selected on the Profile Management screen Double clicking on any profile makes that profile active ...

Page 140: ...EAP Type pulldown 3 Click the Configure button 4 Enter the token User Name 5 Click OK to save the credential information and then click OK again to save the profile 6 Make sure the desired profile is selected on the Profile Management screen Double clicking on any profile makes that profile active ...

Page 141: ... pulldown 3 Click the Configure button 4 From the Trusted Root Certification Authorities pulldown select the appropriate root certification authority 5 From the Select a Certificate pulldown select the appropriate user certificate 6 Click OK to save the certificate information and then click OK again to save the profile 7 Make sure the desired profile is selected on the Profile Management screen D...

Page 142: ...nfigure button 4 Make sure Use Saved User Name and Password is selected 5 Enter the user credentials 6 Click OK to save the credential information and then click OK again to save the profile 7 Make sure the desired profile is selected on the Profile Management screen Double clicking on any profile makes that profile active ...

Page 143: ...ity Options 2 Choose EAP FAST from the WPA WPA2 EAP Type pulldown 3 Click the Configure button 4 Select MSCHAPv2 User Name and Password from the EAP FAST Authentication Method pulldown list 5 Check the checkbox for Allow Automatic PAC Provisioning ...

Page 144: ... the user credentials 9 Click OK to save the credential information click OK again to save the authentication information and then click OK again to save the profile 10 Make sure the desired profile is selected on the Profile Management screen Double clicking on any profile makes that profile active ...

Page 145: ...figure the radio Please refer to the Help function in Microsoft Windows XP for more information on using Windows to configure the wireless network connection To return radio control to the BWU restart the BWU and follow the on screen instructions Using the BWU There are many features contained in the BWU that are not covered in this document For more information click the Help button displayed on ...

Page 146: ...ter the Network name SSID 2 Set Network authentication to Open 3 Click OK to save the profile 4 The BWU automatically connects to the first listed profile within range Use the Up and Down icons to adjust the list as desired ...

Page 147: ... Network authentication to Open 3 Enter and confirm the network key under Network Key 4 Click OK to save the profile 5 The BWU automatically connects to the first listed profile within range Use the Up and Down icons to adjust the list as desired ...

Page 148: ...t LEAP from the EAP method pulldown list 4 Enter the user credentials and confirm the network password under User Name Password 5 Click OK to save the profile 6 The BWU automatically connects to the first listed profile within range Use the Up and Down icons to adjust the list as desired ...

Page 149: ...work authentication to WPA Personal PSK 3 Enter and confirm the network key under Network Key 4 Click OK to save the profile 5 The BWU automatically connects to the first listed profile within range Use the Up and Down icons to adjust the list as desired ...

Page 150: ...thod pulldown list 4 Select MS CHAP v2 from the Inner EAP method pulldown list 5 Enter the user credentials and confirm the network password under User Name Password 6 Click OK to save the profile 7 The BWU automatically connects to the first listed profile within range Use the Up and Down icons to adjust the list as desired ...

Page 151: ... method pulldown list 4 Select GTC from the Inner EAP method pulldown list 5 Enter the appropriate token username for Logon or identity under Client Identity 6 Click OK to save the profile 7 The BWU automatically connects to the first listed profile within range Use the Up and Down icons to adjust the list as desired ...

Page 152: ...alled on the Thor VX9 computer Please refer to Certificates page 5 64 for details 1 Enter the Network name SSID 2 Set Network authentication to WPA Enterprise 3 Select TLS from the EAP method pulldown list 4 Under Client Identity use the Select button to browse for the user certificate ...

Page 153: ... Validate server certificate 7 Use the Select button to browse for the server certificate 8 Click OK to save the profile 9 The BWU automatically connects to the first listed profile within range Use the Up and Down icons to adjust the list as desired ...

Page 154: ...elect LEAP from the EAP method pulldown list 4 Enter the appropriate user credentials and confirm the password under User Name Password 5 Click OK to save the profile 6 The BWU automatically connects to the first listed profile within range Use the Up and Down icons to adjust the list as desired ...

Page 155: ...ect EAP FAST from the EAP method pulldown list 4 Enter the appropriate user credentials and confirm the password under User Name Password 5 Click OK to save the profile 6 The BWU automatically connects to the first listed profile within range Use the Up and Down icons to adjust the list as desired ...

Page 156: ...crosoft Windows Control Panel to discover and manage the Bluetooth scanner connection Do not use the ComponentSoft wedge software provided with the 8650 series Bluetooth Ring Scanners on the Thor VX9 Devices Tab The Devices tab displays any previously discovered Bluetooth devices If there are no Bluetooth devices shown or if the desired device is not shown use the Add Bluetooth Device Wizard to di...

Page 157: ... Bluetooth devices are discovered they are displayed Select the desired Bluetooth device and click Next Select the appropriate passkey option The Bluetooth device is ready to use Options Tab This tab contains various Bluetooth connection options More information can be found using Help and Support on the Win dows Start menu ...

Page 158: ...th devices such as the Bluetooth printer illustrated More information can be found using Help and Support on the Windows Start menu Hardware Tab This tab hardware information for Bluetooth More information can be found using Help and Support on the Windows Start menu ...

Page 159: ...he following Torx 20 screwdriver SIM card from your network operator Installation The following procedure describes how to insert a SIM card 1 Place the Thor VX9 upside down onto a flat clean surface 2 Remove the service hatch by loosening the 2 torx screws 3 Remove the antenna pigtail from the GPRS EDGE 3G PCCard 4 Remove the GPRS EDGE 3G PCCard by pressing the PCCard eject button Connect the pow...

Page 160: ...5 98 5 Insert your SIM card into the PCCard as shown below 6 Reinsert the PCCard into the PCCard socket 7 Reattach the antenna pigtail 8 Reattach the service hatch 9 Start the computer ...

Page 161: ...t startup Using Option GlobeTrotter Connect 1 Double click the gray green Option icon in the system tray to launch the application 2 For some operators the application is automatically configured for the network if not configure the settings as advised by your local operator 3 When all settings are made press the connect button to connect to the preferred network To disconnect press Disconnect ...

Page 162: ...ed See SIM Card Installation page 5 97 Load Firmware While the OneClick Internet utility is preinstalled it is necessary to load the GOBI radio firmware for your selected car rier such as AT T T Mobile or Verizon Note The firmware may automatically be selected when a SIM card is installed in the Thor VX9 Double tap the OneClick Internet icon on the Thor VX9 desktop Tap the Settings button and sele...

Page 163: ...layed double tap the OneClick Internet icon on the desktop Select Settings General tab and tap the Activate button Make sure Automated Activation is selected and tap Next Tap Next to complete the activation Once the activation is completed OneClick Internet may be minimized to the tray To verify your settings tap on the OneClick Internet icon in the system tray Tap Settings Tap the Network tab ...

Page 164: ...5 102 This screen contains the settings including the telephone number from the provider in this case Verizon ...

Page 165: ...adio button allows you to switch the WWAN radio on and off to save power or to disable the radio in instances where it is not desired such as during airplane travel When the radio is switched off the button is red When on it is green If the radio is disabled by a hardware switch or if the device is not available the button is disabled and is light gray white Statistics Button The Statistics area p...

Page 166: ...Internet The update is triggered by pressing the update button The application will check the WebToGo server if updates are available and offer them for download if suitable In order to start the update select a file from the list of available updates and tap OK Help Button OneClick Internet includes online help that can be accessed by tapping the Help button Settings Button Access the Settings me...

Page 167: ... Save a new profile or save changes made when editing a profile Set Profile Select a profile from the Profiles list and tap this button to make it the active profile used for connection Label Description Profile Name Profile name Assign a unique name for each profile APN Access Point Name of the network operator Contact your network operator for more information When you are using a CDMA network t...

Page 168: ...work is shown instead Note The network list only appears if the connection setting is Only use GPRS or Only use UMTS HSPA Select the network and tap on the register button If the change is successful you will see the message Network changed successfully This item is useful when traveling Automatic mode selects the preferred network of your network operator If enabled Network Selection displays a l...

Page 169: ...5 107 CDMA Network Information on the CDMA network is displayed There are no editable parameters on this screen ...

Page 170: ...08 History The history shows the data volume transferred in a specified time frame Select the From and To dates to see the data vol ume sent received in the specified period Tap Reset to reset the counter ...

Page 171: ...card such as AT T or T Mobile By default you have to enter the PIN each time you start WebToGo OneClick Internet using a modem card Deactivate the PIN to avoid entering the PIN each time Change PIN This dialog lets you change your PIN Label Description Current PIN Enter the current PIN New PIN Enter the new PIN Verify PIN Verify the new PIN by entering it again ...

Page 172: ...5 110 Info This tab displays SIM card modem and system Information ...

Page 173: ...wn menu Note Switching between CDMA and UMTS firmware is not done automatically You must select CDMA firmware manually to connect to CDMA networks If you want to return to UMTS networks you must manually select UMTS firmware Activation on CDMA When CDMA Firmware is selected the activation of the modem on the CDMA network starts automatically During the process of loading CDMA firmware an activatio...

Page 174: ...cted OneClick Internet reconnects automatically when the Thor VX9 returns from standby or hibernate Allow roaming When selected OneClick Internet allows connections in foreign networks Note Use care when enabling roaming to avoid roaming charges Roaming Alert When selected OneClick Internet displays an alert when roaming Gobi NDIS Auto Connect When selected OneClick Internet connects automatically...

Page 175: ...licking this button opens the Web Browser and allows the user to surf the Internet once the connection is established The default browser is used which is Internet Explorer by default on the Thor VX9 Email Clicking this button opens the Email application after the connection is established The Email application is the default Email client set in the Control Panel Start Control Panel Internet Optio...

Page 176: ...es Installing or Upgrading OneClick Internet Note You must use the Honeywell supplied version of OneClick Internet Do not change versions unless instructed by your Honeywell representative When ordered with an OS One Click Internet is pre installed by Honeywell before the Thor VX9 is shipped If you have an installed version of OneClick Internet and need to update to a newer version you must uninst...

Page 177: ...erwise please click Reject to cancel installa tion Next the installer asks for the installation directory Use the Browse button to specify a location other than the default Installation process is indicated on screen When completed click the Finish button to exit the installer ...

Page 178: ...5 116 Start OneClick Internet from the Windows Program Menu or double tap the desktop icon ...

Page 179: ...ion Management Refer to the table below for descriptions of the items in the connection management area Icon Description Network signal strength Additionally the network name is displayed to the right of the icon The more green bars the stronger the signal Connect Cancel Disconnect Tap this button to connect or disconnect The color of this button also indicates the status of the connection The rad...

Page 180: ...e button to expand the screen to include connection statistics Tap the button to hide the connection statistics Settings Tap this button to access connection settings Select from several tabs to configure the connection settings Update Tap this button to access OneClick Internet updates Help Click this button to view the on line help Status Ready Tap the Connect button to establish a connection Co...

Page 181: ...n the 95 key keyboard Each of these hidden keys is accessed by pressing the Fn key plus another key Note The 95 key keyboard does not have a 2nd key function To get this key Press These Keys and Then Insert Fn 0 on the number pad Home Fn 7 on the number pad Page Up Fn 9 on the number pad Delete Fn on the number pad End Fn 1 on the number pad Page Down Fn 3 on the number pad Up Arrow Fn 8 on the nu...

Page 182: ... a 2nd F1 key sequence The CAPS LED is illuminated when CapsLock is On The keymaps below assume Caps is Off The Thor VX9 keyboard has several control keys The following control keys are not used The 2nd function of the F3 key is not used as Windows Power Management controls all power management modes on the Thor VX9 The 2nd functions of the F4 and F5 keys are not used as the display brightness is ...

Page 183: ...ete numeric 2nd DOT Home 2nd Left Arrow End 2nd Right Arrow Page Up 2nd Up Arrow Page Down 2nd Down Arrow ScrollLock 2nd Shift F10 F1 F1 F2 F2 F3 F3 F4 F4 F5 F5 F6 F6 F7 F7 F8 F8 F9 F9 F10 F10 F11 2nd Shift F1 F12 2nd Shift F2 a A b B c C d D e E f F g G h H i I j J k K l L m M n N o O p P To get this Key Function Press These Keys in this Order ...

Page 184: ...ft E F Shift F G Shift G H Shift H I Shift I J Shift J K Shift K L Shift L M Shift M N Shift N O Shift O P Shift P Q Shift Q R Shift R S Shift S T Shift T U Shift U V Shift V W Shift W X Shift X Y Shift Y Z Shift Z 1 1 2 2 3 3 4 4 5 5 To get this Key Function Press These Keys in this Order ...

Page 185: ... 8 alpha 2nd 8 numeric 2nd Ctrl 9 alpha 2nd 9 numeric 2nd I letter i alpha 2nd Ctrl I letter i colon 2nd D semicolon 2nd F 2nd L 2nd N _ underscore 2nd M comma 2nd J apostrophe 2nd H tilde 2nd B 2nd S 2nd A 2nd G 2nd Q 2nd W 2nd E 2nd R 2nd T 2nd Y 2nd U 2nd O 2nd P To get this Key Function Press These Keys in this Order ...

Page 186: ...rogram When running RFTerm on the Thor VX9 please refer to RFTerm doc umentation for equivalent keys and keypress sequences IBM 3270 Keypad Overlay Legend on Keypad Explanation Key Sequence Attn Attention Ctrl A Clr Clear Ctrl C Del Delete Ctrl D E Inp Erase Input Ctrl BkSp Ins Insert Ctrl I NL New Line Ctrl N PA1 Ctrl F1 PA2 Ctrl F2 PA3 Ctrl F3 Rst Reset Ctrl R SysReq System Ctrl S ...

Page 187: ...nation Key Sequence Attn Attention Ctrl A Clr Clear Ctrl C Del Delete Ctrl D Dup Duplicate Ctrl U E Inp Erase Input Ctrl Bksp Field Exit Enter Enter Fld Field Minus Ctrl M Fld Field Plus Ctrl L Ins Insert Ctrl I NL New Line Ctrl N SysReq System Ctrl S ...

Page 188: ...6 8 ...

Page 189: ...t Two 2 PS 2 Ports Multipurpose Connector USB and or COM4 via cable Audio Out Microphone In Ethernet Port RJ 45 10 100 Two 2 RS 232C serial ports COM1 and COM2 Two 2 Type A USB 2 0 Ports One 1 Ethernet Port Two 2 PS 2 Ports Multipurpose Connector USB and or COM4 via cable Audio Out Microphone In Ethernet Port RJ 45 10 100 Power Connector Requires DC DC Power Supply 9 150V DC specified by DC DC mod...

Page 190: ...creen with hardened touch screen with defroster touch screen Display options SVGA 12 1 LED backlit indoor display with hardened touch screen with defroster touch screen with hardened defroster touch screen SVGA 12 1 LED backlit outdoor display with hardened touch screen XGA 12 1 LED or CCFL backlit indoor display with hardened touch screen SVGA 12 1 display with standard touch screen with hardened...

Page 191: ...ta Carrier Detect Input 2 RXD Receive Data Input 3 TXD Transmit Data Output 4 DTR Data Terminal Ready Output 5 GND Signal Power Ground 6 DSR Data Set Ready Input 7 RTS Request to Send Output 8 CTS Clear to Send Input 9 5VDC or RI Ring Indicator Input Default or Bar code Scanner Power 400mA max Pin Signal Description 1 DCD Data Carrier Detect Input 2 RXD Receive Data Input 3 TXD Transmit Data Outpu...

Page 192: ...ta 3 MS_CLK Mouse Clock 4 VCC Keyboard Power 5V 5 GND System Ground 6 12VKB Keyboard Power 12V 7 KB_DATA Keyboard Data 8 KB_CLK Keyboard Clock 9 Not Connected Pin Signal Description 1 TXP Transmit 2 TXN Transmit 3 RXP Receive 4 Not Connected 5 Not Connected 6 RXN Receive 7 Not Connected 8 Not Connected ...

Page 193: ...ly 13 CTS COM4 Handshake 6 USB USB Data 14 Not Connected 7 USB USB Data 15 Not Connected 8 GND Ground Pin Signal Description Pin Signal Description 1 VCC 5 5V power 9 Not Connected 2 RXD Receive Data COM4 10 GND Ground 3 TXD Transmit Data COM4 11 GND Ground 4 Not Connected 12 RTS COM4 Handshake 5 12V 12V power supply 13 CTS COM4 Handshake 6 USB USB Data 14 Not Connected 7 USB USB Data 15 Not Conne...

Page 194: ...10 Pin Signal Description 1 DCD Data Carrier Detect Input 2 RXD Receive Data Input 3 TXD Transmit Data Output 4 DTR Data Terminal Ready Output 5 GND Signal Power Ground 6 DSR Data Set Ready Input 7 RTS Request to Send Output 8 CTS Clear to Send Input 9 RI or 12VDC Ring Indicator Input default or Power 400mA max ...

Page 195: ... party B excessive voltage or current supplied to or drawn from the interface connections C static electricity or electro static discharge D operation under conditions beyond the specified operating parameters or E repair or service of the prod uct by anyone other than HII or its authorized representatives This warranty shall extend from the time of shipment for the duration published by HII for t...

Page 196: ...hese warranties are non transferable The duration of the limited warranty for the Thor VX9 is 1 year The duration of the limited warranty for the Thor VX9 Quick Mount Smart Dock is 1 year The duration of the limited warranty for the Thor VX9 Vehicle Mount Assembly is 1 year The duration of the limited warranty for the Thor VX9 internal UPS battery is 1 year The duration of the limited warranty for...

Page 197: ...Back Cvr 1 ...

Page 198: ... Honeywell Scanning Mobility 9680 Old Bailes Road Fort Mill SC 29707 www honeywellaidc com VX9 UG Rev A 10 15 ...

Reviews: