background image

24

NCD Instruction Manual —

 P/N LS10210-051NF-E:C 2/18/2019

Programming

Menu Navigation

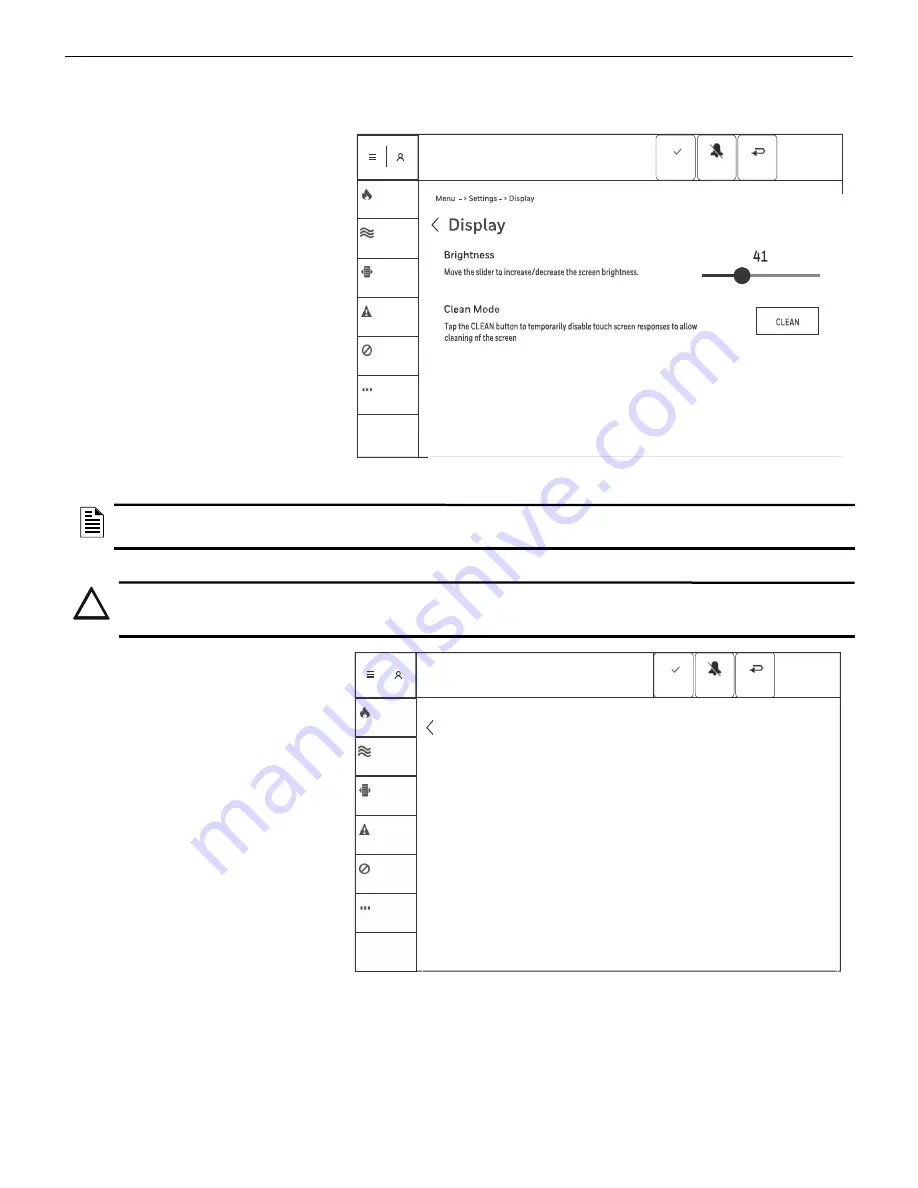
Display

Tap the 

DISPLAY

 touch point to access the back-light brightness setting, wallpaper settings and clean mode.

Brightness   

Tap and hold the slide touch 

point to adjust the back-light brightness. 

Setting the display brightness above 75% 
for prolonged periods of time will 
decrease the overall life of the display. 

Clean mode   

Tap the touch point 

CLEAN


to activate clean mode.   Once activated, 
clean mode disables the touch response to 

allow for cleaning of the screen. A count-
down timer is displayed providing indica-
tion of time left before the system exits 

Clean Mode. The Clean Mode countdown 
timer is programmable through VeriFire 
Tools and defaulted to 15 seconds. Refer 

to the VeriFire Tools for additional infor-
mation.

Wallpaper  

A Wallpaper image can be 

downloaded from VeriFire Tools, to be 
displayed on the System Normal screen.

   
About   

Tap the touch point 

ABOUT

 to 

display the model number, application, 

boot version, kernel version, database, 
database revision, network, and system 
update information. 

System Update  

Tap the touch point 

S

YSTEM

 U

PDATE

 to access application, 

kernel, full system, and wallpaper 

update capabilities. To update the 
application tap the touch point 

UPDATE


APPLICATION

. To update the kernel tap 

the touch point 

UPDATE


KERNEL

. To 

update the full system tap the touch 
point 

UPDATE


FULL


SYSTEM

. To update 

the wallpaper tap the touch point 

UPDATE


WALLPAPER

. For all updates 

the virtual keyboard will appear once 

the selected update is tapped on, tap in 
the file name to update and then tap the 
touch point 

PREFORM


UPDATE

 to com-

plete the update. Updates can be done 
from a file on a USB drive connected 
to the panel.

Users  

Tap the touch point 

USERS

 to 

add or remove a user, change the pass-
word for a user account, or recover a 

password for a user account. 

Figure 3.6  Display Screen

 FIRE ALARM

 CO ALARM


SUPERVISORY


TROUBLE

 DISABLE

 OTHER

System Normal

Ack

Silence

Reset

Thu 2/22/18

1:38:06PM

 SIGNALS
 SILENCED

NOTE:

It is recommended to use only a dry clean, lint free/microfiber cloth to clean the display.  If additional cleaning is needed, apply a 

small amount of Isopropyl alcohol to the cloth and wipe clean. Do not use detergents, solvents, or water for cleaning. Do not spray liquid 

directly onto the display.

!

CAUTION: SETTING THE DISPLAY BRIGHTNESS ABOVE 75% FOR PROLONGED PERIODS OF TIME WILL 

DECREASE THE OVERALL LIFE OF THE DISPLAY.

Silence

Reset

Tue 01/22/18

02:38:06PM

Master

System Normal

Ack

SIGNALS
SILENCED

OTHER

DISABLE

TROUBLE

SUPERVISORY

CO ALARM

FIRE ALARM

About

Menu  - > Settings - > About

NOTIFIER NCD

Unknown

Unknown

Version: 1.000.226 Date: 9/01/2016 Time: 11:12AM

Version: 1.000Date: 9/01/2016 Time: 11:12AM

Model

System Update

Boot

Kernel

Application

Database

Figure 3.7  About Screen

Summary of Contents for NOTIFIER NCD

Page 1: ...Network Control Display NCD Instruction Manual Document LS10210 051NF E Rev C 2 18 2019 ECN 18 0487 ...

Page 2: ...vide adequate warning of a fire Smoke detectors cannot be expected to provide adequate warning of fires caused by arson children playing with matches especially in bedrooms smoking in bed and violent explosions caused by escaping gas improper storage of flammable materials etc Heat detectors do not sense particles of combustion and alarm only when heat on their sensors increases at a predetermined...

Page 3: ...lure to do so can damage circuits Remove all electronic assemblies prior to any drilling filing reaming or punching of the enclosure When possible make all cable entries from the sides or rear Before making modifications verify that they will not interfere with battery transformer or printed circuit board location Do not tighten screw terminals more than 9 in lbs Over tighten ing may damage thread...

Page 4: ...ropriate version for a specific application Documentation Feedback Your feedback helps us keep our documentation up to date and accurate If you have any comments or suggestions about our online Help or printed manuals you can email us Please include the following information Product name and version number if applicable Printed manual or online Help Topic Title for online Help Page number for prin...

Page 5: ...Layout and Wiring Requirements 17 Section 3 Programming 20 3 1 USB Port C 20 3 2 Password Requirements 20 3 3 User Login 20 3 3 1 Adding and Removing a User 20 3 3 2 Changing Password and Recovering a Password 21 3 3 3 Levels of Programing Access for Users on the NCD 22 3 4 Menu Navigation 23 3 4 1 Settings 23 3 4 2 Programming 25 3 4 3 Mapping 26 3 5 Test Diagnostics 27 3 6 Custom Actions 28 Sect...

Page 6: ...was shipped with the equipment and is also available from the manufacturer 1 2 UL 864 Tenth Edition Compliance This product has been certified to comply with the requirements in the Standard for Control Units and Accessories for Fire Alarm Systems UL 864 10th Edition Operation of the NCD with products not tested for UL 864 9th Edition has not been evaluated and may not comply with NFPA 72 and or t...

Page 7: ...0SYSULLD 52745LD AMPS 24 E Power Supply Manual 51907 ACPS 610 Addressable Power Supply Manual 53018 Networking Document Number Noti Fire Net Manual Network Version 5 0 Higher 51584 High Speed Noti Fire Net Manual 54013 NCM W F Installation Document 51533 HS NCM High Speed Network Communications Module Installation Document 54014 ONYXWorks Manual 52342 System Components Document Number DVC Digital ...

Page 8: ... Adjustable back light intensity User defined informational text Audio and visual feedback on touch point Reminder for Fire Supervisory CO and Trouble Trouble Relay Event LED to indicate an off normal status on the NCD AC power LED to indicate primary power status Piezo to indicate unacknowledged events Tamper and Trouble inputs 3 USB Ports Lamp Test locally on NCD FACP Network Board NFS2 640 NCM ...

Page 9: ...nd located along the top of the screen It displays all active events system normal and the Acknowledge Silence and Reset touch points The date and time are also displayed in the Header Bar It provides system status as well as highest priority unacknowledged events Instructional Text Area The Instructional Text Area is used to provide user instruction in an off normal condition The instructional Te...

Page 10: ...nd keeps information clear and undistorted Any display interaction will abort Display Conditioning mode Display conditioning mode will not activate if there are active alarm conditions 1 9 Technical Specifications Power Input 24VDC USB Ports USB is 2 0 USB A and USB Micro are located on the Core Board USB C is located on the front of the NCD display Touch Screen Display 10 inch High Definition Tou...

Page 11: ...rge strap on wrist to prevent equipment damage WARNING ADJUSTING THE SCREEN BRIGHTNESS GREATER THAN 75 WILL REDUCE THE LIFE OF THE DISPLAY Task Refer to 1 Mount the cabinet backbox to the wall Section 2 3 CAB 4 Series Cabinet 2 Attach NCD to dress panel Section 2 5 Dress Plate Mounting 3 Attach option boards e g network communications modules and other devices of the same size to chassis and dress...

Page 12: ...n NCM NCD NCD Noti Fire Net In this diagram the term NCM includes standard and high speed network communication modules Noti Fire Net includes standard and high speed network versions NCM Figure 2 1 Possible Configurations with the NCD Typical NFN Configurations NFS 320 NFS2 640 NFS2 3030 NFS2 640 NFS2 3030 DVC Typical Configurations for Systems Using the NCD as a Display ...

Page 13: ... and chassis Mounting Studs 2 4 Installing the NCD on ONYX Series panels Mounting the NCD on the NFS2 3030 The NFS2 3030 CPU mounts in the CHS M3 chassis located in the top row of the cabinet The CPU will occupy the left half of the chassis When using the NCD as a primary display the NFS2 3030 CPU will need to be remounted with shorter 1 4 inch standoffs PN 42138 included with the NCD The NCD can ...

Page 14: ...DIS1 dress plate Refer to Dress Plate Mounting on page 16 for NCD mounting CPU standoffs at Positions 1 and 2 0 25 inch 6 35 mm for use with CPU2 3030 CPU2 3030 without keypad display Slot 3 Do Not Use Slot 2 Chassis mounting slots Figure 2 3 Standoffs on Chassis CHS M3 Do Not Use Slot 1 CAUTION IT IS CRITICAL THAT ALL MOUNTING HOLES OF THE NETWORK CONTROL DISPLAY NCD AS WELL AS THE NFS2 3030 CPU ...

Page 15: ...the LEFT mounting position on the dress plate DP GDIS1 Option boards Mounted on BMP 1 Dress Panel DP GDIS1 NCD CPS 24 E Backbox Top view of the NFS2 640 and the NFS 320SYS with NCD and Option boards installed NCD Annunciators Top View of the NFS2 640 and the NFS 320SYS with the NCD and Annunciators installed CPS 24 E Dress Panel DP GDIS1 Figure 2 4 Installing the NCD on the NFS2 640 and the NFS 32...

Page 16: ... up mounting holes on the NCD with the mounting studs on the dress plate with the screen facing out Secure the NCD to the dress plate using the four 4 40 nuts to fasten the NCD to the dress plate Install Ground Screws on the dress plate using two 6 32 screws Figure 2 5 Dress Plate Mounting NOTE It is important to secure ground screws on both the Core top and DIM bottom board for proper operation G...

Page 17: ...4V Power IN OUT N O N C COM SW1 SW2 AIO A SIDE TERMINATION IN OUT IN SW16 TB1 TB2 TB3 TB4 TB5 Trouble Tamper J7 J8 J9 J6 J10 J11 J12 J1 J3 USB A USB B Micro Piezo Enable disable Core Board DIM Board Disable Enable NUP OCuLink Cable Future Use Future Use WARNING DO NOT CONNECT OR DISCONNECT THE OCULINK CABLE BETWEEN THE CORE AND DIM BOARDS UPPER AND LOWER BOARDS WHILE POWER IS APPLIED TO PREVENT SY...

Page 18: ...esent and an off normal LED for any off normal condition See Figure 2 8 Designator Connection Wire Connections TB1 REQUIRED Alt 24 Volt Power Pin 1 IN Pin 2 IN Pin 3 OUT Pin 4 OUT TB2 Trouble Relay Pin 1 Normally Open Pin 2 Normally Closed Pin 3 Common J10 NUP Connection Keyed J11 USB A N A J12 USB Micro N A J7 Trouble Input J8 Tamper Input J9 Future Use Future Use TB3 Future Use Future Use TB4 Fu...

Page 19: ...zo Enable Disable To enable the Piezo position SW16 in the UP position To disable the Piezo position SW16 in the DOWN posi tion When the Piezo is disabled the NCD will display a trou ble condition until it is re enabled See Figure 2 9 Figure 2 9 Piezo Enable Disable Piezo Enable Disable SW16 Core Board DIM Board ...

Page 20: ...anage up to 50 unique password protected user accounts on the NCD This login will allow access for various programing options and programming levels on the NCD 3 3 1 Adding and Removing a User A user name cannot exceed 16 alpha numeric characters Adding a User At the main menu tap on the touch point SETTINGS and then USERS In the users menu tap on ADD USER The screen will prompt you to create a us...

Page 21: ...vering a Master Password At the main menu tap on SETTINGS and USERS Once in the users menu tap on RECOVER PASSWORD and then tap on GENERATE RECOVERY CODE Record the code and contact NOTIFIER Technical Support Once the temporary password has been received and entered into the panel the master password must be changed The temporary password is only active for five days Once it expires the recovery p...

Page 22: ...ere in no other user logged in The default user name is set at General Access A Level 2 user can also be programmed to be logged in via a key switch wired to the back of the panel The default user name is set at Key switch Access A Level 1 user can be programmed to be logged in by default when there is no other user logged in The default user name is set at Public Access All user names can be cust...

Page 23: ...IAGNOSTICS touch point to enter the test diagnostics menu This menu provides access to Lamp Test and CPU temperature along with panel the history view 3 4 1 Settings Tapping the SETTINGS touch point on the Menu screen will display the Settings options on the NCD Display Tap on the DISPLAY touch point to adjust brightness or enter clean mode Refer Display on page 24 About Tap the ABOUT touch point ...

Page 24: ...ernel tap the touch point UPDATE KERNEL To update the full system tap the touch point UPDATE FULL SYSTEM To update the wallpaper tap the touch point UPDATE WALLPAPER For all updates the virtual keyboard will appear once the selected update is tapped on tap in the file name to update and then tap the touch point PREFORM UPDATE to com plete the update Updates can be done from a file on a USB drive c...

Page 25: ...6 for more information on mapping FIRE ALARM CO ALARM SUPERVISORY TROUBLE DISABLE OTHER System Normal Ack Silence Reset Thu 2 22 18 1 38 06PM SIGNALS SILENCED NETWORK Programming Menu Programming Figure 3 8 Programming Screen FIREALARM COALARM SUPERVISORY TROUBLE DISABLE OTHER System Normal Ack Thu2 22 18 1 38 06PM SIGNALS SILENCED Silence Reset Menu Programming Network Network Node Number The net...

Page 26: ...apped Nodes Allows the user to view all mapped nodes on a system It will show the node number and what panel it is assigned to Unmapped Nodes Allows the user to view all unmapped nodes on a system It will show the node number and what panel it is assigned to FIRE ALARM CO ALARM SUPERVISORY TROUBLE DISABLE OTHER System Normal Ack Silence Reset Thu 2 22 18 1 38 06PM SIGNALS SILENCED VIEW Mapping Map...

Page 27: ...mpted to tap RESET to reset the readings History Tap the HISTORY touch point allows the user to view the panel history as well as the network history History views may also be filtered Tap on the touch point FILTER A touch point for SEARCH and CLEAR will appear along with a virtual keyboard Tap in a date under date range to search a specific date range Tap in a keyword in the CONTAINS TEXT section...

Page 28: ... of points to enable and tap on touch point ENABLE The DISABLE touch point will be grayed out if the group of points is disabled and there will be a trou ble message on the panel stating which point is disabled Turn ON OFF points To turn ON or OFF a group of points from the main menu tap on the touch point CUSTOM ACTIONS select the point to turn ON OFF and tap on either TURN ON or TURN OFF One wil...

Page 29: ...NCD Instruction Manual P N LS10210 051NF E C 2 18 2019 29 Notes ...

Page 30: ...nd a Reset performed to clear the alarm state from the NCD EVENT SYMBOL DISPLAY INDICATION Fire Alarm Fire Alarm is indicated in RED CO Alarm CO Alarm is indicated in BLUE Supervisory Supervisory is indicated in YELLOW Trouble Trouble is indicated in YELLOW Disabled Point Disabled Point is indicated in YELLOW Other Event Other is indicated as the highest priority that is not categorized Ack Silenc...

Page 31: ...cific device information in the Events List Displays information on how to react to the event in the Instructional Text Area Latches the NCD in CO Alarm 4 2 1 Responding to a Carbon Monoxide Alarm To acknowledge the event and silence the NCD sounder do the following The Informational Text Area on the screen will indicate step by step what needs to be done to acknowledge and silence the event Tap o...

Page 32: ... mark will appear next to the acknowledged event Tap on the SILENCE touch point located in the Header Bar The SILENCE icon in the Alert Bar will illuminate blue once the NCD is silenced All silenceable will turn off BLOCK ACKNOWLEDGE allows for multiple events to be acknowledged at once Investigate and correct the condition that activated the Supervisory point Once all the events have been acknowl...

Page 33: ...ch point will be highlighted in blue A check mark will appear next to the acknowledged event BLOCK ACKNOWLEDGE allows for multiple events to be acknowledged at once Tap on the SILENCE touch point located in the Header Bar the silence icon in the Alert Bar will illuminate blue once the NCD is silenced Investigate and correct the condition that initiated the trouble condition Once all the events hav...

Page 34: ...oint will be highlighted in blue A check mark will appear next to the acknowledged event BLOCK ACKNOWLEDGE allows for multiple events to be acknowledged at once Tap on the SILENCE touch point located in the Header Bar The SILENCE icon in the Alert Bar will illuminate blue once the NCD is silenced Enable the disabled point Once all the events have been acknowledged the blue highlight indicator will...

Page 35: ... Tap on the ACKNOWLEDGE touch point located in the Header Bar The acknowledge touch point will be highlighted in blue A check mark will appear next to the acknowledged event BLOCK ACKNOWLEDGE allows for multiple events to be acknowledged at once Tap on the SILENCE touch point located in the Header Bar The SILENCE icon in the Alert Bar will illuminate blue once the NCD is silenced Once all the even...

Page 36: ...36 NCD Instruction Manual P N LS10210 051NF E C 2 18 2019 Notes ...

Page 37: ...sory or Tamper condition occurs such as a sprinkler valve tamper condition The indication illuminates steady after conditions are acknowledged and turns off when the conditions are cleared A Tamper indication will latch until RESET is pushed RESET is required for any latched event Security A blue indication flashes on the Alert Bar when a security activation occurs Illuminates steadily after ackno...

Page 38: ...Cut along dotted line ...

Page 39: ...LIED WITH RESPECT TO THE PRODUCTS TRADEMARKS PROGRAMS AND SERVICES RENDERED BY MANUFACTURER INCLUDING WITHOUT LIMITATION INFRINGEMENT TITLE MERCHANTABILITY OR FITNESS FOR ANY PARTICULAR PURPOSE MANUFACTURER SHALL NOT BE LIABLE FOR ANY PERSONAL INJURY OR DEATH WHICH MAY ARISE IN THE COURSE OF OR AS A RESULT OF PERSONAL COMMERCIAL OR INDUSTRIAL USES OF ITS PRODUCTS This document constitutes the only...

Page 40: ...NOTIFIER 12 Clintonville Road Northford CT 06472 1610 USA 203 484 7161 www notifier com ...

Reviews: