background image

www.honeywell.com/security

76  |  equIP® Series 30x Zoom WDR PTZ Camera User Guide

Note

Before setting up auto tracking, you must first save a preset and then add a smart 
plan to the preset.

To set up auto tracking:

1.

Select a preset for auto tracking from the 

Preset

 list.

2.

In the 

Parameter

 area, set 

Anti-Disturb Enable

 to 

ON

 or 

OFF

. When enabled, 

anti-disturb reduces false alarms from movement in the scene (such as leaves moving 
in the wind).

3.

Set 

Shadow Scene Enable

 to 

ON

 or 

OFF

. When enabled, shadow scene reduces false 

alarms from shadows in the scene.

4.

Move the 

Sensitivity

 slider to set the desired detection sensitivity. 

5.

In the

 Advanced Parameter

 area, set the 

Tracking Overlap Rate

Valid Tracking 

Distance

, and 

Valid Tracking Time

.

6.

Click 

Save

 to apply the settings.

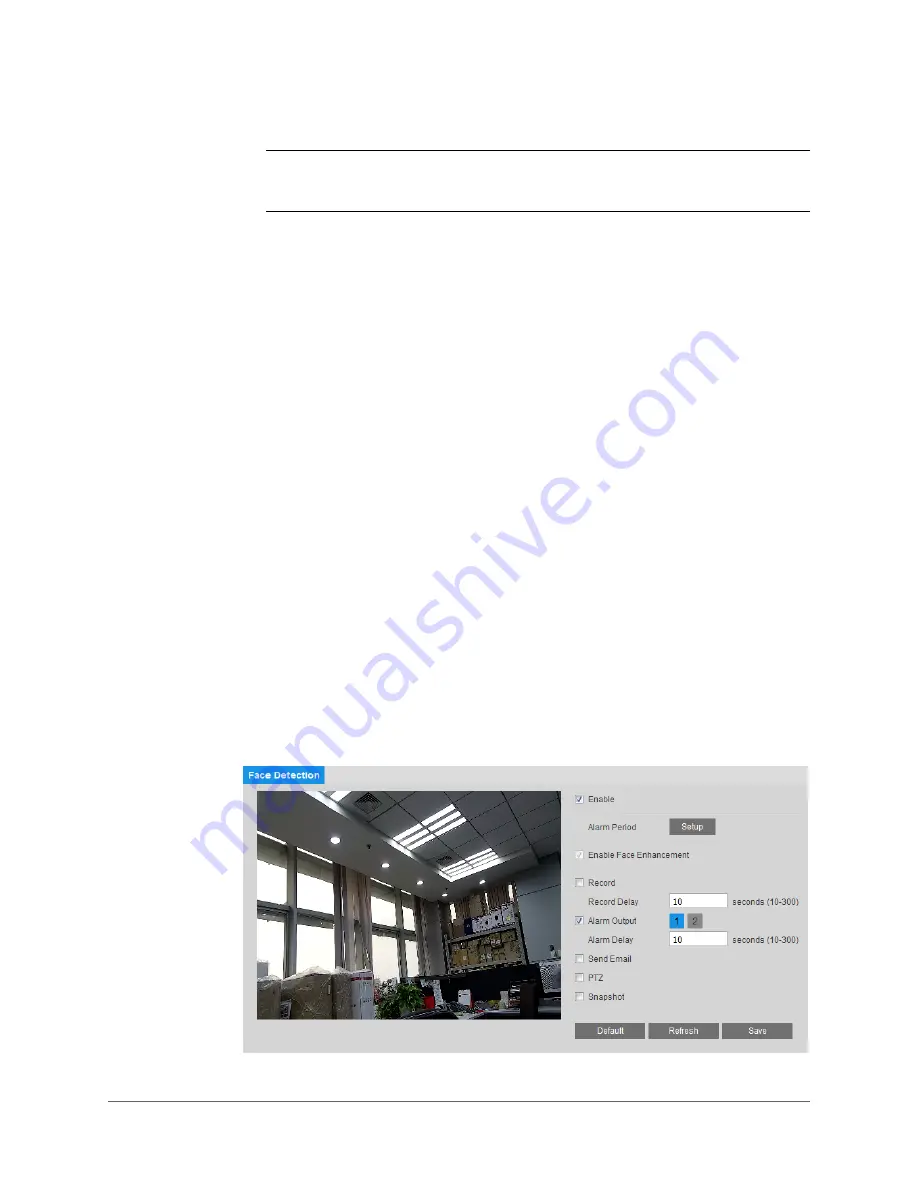
Configuring Face Detection Events

You can configure face detection event settings on the 

Setup > IVS Analysis > Face 

Detection

 page.

Tracking Overlap Rate

Calculates the overlap between an object’s current position and its 
starting position. The higher the setting, the more sensitive the 
tracking detection will be.

Valid Tracking Distance

Auto tracking only detects objects within the 

Valid Tracking 

Distance

. The lower the setting, the more sensitive the tracking 

detection will be.

Valid Tracking Time

Auto tracking stops when the 

Valid Tracking Time

 elapses (1 = 0.1 

seconds; 20 = 2 seconds).

Summary of Contents for equIP HFD6GR1

Page 1: ...equIP Series Cameras Document 800 22456 Rev A 04 2017 USER GUIDE 30X ZOOM WDR IP PTZ CAMERA HDZ302D HDZ302DE HDZ302DIN ...

Page 2: ......

Page 3: ...User Guide ...

Page 4: ...Revisions Issue Date Revisions A 04 2017 New document ...

Page 5: ...d and found to comply with the limits for a Class A digital device pursuant to part 15 of the FCC Rules These limits are designed to provide reasonable protection against harmful interference when the equipment is operated in a commercial environment This equipment generates uses and can radiate radio frequency energy and if not installed and used in accordance with the instruction manual may caus...

Page 6: ...lation and servicing should be performed only by qualified and experienced technicians to conform to all local codes and to maintain your warranty Do not install the unit in an extremely hot or humid location or in a place subject to dust or mechanical vibration The unit is not designed to be waterproof Exposure to rain or water may damage the unit Any wall or ceiling mounting of the product shoul...

Page 7: ...allen into the unit If the unit has been exposed to rain or water If the unit does not operate normally by following the operating instructions Adjust only those controls that are covered by the operating instructions as an improper adjustment of other controls may result in damage and will often require extensive work by a qualified technician to restore the unit to its normal operation If the un...

Page 8: ...ters Laboratories The FCC compliance logo This logo indicates that the product conforms to Federal Communications Commission compliance standards The direct current symbol This symbol indicates that the power input output for the product is direct current The alternating current symbol This symbol indicates that the power input output for the product is alternating current The RCM compliance logo ...

Page 9: ...Up Live Video Streaming 23 Setting the Stream Type 23 Setting the Stream Protocol 23 Logging Out of the Web Client 23 3 PTZ Operation 25 Configuring PTZ Functions 25 Configuring Presets 26 Configuring Tours 27 Configuring Scans 28 Configuring Patterns 29 Configuring Auto Pan 29 Configuring Sectors 30 Configuring PTZ Speed 30 Configuring Idle Motion 30 Configuring PowerUp Settings 31 Configuring Ti...

Page 10: ...Picture Overlays 49 Configuring Regions of Interest 49 Configuring Audio Settings 50 6 Configuring Network Settings 51 Configuring TCP IP 52 IPv4 Address Configuration 52 IPv6 Address Configuration 53 ARP Ping 53 Configuring Network Connections 54 Configuring ONVIF 55 Configuring PPPoE Settings 55 Configuring DDNS Settings 56 Filtering IP MAC Addresses 57 Adding IP Mac Addresses to the List of App...

Page 11: ...ecording Settings 83 9 Configuring System Settings 85 Configuring General System Settings 85 Configuring Date and Time Settings 86 Changing the Date and Time Format 86 Setting the Date and Time 86 Configuring Account Settings 87 Managing Groups 87 Creating a Group 87 Modifying a Group 89 Deleting a Group 89 Managing Users 90 Creating a User Account 90 Modifying a User Account 91 Deleting a User Ac...

Page 12: ...www honeywell com security 12 equIP Series 30x Zoom WDR PTZ Camera User Guide ...

Page 13: ...ed video and snapshots Chapter 5 Configuring Video and Audio Settings describes how to set up video and audio streams Chapter 6 Configuring Network Settings describes how to set up the camera on a network For advanced users only Chapter 7 Configuring Event Settings provides instructions for configuring alarm inputs outputs motion detection audio detection tampering detection face detection and sys...

Page 14: ... cameras refer to the following documents You can find these and other documents on the product webpage http www honeywellvideo com products video systems video redefined equIP family 1274477 html Document Title Part Number equIP Series Network Security Guide 800 23224 HDZ302D HDZ302DE Quick Installation Guide 800 22457 HDZ302DIN Quick Installation Guide 800 22492 ...

Page 15: ...Tool Utility To install the IPC Tool utility and create a desktop shortcut 1 Insert the included Software and Document disc into your PC s disc drive 2 Install the IPC Tool utility to your PC The shortcut is added to the desktop Discovering Your Camera on the Network To discover your network camera s open the IPC Tool utility enter your user name and password and then click Connect Cameras that ar...

Page 16: ... To assign static IP addresses enter the settings in IP Range Subnet Mask and Default Gateway fields and then click Apply Upgrading the Camera s Firmware Before you begin using your camera make sure you have the latest firmware installed You can upgrade a single camera or multiple cameras at the same time To upgrade a single camera 1 Select the camera that you want to upgrade from the devices list...

Page 17: ... the Camera from a Web Browser To access the camera from a web browser 1 Select the camera that you want to access from the devices list The camera must be online 2 On the Device Information tab click Web Page The web client opens in your default browser ...

Page 18: ...www honeywell com security 18 equIP Series 30x Zoom WDR PTZ Camera User Guide ...

Page 19: ...ge 19 Overview of the Live Interface page 20 Configuring the Live Interface page 21 Working in the Live Interface page 22 Logging Out of the Web Client page 23 Logging In to the Web Client If this is your first time logging in to the web client on the login page enter the default user name admin and password 1234 and then click Login ...

Page 20: ...mend that you create a new secure password The password must be at least 8 characters long and contain at least one lowercase letter one number and one special character The password cannot be blank Overview of the Live Interface Figure 2 1 shows the layout of the web client s Live interface Figure 2 1 Live Interface ...

Page 21: ...k Reset Note These settings only apply to the client end To change the settings at the camera end go to Setup Camera Setup Conditions Picture Original Size Displays the video at actual size the exact dimensions are determined by the stream resolution Full Screen Displays the video in full screen mode Double click or press Esc to exit full screen mode Width Height Ratio Displays the video in its or...

Page 22: ... The recorded video is saved to the location specified in Setup Storage Setup Destination Path Live Record Triple Snapshot Click to take three snapshots in quick succession 1 per second The snapshots are saved to the location specified in Setup Storage Setup Destination Path Live Snapshot Snapshot Click to take a snapshot of the current video The snapshot is saved to the location specified in Setu...

Page 23: ...ct TCP UDP or Multicast Logging Out of the Web Client To log out of the web client in the upper right corner of the screen click Logout Main Stream Delivers high definition video for real time monitoring recording and storage Uses the most bandwidth Sub Stream 1 Delivers low standard definition video typically for remote monitoring in lower network bandwidth environments Sub Stream 2 Delivers low ...

Page 24: ...www honeywell com security 24 equIP Series 30x Zoom WDR PTZ Camera User Guide ...

Page 25: ...17 3 PTZ Operation 3 This chapter contains the following sections Configuring PTZ Functions page 25 Operating PTZ Controls page 33 Configuring PTZ Functions You can configure PTZ functions on the Setup PTZ Function page ...

Page 26: ...ioning 2 In the Preset section click Add A preset is added to the list 3 Click the Save button to save the preset 4 To add another preset repeat steps 2 to 4 above You can add up to 80 presets To rename a preset In the Preset section double click the name of the preset to make it editable type the new name and then press Enter To remove a preset In the Preset section click the Delete button of the...

Page 27: ...he preset double click the number in the Preset column click the down arrow to expand the list and then select a new preset from the list 4 To change the duration time double click the number in the Duration column Type a new duration time in seconds and then press Enter 5 To add another preset to the tour repeat steps 1 to 4 A tour must contain at least two different presets 6 Click Save to save ...

Page 28: ...cans To set up a scan 1 In the Auto Scan section select the scan number that you want to configure from the Scan No list You can configure up to 5 scans 2 Set the scan speed by dragging the Speed slider left or right or by clicking the and signs 3 Click Set 4 Using the pan controls below the preview window position the camera at the left limit stop and then click Set Left Limit 5 Position the came...

Page 29: ...g 4 Using the controls below the preview window move the camera and adjust the zoom focus and iris as desired 5 Click Stop Record to stop recording 6 To preview the pattern click Start To stop the pattern click Stop Configuring Auto Pan To set up autopan 360 degree continuous rotation 1 In the Auto Pan section set the rotation speed by dragging the Pan Speed slider left or right or by clicking the...

Page 30: ...r Name box enter a name for the sector for example Courtyard 6 Click Save to apply the settings Configuring PTZ Speed To set the PTZ speed next to PTZ Speed click Low Medium or High Configuring Idle Motion When idle motion is enabled the camera performs a specified action preset tour scan or pattern when the camera is idle receives no control inputs for a specified period of time To enable idle mo...

Page 31: ...Limit area select a maximum tilt angle for the camera from the Max Elevation list 2 Using the PTZ controls below the preview window move the camera to the upper tilt limit and then next to Up Line click Setup 3 Move the camera to the lower tilt limit and then next to Down Line click Setup 4 Select the Enable check box to enable the tilt limit function After the function is enabled click Live to go...

Page 32: ...upted by manually calling the camera after which the time task resumes 6 Click Period Setting The Setup window opens 7 Set the days and times when you want the time task function to be active and then click Save 8 Click Save to apply your settings To delete all time tasks Click Clear All Restarting the PTZ To restart the PTZ dome in the PTZ Restart area click PTZ Restart Restoring Defaults To rest...

Page 33: ...ou can access predefined functions such as autoscan preset tour pattern and autopan Two additional functions are Assistant and Positioning Assistant lets you activate an auxiliary command Positioning lets you send the camera to a specific position To use Assistant 1 Select Assistant from the drop down list 2 Enter the number of the auxiliary command that you want to send to the camera 3 Click Aux ...

Page 34: ...www honeywell com security 34 equIP Series 30x Zoom WDR PTZ Camera User Guide ...

Page 35: ...wing sections Overview of the Playback Interface page 35 Playing Back Recorded Video page 37 Downloading Recorded Video page 38 Viewing Snapshots page 39 Overview of the Playback Interface Figure 4 1 shows the layout of the web client s Playback interface Figure 4 1 Playback Interface ...

Page 36: ...uctions on how to create and export a video clip see Downloading Recorded Video on page 38 Figure 4 3 Video Clip Area Table 4 1 Playback Controls Play Pause Click to play recorded video Pause Click to pause playback Stop Click to stop playback Next Frame Click to advance to the next frame when playback is paused Slow Play Click to slow down playback Fast Play Click to speed up playback Volume Clic...

Page 37: ...click the date that you want to search Recordings for the selected date appear in the timeline color coded according to recording type c Below the calendar click the File List button to narrow your search by time period and or by download format Table 4 3 Timeline Controls Record Type General Displays video saved during normally scheduled recording in the timeline Event Displays video saved during...

Page 38: ...d 3 On the calendar click the date that the video was recorded 4 Click File List to display the list of video files for that date 5 Set the Download Format to dav or mp4 6 From the file list click the download button of the file that you want to download The button changes to and the file is saved to the location specified in Setup Compression Setup Path Playback Download To create and export a vi...

Page 39: ...pshot and double click the file to open it If you have configured the system to take snapshots on a schedule or during motion detection or alarm events you can view and download them To view or download a system generated snapshot 1 From the File Type list select jpg 2 From the Data Src list select the location where the snapshot files are stored 3 On the calendar click the date that the snapshot ...

Page 40: ...www honeywell com security 40 equIP Series 30x Zoom WDR PTZ Camera User Guide ...

Page 41: ...select the camera profile that you want to configure settings for Normal Day or Night Picture In the Picture area you can set the picture style and adjust the picture settings In the Style list select Soft Standard or Vivid Adjust the brightness contrast saturation sharpness chroma control sharpness and sharpness control and gamma levels by dragging the slider left or right to decrease or increase...

Page 42: ...w noise low motion blur and manual exposure modes 50Hz Minimizesflickerinindoorapplicationswhere the AC frequency is 50 Hz generally PAL regions Works with auto and manual exposure modes 60Hz Minimizesflickerinindoorapplicationswhere the AC frequency is 60 Hz generally NTSC regions Works with auto and manual exposure modes Auto Exposure is adjusted automatically Iris Priority The shutter speed and...

Page 43: ...es that cause the camera to switch between day color and night black and white mode Select Low Medium or High Delay defines the delay time before switching between modes Select a value between 2s and 10s Click Save to apply the settings Auto White balance is adjusted automatically Manual White balance is adjusted by moving the Red and Blue gain sliders Click the and signs to make fine adjustments ...

Page 44: ...mera will only focus on objects farther than 5 meters away Set Sensitivity to High Default or Low The higher the value the more quickly the objects in the scene will come into focus If the lens sticks or fails to hold a sharp focus click Lens Init to initialize reset the lens Click Save to apply the settings Defog To enable the defog function set Mode to OFF Manual or Auto If Mode is set to Manual...

Page 45: ... You can configure video streaming properties on the Setup Compression Setup Video page The page is divided into two sections Main Stream and Sub Stream In the Sub Stream section two sub streams are configurable Sub Stream 1 and Sub Stream 2 To enable a sub stream select one of the sub streams and then select the Enable check box Normal The Normal profile is always enabled Full Time The Day profil...

Page 46: ...PAL cameras Bit Rate In the Bit Rate Type box select CBR or VBR In the Bit Rate box select a bit rate from the list using the Reference Bit Rate as a guide I Frame Interval In the I Frame Interval box enter a value between 1 and 150 The default I frame interval is two times the frame rate For example if the frame rate is 30 fps the I frame interval will be 60 H 264 Main Profile Uses less bandwidth...

Page 47: ...apshot Type Set the Snapshot Type to General or Event Image Size The image size is determined by the main stream resolution setting It is not configurable See Resolution on page 46 Quality Set the Quality to a value between 1 lowest and 6 highest Interval Select a snapshot frequency between 1 snapshot per second 1s and 7 snapshots per second 7s or click Customized to define a custom setting betwee...

Page 48: ...e channel title properties on the Setup Compression Setup Overlay Channel Title page To display the channel title click Enable and then click Save By default the channel title appears in the lower left corner of the video image To move the channel title drag the yellow Channel Title box to the desired location in the preview window and then click Save To modify the channel title enter the new titl...

Page 49: ...perties on the Setup Compression Setup Overlay Picture Overlay page To display a picture overlay click Enable click Upload Picture upload the picture and then click Save The file must be in BMP format less than 16 KB and no more than 128 128 pixels To move the picture overlay drag the yellow frame to the desired location in the preview window and then click Save Configuring Regions of Interest You...

Page 50: ... To enable audio for the stream select the Enable check box select the format G 711A G 711Mu G 726 AAC MPEG2 Layer2 G 722 1 G 729 and then select a sampling frequency 8 or 16 kHz In the Properties area select the audio input type LineIn Microphone enable or disable noise filtering and adjust the microphone and or speaker volumes by moving the sliders Click the and signs to make fine adjustments Cl...

Page 51: ...ge 55 Configuring PPPoE Settings page 55 Configuring DDNS Settings page 56 Filtering IP MAC Addresses page 57 Configuring Email Settings page 59 Configuring UPnP Port Mapping page 60 Configuring SNMP Settings page 61 Configuring Bonjour page 61 Configuring Multicast Settings page 62 Configuring 802 1X Settings page 62 Configuring QoS Settings page 63 Working with Certificates page 63 ...

Page 52: ...Pv4 and obtains IP settings automatically via DHCP In the Hostname field enter a nickname for the camera that can be mapped to the IP address and used to identify the camera To manually assign IP address settings set Mode to Static and then replace the values in the IP Address Subnet Mask and Default Gateway fields To manually assign DNS server addresses replace the values in the Preferred DNS Ser...

Page 53: ...dress are in the same network segment Click Save to apply the settings ARP Ping You can assign an IP address to the camera using the ARP Ping service To enable ARP Ping to set the IP address 1 Obtain an unused IP address in the same LAN as your PC 2 Write down the MAC address of the camera it is listed on the label 3 Select the Enable ARP Ping check box and then click Save ...

Page 54: ... verify that the IP address works open your browser and type in the address bar http followed by the IP address for example http 192 168 0 125 then press Enter Configuring Network Connections You can configure network connections and port settings on the Setup Network Setup Connection Connection page By default the maximum number of simultaneous connections the camera will support is set to 10 To ...

Page 55: ...cation is enabled by default To disable it next to Login Authentication click OFF and then click Save Configuring PPPoE Settings You can configure Point to Point Protocol over Ethernet PPPoE settings on the Setup Network Setup PPPoE page To enable PPPoE 1 Select the Enable check box 2 In the User Name and Password fields enter the user name and password that you received from your Internet service...

Page 56: ...Server Type drop down list 4 In the Domain Name field enter the domain name hostname that you registered with the DDNS service for example mycamera dyndns org 5 In the User Name and Password fields enter the user name and password of the account that you registered in step 1 6 In the Update Period field enter the interval in minutes between address updates sent to the DDNS server Note If you selec...

Page 57: ...m the list at any time If a user is accessing the camera over a WAN enter the MAC address of the user s router instead of an IP address Adding IP Mac Addresses to the List of Approved Users To add an IP MAC address 1 Click Add IP MAC 2 In the Add IP MAC window select IP Address IP Segment or MAC from the drop down list enter the relevant address and then click Save The address is added to the list...

Page 58: ... from the List of Approved Users To delete a single IP MAC address 1 In the Address List click the Delete icon of the address that you want to delete 2 A confirmation message appears Click OK to continue and then click Save to apply the settings The address is removed from the list of approved users To delete multiple IP MAC addresses 1 Click Remove All 2 A confirmation message appears Click OK to...

Page 59: ...subject line of the email 6 Select the Attachment check box if you want to enable snapshot attachments 7 In the Mail Receiver field enter the recipient s email address and then click the sign to add it to the list You can enter up to three email addresses To remove an address from the list select it and then click the sign 8 In the Interval field specify the interval between email notification mes...

Page 60: ... Network in Windows 7 To enable UPnP in Windows XP 1 Go to Start Control Panel Add or remove programs 2 Click Add or remove programs then select Networking Services in the Windows Components Wizard 3 Click Details then select Internet Gateway Device Discovery and Control Client and UPnP User Interface 4 Click OK to begin the installation To enable UPnP in Windows 7 1 Go to Start Control Panel Netw...

Page 61: ...in the range 1 65535 3 In the Trap Address field enter the IP address of the SNMP server where trap notifications will be sent 4 By default the Trap Port is 162 To change the port enter a number in the range 1 65535 5 Click Save to apply the settings Configuring Bonjour You can configure Bonjour settings on the Setup Network Setup Bonjour page Bonjour is a zero configuration networking application...

Page 62: ...dress and port using the suggested ranges as a guide 2 Click Save to apply the settings To view video in multicast mode In Live view select Multicast from the Protocol drop down list Configuring 802 1X Settings You can configure 802 1X settings on the Setup Network Setup 802 1X page 802 1X is a port based network access control protocol for preventing unauthorized devices from accessing the LAN Yo...

Page 63: ...rtificate page To install a Honeywell signed root certificate 1 Click Export navigate to the directory where you want to save the certificate ca crt on your PC and then click Save 2 Go to the directory where you saved the certificate and double click the certificate The Certificate window opens 3 In the Certificate window on the General tab click Install Certificate to open the Certificate Import ...

Page 64: ...www honeywell com security 64 equIP Series 30x Zoom WDR PTZ Camera User Guide ...

Page 65: ...ents page 67 Configuring Motion Detection Events page 69 Configuring Camera Tampering Events page 71 Configuring Audio Events page 73 Configuring Smart Plan Settings page 74 Configuring Auto Tracking Settings page 75 Configuring Face Detection Events page 76 Configuring Alarm Events You can configure alarm event settings on the Setup Alarm Alarm page ...

Page 66: ... In the Record Delay field enter the number of seconds that the system will continue to record video after an alarm event has ended Enter a value between 10 and 300 9 To generate an alarm output when an alarm event is detected select the Alarm Output check box and select the alarm output s to be activated 10 In the Alarm Delay field enter the number of seconds that the system will continue to gene...

Page 67: ...he installed microSD card is full You can configure settings for each type of event To enable SD card event detection 1 On the SD Card tab select the event type that you want to configure from the Event Type list No SD Card SD Card Error or Capacity Warning 2 Select the Enable check box 3 To generate an alarm output when the event is detected select the Alarm Output check box and select the alarm ...

Page 68: ...eadend and in the Time field enter the countdown time If no connection is established with the IP address within the specified time the system will will detect a network disconnection event 4 To start recording video when the event is detected select the Record check box 5 In the Record Delay field enter the number of seconds that the system will continue to record video after the event has ended ...

Page 69: ...generate an alarm output when the event is detected select the Alarm Output check box and select the alarm output s to be activated 4 In the Alarm Delay field enter the number of seconds that the system will continue to generate an alarm output after the event has ended Enter a value between 10 and 300 5 To send an email notification when an illegal access event is detected select the Send Email c...

Page 70: ...a click Setup The Area window opens b By default the whole video window is configured as a motion detection area To define a smaller area drag your mouse over the area s that you want to deselect or click Remove All and then redraw the area s with your mouse c You can define up to 4 motion detection profiles regions each with different sensitivity and threshold settings Next to Region click one of...

Page 71: ...0 and 300 10 To send an email notification when motion is detected select the Send Email check box Email settings must be configured in Setup Network Setup SMTP Email See Configuring Email Settings on page 59 11 To initiate a predefined preset tour or pattern when motion is detected select the PTZ check box and select the desired action from the Activation list 12 To take a snapshot when motion is...

Page 72: ...heck box and select the alarm output s to be activated 7 In the Alarm Delay field enter the number of seconds that the system will continue to generate an alarm output after a camera tampering event has ended Enter a value between 10 and 300 8 To send an email notification when a camera tampering event is detected select the Send Email check box Email settings must be configured in Setup Network S...

Page 73: ...udio environment before an audio detection event is triggered 3 Next to Alarm Period click Setup The Alarm Period window opens 4 Set the days and times when you want the alarm function to be active and then click Save 5 In the Anti Dither field enter the anti dither time in seconds Enter a value between 0 and 100 seconds The system will only allow one audio event within this period 6 To start reco...

Page 74: ...napshot when an audio event is detected select the Snapshot check box Note For the snapshot to be attached to the email notification the Attachment check box must be selected in Setup Network Setup SMTP Email See Configuring Email Settings on page 59 13 Click Save to apply the settings Configuring Smart Plan Settings You can add auto tracking or face detection to a configured preset on the Setup I...

Page 75: ...al smart function to ON 2 Click the Extensional smart function tab and then click Open The IntrusionTrace webpage opens IntrusionTrace is a video analytics application designed for 24 7 outdoor operation Configuring Auto Tracking Settings You can configure auto tracking settings on the Setup IVS Analysis Auto Tracking page ...

Page 76: ...lider to set the desired detection sensitivity 5 In the Advanced Parameter area set the Tracking Overlap Rate Valid Tracking Distance and Valid Tracking Time 6 Click Save to apply the settings Configuring Face Detection Events You can configure face detection event settings on the Setup IVS Analysis Face Detection page Tracking Overlap Rate Calculates the overlap between an object s current positi...

Page 77: ...and select the alarm output s to be activated 8 In the Alarm Delay field enter the number of seconds that the system will continue to generate an alarm output after the event has ended Enter a value between 10 and 300 9 To send an email notification when an event is detected select the Send Email check box Email settings must be configured in Setup Network Setup SMTP Email See Configuring Email Se...

Page 78: ...www honeywell com security 78 equIP Series 30x Zoom WDR PTZ Camera User Guide ...

Page 79: ...g sections Configuring Recording Schedules page 79 Configuring Storage Settings page 80 Configuring Recording Settings page 83 Configuring Recording Schedules You can set up both regular and holiday schedules for recording video and saving snapshots on the Setup Storage Setup Schedule page ...

Page 80: ...day Click Save to apply the settings Follow the same procedure to configure the settings on the Snapshot Schedule tab On the Holiday Schedule tab you can designate holidays by clicking dates on the calendar On the selected dates the video recording snapshot schedule will follow the holiday settings you configured in the Record Schedule and Snapshot Schedule tabs Click Save to apply the settings Co...

Page 81: ...t a time FTP and NAS cannot be used together Configuring the Local SD Card for Storage If the camera has a microSD card installed the Local tab displays the microSD card details You can set up the installed microSD card for read only read and write or hot swap operation by clicking the corresponding button Read Only Data on card can be displayed but not modified Read Write Data on card can be disp...

Page 82: ...ed video snapshot files will be stored 5 Click Save to apply the settings Panic Save To save recorded video snapshots to the camera s microSD card when the network connection to the FTP is offline or unavailable select the Panic Save Local check box and then click Save to apply the setting Configuring an NAS Disk for Storage On the NAS tab you can enable network attached storage and configure stor...

Page 83: ...onds To change this setting enter a time between 0 and 5 seconds in the Pre Event Record field From the Disk Full list select Overwrite or Stop Overwrite Recording continues when disk capacity is reached and overwrites previously saved video Stop Recording stops when disk capacity is reached Nothing is overwritten and no further video is recorded Set Record Mode to Auto Manual or Off Auto Video re...

Page 84: ...www honeywell com security 84 equIP Series 30x Zoom WDR PTZ Camera User Guide ...

Page 85: ...ormation page 94 Managing Logs page 94 Viewing Online Users page 96 Configuring General System Settings You can configure the device name user interface language video standard analog output and status LED settings on the Setup System Setup General page To change the device name in the Device Name field enter a new name and then click Save To change the interface language select a language from th...

Page 86: ... camera s date and time You can manually enter the date and time synchronize with your PC s internal clock or set up the camera to synchronize automatically with a Network Time Protocol NTP server at regular intervals To manually set the date and time enter the date and time in the Current Time fields and then click Save To synchronize the date and time with your PC click Sync PC If the synchroniz...

Page 87: ...te and time to synchronize with the NTP server You can enter a value between 0 and 30 6 Click Save to apply the settings Configuring Account Settings You can manage user accounts and permissions on the Setup System Setup Account page Managing Groups By default there are two categories or groups of users admin and user If you want you can create additional custom groups Creating a Group You can cre...

Page 88: ... the settings in Setup Alarm Setup Alarm Log Search The user can search logs in Setup Information Log Clear Log The user can clear logs in Setup Information Log Upgrade The user can upgrade firmware in Setup System Setup Upgrade Auto Maintain The user can access the settings in Setup System Setup Auto Maintain General The user can access the settings in Setup System Setup General Video Audio The u...

Page 89: ...scription in the Remark field 3 From the Authority List select or deselect specific permissions for the group see Table 9 1 or select the All check box to select deselect all of the permissions 4 Click Save to apply the settings Deleting a Group You can delete any custom group that you have created you cannot delete the administrator group or the user group To delete a group 1 On the Group tab sel...

Page 90: ...at least 8 characters in length and contain a combination of uppercase and lowercase letters at least one number and at least one special character 3 Assign the account to a group admin user or a custom group that you have created chosen from the Group list 4 If you want you can enter a brief description in the Remark field 5 From the Authority List select permissions for the account see Table 9 1...

Page 91: ... can edit the description in the Remark field 5 From the Authority List select or deselect specific permissions for the account see Table 9 1 or select All to select deselect all of the available permissions Note Each user is assigned to a group The individual user s permissions cannot exceed those of the group to which the user belongs To modify permissions at the group level see Modifying a Grou...

Page 92: ...s to its factory default settings Backing Up Restoring a Configuration You can back up or restore configuration settings on the Setup System Setup Import Export page To back up a configuration 1 Click Export The Save As window opens 2 By default the backup file is named DeviceConfig backup Rename the file if you want navigate to the directory where you want to save the file and then click Save The...

Page 93: ...ion select the Auto Delete Old Files check box and then specify the age in days of the files to be deleted For example if you enter 30 files that are 30 days old and older will be deleted automatically Click Save to apply the settings Upgrading the Firmware You can upgrade the camera firmware on the Setup System Setup Upgrade page Note Before you begin you will need to obtain the new firmware and ...

Page 94: ...nformation Version page Managing Logs You can view back up and delete log files on the Setup Information Log page Viewing Logs There are six log types System Setting Data Event Record and Account To view logs by type 1 Enter the Start Time and End Time search parameters 2 From the All Types list select the log type s that you want to retrieve and then click Search The logs are listed by time user ...

Page 95: ...g Up Logs To back up a log 1 Click Backup The Save As window opens 2 By default the backup file is named LogBackup YYYY MM DD txt Rename the file if you want locate the directory where you want to save the file and then click Save Deleting Logs To delete all logs 1 Click Clear 2 A confirmation message appears Click OK to continue All of the logs that you have not backed up are deleted ...

Page 96: ...ies 30x Zoom WDR PTZ Camera User Guide Viewing Online Users You can see which users are currently online on the Setup Information Online User page The users are listed by user name IP address and login time To refresh the list click Refresh ...

Page 97: ...5 mm Max Aperture F1 6 F4 4 Angle of View Horizontal 62 35 2 53 Vertical 37 87 1 79 S N Ratio 55 dB or more AGC off Electronic Shutter Speed 1 1 1 30 000 s Shutter WDR 120 dB Exposure Mode Iris Priority Shutter Priority Gain Priority Manual Backlight Compensation BLC HLC WDR White Balance Auto Indoor Outdoor ATW Manual Day Night Auto Color BW Noise Reduction 3DNR Image Rotation Flip Electronic Ima...

Page 98: ...t illegal access Event Notification Record SD card and FTP relay output email preset tour pattern snapshot Languages Supported English Arabic Czech Dutch French German Italian Japanese Korean Polish Portuguese Russian Simplified Chinese Spanish Turkish Network Video Compression H 265 H 264 MJPEG Video Resolution Up to 1920 1080 Frame Rate Main Stream 1080p 60 50 fps 1 3 MP 720p 30 25 fps Sub Strea...

Page 99: ... White Temperature 40 F to 140 F 40 C to 60 C Cold start only for 24 VAC powered units Relative Humidity Less than 95 non condensing Ingress Protection IP66 Impact Resistance IK10 Regulatory Emissions EN 55032 FCC Part 15B AS NZ CISPR 22 2009 A1 2010 Immunity EN 50130 4 Safety EN 60950 1 EN 60950 22 UL Listed to UL CSA 60950 1 UL CSA 60950 22 RoHS EN 50581 Integration MAXPRO NVR Family Entry to En...

Page 100: ...atio 55 dB or more AGC off Electronic Shutter Speed 1 1 1 30 000 s Shutter WDR 120 dB Exposure Mode Iris Priority Shutter Priority Gain Priority Manual Backlight Compensation BLC HLC WDR White Balance Auto Indoor Outdoor ATW Manual Day Night Auto Color BW Noise Reduction 3DNR Image Rotation Flip Electronic Image Stabilization On Off Defog On Off Audio Input Output 1 1 Alarm Input Output 7 2 Onboar...

Page 101: ...am 1080p 60 50 fps 1 3 MP 720p 30 25 fps Sub Stream 1080p 1 3MP 720p 30 25 fps Third Stream D1 CIF 30 25 fps Audio Compression G 711a G 711mu AAC G 722 G 726 MPEG2 L2 Audio Stream Full duplex simplex Interface RJ 45 10 100 Mbps Ethernet Supported Protocols IPv4 v6 TCP IP UDP RTP RTSP HTTP HTTPS SSL ICMP FTP SMTP DHCP PPPoE UPnP IGMP SNMP Bonjour DNS DDNS IEEE 802 1X QoS NTP IP Filter Multicast ONV...

Page 102: ...ons EN 55032 FCC Part 15B AS NZ CISPR 22 2009 A1 2010 Immunity EN 50130 4 Safety EN 60950 1 EN 60950 22 UL Listed to UL CSA 60950 1 UL CSA 60950 22 RoHS EN 50581 Integration MAXPRO NVR Family Entry to Enterprise Level Network Video Recorders 4 0 and greater MAXPRO VMS Family Entry to Enterprise Level Network Video VMS R410 and greater DVM DVM R600 1 SP1 HUS HUS 5 1 Accessories HDZNPTA 1 5ʺ NPT Ada...

Page 103: ...e AGC off Electronic Shutter Speed 1 1 1 30 000 s Shutter WDR 120 dB Exposure Mode Iris Priority Shutter Priority Gain Priority Manual Backlight Compensation BLC HLC WDR White Balance Auto Indoor Outdoor ATW Manual Day Night Auto Color BW Noise Reduction 3DNR Image Rotation Flip Electronic Image Stabilization On Off Defog On Off Audio Input Output 1 1 Alarm Input Output 1 1 Onboard Storage Up to 1...

Page 104: ... 1080 Frame Rate Main Stream 1080p 60 50 fps 1 3 MP 720p 30 25 fps Sub Stream 1080p 1 3MP 720p 30 25 fps Third Stream D1 CIF 30 25 fps Audio Compression G 711a G 711mu AAC G 722 G 726 MPEG2 L2 Audio Stream Full duplex simplex Interface RJ 45 10 100 Mbps Ethernet Supported Protocols IPv4 v6 TCP IP UDP RTP RTSP HTTP HTTPS SSL ICMP FTP SMTP DHCP PPPoE UPnP IGMP SNMP Bonjour DNS DDNS IEEE 802 1X QoS N...

Page 105: ...tance IK10 bubble only Regulatory Emissions EN 55032 FCC Part 15B AS NZ CISPR 22 2009 A1 2010 Immunity EN 50130 4 Safety EN 60950 1 EN 60950 22 UL Listed to UL CSA 60950 1 UL CSA 60950 22 RoHS EN 50581 Integration MAXPRO NVR Family Entry to Enterprise Level Network Video Recorders 4 0 and greater MAXPRO VMS Family Entry to Enterprise Level Network Video VMS R410 and greater DVM DVM R600 1 SP1 HUS ...

Page 106: ...www honeywell com security 106 equIP Series 30x Zoom WDR PTZ Camera User Guide ...

Page 107: ...B backing up configurations 92 logs 95 batch firmware upgrading 16 bit rate 46 BLC backlight compensation 42 Bonjour 61 brightness 21 C camera profile 41 45 camera specifications 97 105 camera version information 94 CBR constant bit rate 46 certificates 63 channel title 48 configuration settings backing up 92 restoring 92 contrast 21 creating user accounts 90 user groups 88 creating video clips 38...

Page 108: ...el 21 image orientation 41 image stabilization 41 IP address settings 52 IP filter settings 57 58 IPC Tool assigning new IP address using 16 discovering cameras using 15 installing 15 upgrading firmware using 16 IVS intelligent video surveillance 21 69 77 L language 85 latency 23 list of symbols 8 live interface configuring 21 controls 21 22 overview 20 live video streaming setup 23 45 local stora...

Page 109: ...s 67 serial number 94 smart codec 46 smart plan settings 74 smoothing See fluency SMTP See email settings snapshots configuring settings 47 downloading 39 schedule 80 taking snapshots of live video 22 taking snapshots of recorded video 39 viewing 39 SNMP Simple Network Management Protocol 61 specifications 97 105 stream properties 45 stream protocols 23 stream type 23 sub stream 1 23 45 sub stream...

Page 110: ...9 playing back recorded video 37 recording properties 83 regular schedule 80 setting stream type 23 snapshot schedule 80 storage 80 82 streaming properties 45 taking snapshots of live video 22 taking snapshots of recorded video 39 watermark 47 white balance 43 video clips controls 36 creating 38 exporting 38 video standard 85 viewing logs 94 W warranty 7 watermark 47 WDR wide dynamic range 42 web ...

Page 111: ......

Page 112: ...12th Ave Miami FL 33178 USA www honeywell com security clar 1 305 805 8188 Honeywell Security Asia Pacific 35F Tower A City Center 100 Zun Yi Road Shanghai 200051 China www asia security honeywell com 86 21 2219 6888 Honeywell Security Middle East N Africa Emaar Business Park Sheikh Zayed Road Building No 2 Office No 301 Post Office Box 232362 Dubai United Arab Emirates www honeywell com security ...

Reviews: