


Dolphin 6000 HomeBase
12-3
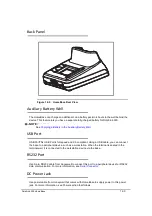
Back Panel
0
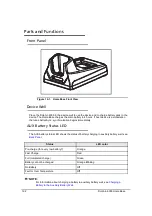
Figure 12-2. HomeBase Rear View
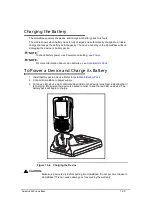
Auxiliary Battery Well
0
The HomeBase can charge an additional Li-ion battery pack in 4 hours in the well behind the
device. This feature lets you have a separate fully-charged battery for Dolphin 6000.
NOTE:
NOTE
:
See
Charging a Battery in the Auxiliary Battery Well
.
USB Port
0
USB PortThis USB Port is full-speed and 2.0 compliant. Using a USB cable, you can connect
the base to a peripheral device, such as a workstation. When the terminal is seated in the
terminal well, it is connected to the workstation device via the base.
RS232 Port
0
Use 9-pin, RS232 cable from Honeywell to connect this port to a peripheral device for RS232
data communication. For more information, see
Serial Connector
.
DC Power Jack
0
Use power cable from Honeywell that comes with HomeBase to supply power to this power
jack. For more information, see Power section that follows.
Summary of Contents for Dolphin 6000
Page 1: ...Dolphin 6000 Mobile Computers with Windows Mobile 6 5 Users Guide ...
Page 8: ...viii ...
Page 26: ...2 12 Getting Started ...
Page 29: ...Hardware Overview 3 3 Front View 0 Figure 3 1 Front View 5 1 7 2 10 6 8 9 4 3 ...
Page 31: ...Hardware Overview 3 5 Base View 0 Figure 3 2 Base View 5 4 3 2 1 9 8 7 6 ...
Page 44: ...3 18 Hardware Overview ...
Page 76: ...7 22 System Settings ...
Page 102: ...9 16 Working with GSM GPRS EDGE ...
Page 103: ...Working with Bluetooth Radio 10 1 Working with Bluetooth Radio Enabling the Bluetooth Radio 0 ...
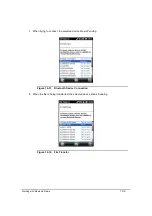
Page 123: ...Dolphin 6000 HomeBase 12 9 RS232 Pin Configuration 0 Figure 12 5 COM1 Properties ...


