•
3
15
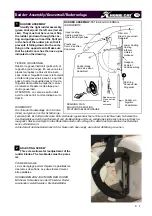
Set the hulls in parallel (the frame will be
very difficult to attach to the hulls if they are
misaligned). Feed the trampoline halves into the
rear crossbar.
Mettre les coques parallèles. Glisser les trampolins
gauche et droit dans la traverse arrière.
Legen Sie beide Rümpfe parallel zueinander. Führen
Sie die Trampolinhälften in die dafür vorgesehene
1
1
2
3
4
5
6
7
8
Rear crossbar
Traverse arrière
Achterholm
Place the rear crossbar on the hulls and in-
sert the 4 bolts (2) + stainless washer (3) +
nylon washer (4), through the bar and the hull. In-
side the hull (access through the inspection
ports) place the waterproof washer (5) + stainless
washer (6) + nut (7) and the nylstop nut (8). Do
not tighten the bolts up.
Positionner la traverse arrière sur les coques et
mettre les 4 vis (2) + rondelles inox (3) + rondelles
plastiques (4) à travers la traverse puis la coque (voir
dessin ci-contre).A l’intérieur de la coque (accès par
les trappes de visite), mettre la rondelle d’étanchéité
(5), la rondelle inox (6), l'écrou simple (7) et l'écrou
indessérable (8) sans les serrer à fond.
Setzen Sie den Achterholm in die dafür vogesehenen
Holmaufnahmen ein und ziehen Sie die Bolzen wie
auf Bild 2 gezeigt an. Im Innern des Holmes (leicht
durch den Luckendeckel zugängig) werden die Ab-
dichtungscheibe (5), die inox scheibe (6), die ein-
fache Mutter (7) und die Nylstop Mutter (8) aufges-
2
Front crossbar/Traverse avant/
Vorderholm
Dolphin striker
Martingale
Unterzug
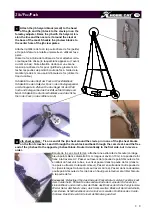
Feed the lacing strip into the front crossbar.
Place the front crossbar on the hulls and
proceed the same way as for the rear crossbar.
Do not forget the tensioner rod fastening. Now,
tighten all the bolts.
Passer la bande avant de trampolin dans la traverse
avant. Positionner la traverse avant sur les coques
en procédant comme pour la traverse arrière (voir
dessin ci-dessus), en n'oubliant pas les ferrures inox
de maintien de la martingale. A présent, serrer toutes
les vis de fixation des traverses.
Führen Sie das vordere Trampolinteil in die Öffnung
im Vorderholm. Setzen Sie den Vorderholm in die
Holmaufnahmen ein und montieren Sie die Schrau-
ben genauso wie bei der hinteren Einrichtung. Ver-
gessen Sie nicht die Unterzug-Verbindung. Nun, kön-
nen Sie alle Schrauben festziehen.
2
)UDPH&DGUH5DKPHQ


