-12-
2. Disassembly of the dust seal
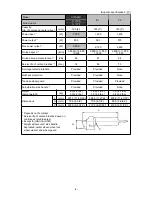
(1) Remove the Magnet
[18] <19>
. (Note that the magnet features a left-hand thread.)
(2) Insert the hooks of the J-204 Bearing Puller between the commutator and Dust Seal (A)
[16] <17>
from
both sides, and then fix the hooks with the wing bolts.
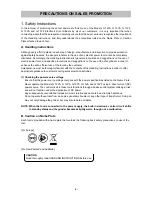
(3) Place the J-204 Bearing Puller on a supporting jig and push down on the armature shaft with a hand
press to remove Dust Seal (A)
[16] <17>
together with Ball Bearing 608VVC2PS2L
[17] <18>
. Replace
Dust Seal (A)
[16] <17>
with a new one, since it will be damaged by removing Ball Bearing
608VVC2PS2L
[17] <18>
.
3. Disassembly of the gear
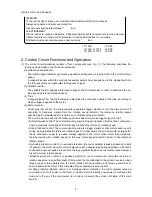
(1) Loosen the four Seal Lock Screws (W/Sp. Washer) M5 x 16
[26] <27>
, and then remove the Packing
Gland
[25] <26>
together with Spindle (A)
[28] <29>
and the Gear
[19] <20>
from the Gear Cover Ass'y
[4] <5>
as a single body.
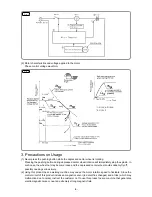
(2) When necessary to remove the Gear
[19] <20>
from Spindle (A)
[28] <29>
, it is highly recommended to
use the special repair tools described below. As illustrated in Fig. 4 support the angled surface of the
Gear
[19] <20>
with the J-129-2 Gear Puller (special repair tool, Code No. 970906), rest the J-129-2
Gear Puller on the J-130 Sleeve (special repair tool, Code No. 970907), and then push down on the tip
of Spindle (A)
[28] <29>
with a hand press to remove the Gear
[19] <20>
.
Fig. 4

