background image


- 14 - 

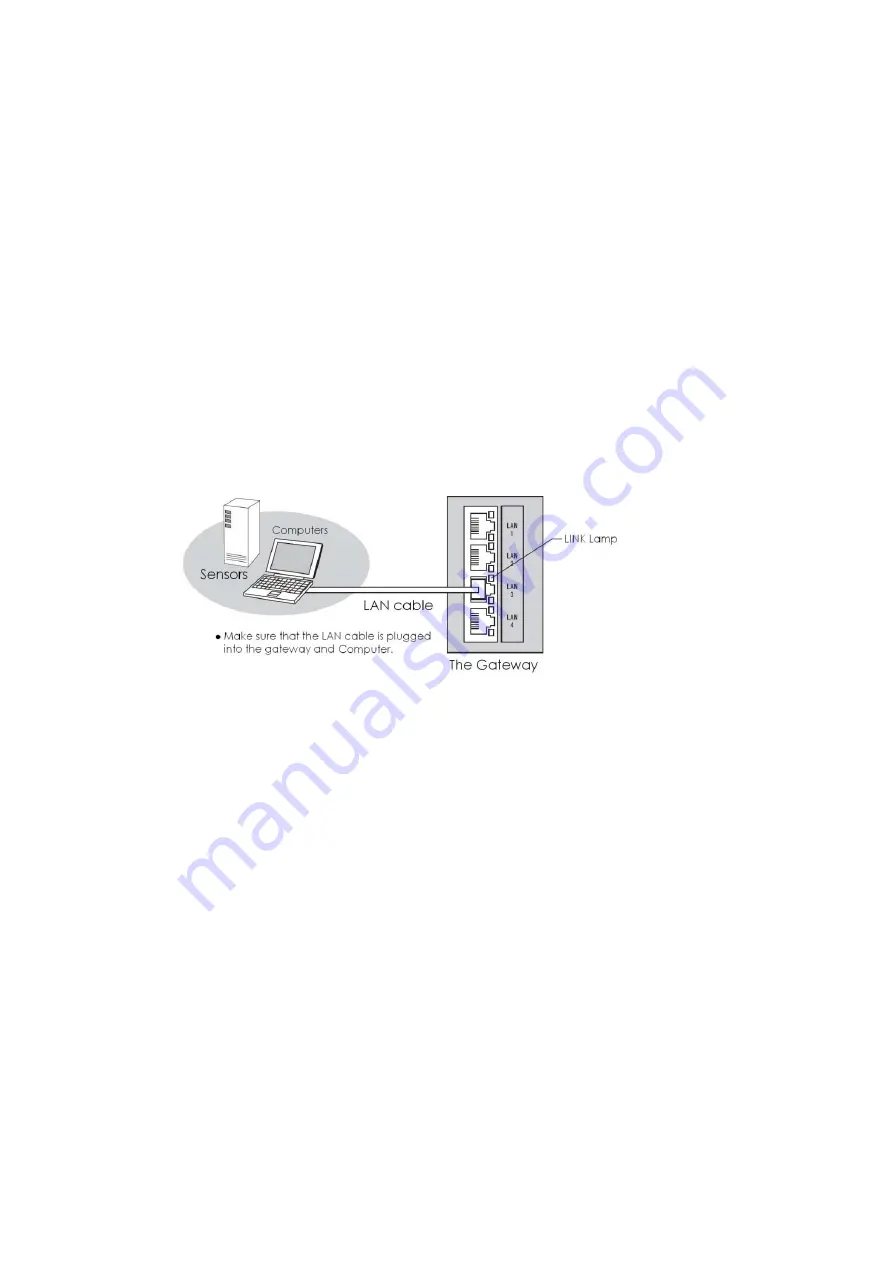
4.2  Wired LAN Connection 


Where wired LAN connection to the Gateway is necessary, follow the procedure below.   

For how to operate the destination equipment such as PC or sensor, refer to instruction 

manual of the destination equipment. 


1.  Referring to instruction manual of the destination equipment, set up the wired LAN 

connection of the destination equipment so that the IP address of the destination 

equipment is automatically assigned by DHCP server (the Gateway). 


2.  Turn off power of the Gateway and turn off power of the destination equipment. 


3.  Prepare a LAN cable, either provided by the Gateway or procured according to 

Subsection 1.3.3.    Connect this LAN cable between the LAN port of the destination 

equipment and one of the LAN ports LAN1 through LAN4 in the rear access area of 

the Gateway until you hear a click from each port connection.    When performing 

this connection on the Gateway mounted on the wall, support the Gateway by hand 

to avoid extra mass. 

(area of LAN ports only)


Note:    Equipment layouts and destination connection shown above are for 

reference only.    These layouts and connection must be made according to actual 

environment of the user premise. 


4.  Turn on power of the Gateway.    Ensure that the LINK lamp of the subject port on 

the Gateway turns on in green. 


5.  Turn on power of the destination equipment.    Ensure that the LINK lamp of the 

subject port on the Gateway stays on or blinks in green. 


Summary of Contents for EM-G21

Page 1: ...l before installing and this product In order to ensure the safe operation of the Hitachi EMS Gateway read obey all safety messages and all of the instructions contained in the manual and the warnings After reading this manual this manual should be kept in a readily accessible location ease of reference If this product is sold to another party this manual should the product to the new owner of the...

Page 2: ...readily accessible location for ease of reference If the Gateway is sold or given to another party this manual should accompany the product to the new owner of the product WARNING Indicates a potentially hazardous situation which if not avoided can result in death or serious injury CAUTION Indicates a hazardous situation which if not avoided will or can result in minor or moderate injury NOTICE In...

Page 3: ...ensation inside the equipment or cables and may result in fire electric shock or failure of the Gateway Keep away from sudden temperature change Do not install the Gateway in a location that is subject to sudden changes in temperature This may cause condensation inside the equipment or cables and may result in fire electric shock or failure of the Gateway Keep away from high humidity Do not instal...

Page 4: ...tection laws The use of the Gateway in environments other than home use may result in death severe injury or property damage Do not install the Gateway near a medical device or in a hospital The radio waves from the Gateway may interfere with medical devices and cause the devices to malfunction which may result in death severe injury or property damage Do not install the Gateway where a pacemaker ...

Page 5: ...ult in death personal injury or property damage Always use the attached stand to install the Gateway on a horizontal surface Failure to use the attached stand may result in the Gateway to tip or overturn and result in personal injury or property damage When installing the Gateway on a wall use the attached stand and wall mounting screws to firmly secure the Gateway to wall so that the mass of the ...

Page 6: ... data communication Do not install the Gateway in close proximity to a microwave a room shielded with a metallic door or a location subject to electrostatic discharge or radio disturbance Installation of the Gateway in these areas may cause the Gateway to malfunction The installation of the Gateway in an area subject to a strong magnetic signal or radio emissions may result in the malfunction or f...

Page 7: ... heavy object such as desk or furniture Do not fasten the power cord with nails or staples Do not connect the cord to the AC adapter supplied with the Gateway to an extension cord The connection to an extension cord may result in a fire Do not apply multiple loads to the outlet that is feeding power to the Gateway Overloading the outlet may result in the overheating or deterioration of the power s...

Page 8: ...lanket table cloth linen or paper When a lightning strike is likely unplug the power cord of the AC adapter from the outlet and refrain from using the Gateway A lightning strike may cause fire an electric shock or machine failure When you hear a thunder do not touch the power cord or any cable connection between the Gateway and the peripheral devices A lightning strike may cause an electric shock ...

Page 9: ...way Do not step on the Gateway Failure to follow this instruction may result in personal injuries or damage to the equipment In the event of fire or earthquake check the condition of the Gateway Immediately disconnect power to the Gateway by unplugging the power cord of the AC adapter from the outlet if any problems are identified Failure to disconnect power to the Gateway may result in damage to ...

Page 10: ... or electric shock NOTICE When unplugging and plugging the power cord of the AC adapter attached to the Gateway wait 10 seconds or longer between unplugging and plugging When the exterior of the Gateway is dirty wipe the exterior with a dry soft cloth If the dirt in areas other than device connecting cable ports is heavy wipe the dirt using a well wrung out soft cloth moistened with neutral deterg...

Page 11: ...inyl bags beyond the reach of children Otherwise they may suffocate by accidentally swallowing a small piece of packing material or putting a vinyl bag on their heads CAUTION Unplug the power cord of the AC adapter from the outlet when you do not plan to use the Gateway for an extended period of time ...

Page 12: ...rformances of connected PCs and network usage rates When an IEEE 802 11b device an IEEE 802 11g device and an IEEE 802 11n device coexist in the network at your premise the throughput of the IEEE 802 11n device may become significantly slow To enable communications with an IEEE 802 11n device wireless encryption on the wireless LAN terminal must be set to no encryption WPA PSK AES or WPA2 PSK AES ...

Page 13: ...te network without consent and either steal personal or confidential information leaking spread false information while impersonating a particular person spoofing overwrite intercepted communications tampering or spread malware to corrupt data and crash the system destroying Most wireless LAN adapters and wireless LAN access points are equipped with security measures against the above mentioned th...

Page 14: ...D and Security Encryption Key 15 5 1 1 Determination of SSID 15 5 1 2 Determination of Security Encryption Key 15 5 2 Setup of MAC Address Filtering 18 5 3 Wireless Connection on Windows 7 or Windows Vista 19 5 3 1 Connection by Selecting SSID from List on Windows 7 or Windows Vista 19 5 3 2 Connection by Directly Typing SSID on Windows 7 or Windows Vista 20 5 4 Wireless Connection on Windows XP 2...

Page 15: ... XV 8 APPENDIX 33 8 1 Initialization of the Gateway 33 8 2 Specifications 34 8 2 1 Hardware Specifications 34 8 2 2 Software Specifications 35 8 3 Trademarks 36 ...

Page 16: ...ory AC adapter and power cord 1 set AC cord length 2 m DC cord length 1 2 m Note If the power cord is separated from the AC adapter body insert the cord connector fully into the adapter slot USB cap 2 Note Always mount a USB cap on each unused USB port of the Gateway Wall mounting screw 2 Read This First instruction sheet 1 User Manual CD ROM 1 LAN cable 1 Cable length 1 m Category 5e or higher ...

Page 17: ...ATUS2 lamp Don t care Status of service in use STATUS3 lamp Don t care Status of service in use USB1 and USB2 ports Not applicable Ports for connection of USB devices Only allowed for designated devices Elements in rear access area Name Status Meaning Off LAN connection unusable On Green LAN connection usable LINK lamp 4 places Blink Green Communication on LAN connection in progress Off 10 Mbps li...

Page 18: ...browser LAN facility When the user PC is to be connected to the Gateway via wired LAN LAN cable the PC needs to have a 1000BASE T 100BASE TX 10BASE T LAN port If the PC is not equipped with such a LAN port a third party LAN board or LAN card supporting 1000BASE T 100BASE TX 10BASE T as well as relevant LAN driver need to be installed on the PC in accordance with applicable instructions When the us...

Page 19: ... or higher Under Mac OS X 10 4 or higher Safari 3 0 4 or higher NOTICE Hitachi Ltd recommends Internet Explorer 9 0 to Windows user Notes on browser settings and browser operation Under Windows avoid proxy server connection to any external network Otherwise display or operation may be incorrect Enable use of JavaScript on the browser as applicable Depending on the type or settings of the browser i...

Page 20: ...These default wireless LAN settings i e Service Set IDs SSIDs and relevant Security Encryption Keys comprising Pre Shared Key PSK and Wired Equivalent Privacy WEP key are shown on the equipment label as illustrated below Note The illustrated label is for reference only and may differ on actual units INFORMATION Take utmost care in managing the medium that contains a copy of default wireless LAN se...

Page 21: ... sure to keep the Gateway away from a possible source of noise such as refrigerator or television set WARNING Always install the Gateway right side up Do not lay the Gateway on its side or place it upside down Do not place any objects on top of the Gateway Failure to follow these instructions may result in a fire Vertical installation on horizontal surface Wall mounting installation Stand The Gate...

Page 22: ...eway in a poorly ventilated area may case the Gateway to become overheated and may result in fire or damage to the Gateway 1 Combine the vertically oriented Gateway and the stand by sliding the hook plates on the bottom of the Gateway into the mating slots on the upper surface of the stand until they snap into place Stand The Gateway 2 Place the combined Gateway and the stand on a horizontal surfa...

Page 23: ...y Location where the tip of the wall mounting screw may damage cables routed behind the wall or thrust out the other side of the wall in the next room When mounting the Gateway onto the stand secured on the wall unmounting the Gateway from the stand secured on the wall or connecting a cable on the Gateway mounted on the wall support the Gateway by hand to avoid extra mass To perform wall mounting ...

Page 24: ...s of the Gateway There is enough thickness so that the tip of the wall mounting screw may not damage cables routed behind the wall or thrust out the other side of the wall in the next room 3 Detach the Gateway from the stand by sliding the hook plates on the equipment label side of the Gateway away from the mating slots on the front surface of the stand until they come off 4 Place the stand to the...

Page 25: ...of the Gateway into the mating slots on the front surface of the stand until they snap into place Pay attention not to apply extra mass on the stand during or after mounting 6 While supporting the Gateway by hand to avoid extra mass mount the attached USB caps on the unused USB ports in the front access area of the Gateway see Section 1 2 for the port location ...

Page 26: ... the Gateway do the steps below 1 Unmount the Gateway carefully from the stand in the reverse manner of mounting Pay attention not to apply extra mass on the stand during unmounting 2 Remove the two wall mounting screws and the stand from the wall ...

Page 27: ...for the port location When performing this insertion on the Gateway mounted on the wall support the Gateway by hand to avoid extra mass Keep this connection throughout use of the Gateway 2 First time only Connect the cord connector of the attached power cord fully into the slot in the AC adapter if they are not yet connected Keep this connection throughout use of the Gateway 3 While holding the pl...

Page 28: ...en the LAN port of the WAN side equipment and the WAN port in the rear access area of the Gateway until you hear a click from each port connection When performing this connection on the Gateway mounted on the wall support the Gateway by hand to avoid extra mass Note Equipment layouts and destination connection shown above are for reference only These layouts and connection must be made according t...

Page 29: ...rocured according to Subsection 1 3 3 Connect this LAN cable between the LAN port of the destination equipment and one of the LAN ports LAN1 through LAN4 in the rear access area of the Gateway until you hear a click from each port connection When performing this connection on the Gateway mounted on the wall support the Gateway by hand to avoid extra mass area of LAN ports only Note Equipment layou...

Page 30: ...y 5 1 2 Determination of Security Encryption Key You can determine the Security Encryption Key by choosing either of the default Security Encryption Key values for SSID 1 and SSID 2 which you copied in Subsection 1 3 4 based on the conditions below Default Security Encryption Key for SSID 1 applies to WPA PSK TKIP WPA PSK AES WPA2 PSK TKIP WPA2 PSK AES or WPA PSK WPA2 PSK TKIP AES Default Security...

Page 31: ...on Type 10 characters in any combination of hexadecimal letters 0 to 9 a to f and A to F case sensitive 5 default for SSID 2 128 bit WEP key with 13 digit alphanumeric Configuration Type 13 characters in any combination of alphanumerics 0 to 9 a to z and A to Z case sensitive and specific symbols other than space apostrophe single quote double quote comma and backslash Entry of all asterisks is no...

Page 32: ...on page navigates to the SSID Entry Editor page where you can confirm the current encryption method and other configuration details of the selected SSID 8 If you wish to create a new PSK or a new WEP key select encryption method parameters and type encryption key characters in applicable fields of the SSID Entry Editor page according to the rules aforementioned Finally click Set button on the same...

Page 33: ...st 4 The SSID Entry Editor page navigates to the MAC Filtering page shown below 5 In MAC Address field of Accept MAC Address section type the MAC address of the user PC for wireless connection according to the rules below Hexadecimal letters 0 to 9 a to f and A to F not case sensitive and colon in the form of xx xx xx xx xx xx are accepted If the user PC shows a hyphen as a separator use a colon i...

Page 34: ...etween the user PC and the Gateway 3 On the user PC click Start button Windows logo button and click Control Panel 4 Click Network and Internet and click Connect to a network to navigate to the wireless LAN connection page 5 In the list of SSIDs select the SSID value you determined in Subsection 5 1 1 emg21 1 for SSID 1 and emg21 2 for SSID 2 where depends on the actual unit 6 In Security key fiel...

Page 35: ... connect to a wireless network from the list of connection options and click Next button 7 In Network Name field type the SSID value you determined in Subsection 5 1 1 emg21 1 for SSID 1 and emg21 2 for SSID 2 where depends on the actual unit 8 In Security Type field select an option according to your preference encryption type is automatic WPA2 Personal is recommended for an IEEE 802 11n based us...

Page 36: ...lick Network and Internet connections 5 Click Network Connections 6 Right click Wireless Network Connection and select View Available Wireless Networks from the drop down menu to open the Wireless Network Connection window 7 In the list of SSIDs select the SSID value you determined in Subsection 5 1 1 emg21 1 for SSID 1 and emg21 2 for SSID 2 where depends on the actual unit 8 In Security key fiel...

Page 37: ...etworks tab check Use Windows to configure my wireless network settings check box and click Add button 10 Click Association tab 11 In Network name SSID field type the SSID value you determined in Subsection 5 1 1 emg21 1 for SSID 1 and emg21 2 for SSID 2 where depends on the actual unit 12 In Network Authentication and Data encryption fields select each option according to your preference A combin...

Page 38: ...r right menu bar and select Turn AirPort On in the menu Note If Turn AirPort On is not available in the menu and Turn AirPort Off is shown instead first select Turn AirPort Off in the menu and then select Turn AirPort On in the menu 4 In the list of SSIDs select the SSID value you determined in Subsection 5 1 1 emg21 1 for SSID 1 and emg21 2 for SSID 2 where depends on the actual unit 5 In Passwor...

Page 39: ...ld select an option according to your preference WPA2 Personal is recommended for an IEEE 802 11n based user PC 9 In Password field type the Security Encryption Key value you determined in Subsection 5 1 2 Click Add button 10 Ensure that the specified SSID appears in the list of Preferred Networks section Click OK button to close the AirPort dialog 11 In the Network dialog returned select the spec...

Page 40: ...ise firmware upgrade will not complete successfully When the Gateway has downloaded a new version firmware file and is manually restarted before the predefined timeframe by unplugging and plugging the power cord the Gateway starts up in the new firmware version When the Gateway starts up in the state of factory shipment and a new firmware version is found after this startup process the Gateway aut...

Page 41: ...e EMS Gateway setup page https 192 168 24 1 by default in the address bar of your browser and hit the Enter key A log in dialog opens 4 Type your user ID user by default and password user by default in applicable fields and click OK button 5 The top page of the setup page opens The firmware version currently installed in the Gateway appears in Firmware Version section 6 Close the browser to log ou...

Page 42: ...etwork Checking for new version firmware file once within 24 hours of initial startup of the Gateway and once per day thereafter Downloading of new version firmware file Upgrading of firmware in the Gateway as scheduled User PC for setting operation The timeframe for upgrading the firmware is set by default to a certain hour of day between 1 a m to 5 a m and actual time for upgrading the firmware ...

Page 43: ...er by default and password user by default in applicable fields and click OK button The top page of the setup page opens 5 Click Administration from menu to drop down the list and click Firmware Upgrade in the list 6 The top page navigates to the Firmware Upgrade page shown below Ensure that enable check box in Auto Reboot field of Auto Reboot section is checked 7 In Reboot Time field of Auto Rebo...

Page 44: ... your browser and hit the Enter key A log in dialog opens 4 Type your user ID user by default and password user by default in applicable fields and click OK button The top page of the setup page opens 5 Click Administration from menu to drop down the list and click Firmware Upgrade in the list The top page navigates to the Firmware Upgrade page shown below 6 Click Browse button in Local Firmware U...

Page 45: ...ptom Suspected Cause and Action To Be Taken a The POWER lamp in the front access area of the Gateway is not lit in green Check if the power cord plug is firmly inserted in the outlet Try connecting any other device to the outlet to see if the power is supplied to the outlet If the power cord is plugged to a service outlet of any other device such as PC plug the power cord directly to a mains outle...

Page 46: ...rring to instruction manual of the connected PC set up the wired LAN connection of the connected PC so that the IP address of the connected PC is automatically assigned by DHCP server the Gateway To cause the above setting to take effect the Gateway needs to start up and become ready prior to startup of the connected PC To ensure this recycle power of the connected PC while the Gateway is running ...

Page 47: ...e ensure that the values of WEP Key Index and WEP Keys 1 to 4 match between the Gateway and the user PC When MAC address filtering is in use ensure that the MAC address of the user PC is registered to the Gateway according to the procedure of Section 5 2 Wireless LAN connection may fail when the encryption setting of an IEEE 802 11n based user PC is WPA PSK TKIP or WPA2 PSK TKIP To ensure communic...

Page 48: ...MATION Log in authentication settings of user ID and password are important personal information which if stolen may be abused Take utmost care in managing your user ID and password Initialization completely deletes the settings you made to the Gateway It is advised that you back up the current settings onto a hard disk of your PC or similar medium before you perform initialization To perform init...

Page 49: ...Modulation Orthogonal frequency division multiplexing OFDM Data rate HT20 144 4 130 117 104 78 72 2 65 58 5 52 39 26 19 5 13 6 5 Mbps auto sensing HT40 dual channel 300 270 243 216 162 150 135 121 5 108 81 54 40 5 27 13 5 Mbps auto sensing Antenna Diversity multiple input and multiple output MIMO with 2 transmit and 2 receive antennas built in USB port Physical interface Right Angle to Type A Fema...

Page 50: ...e Set Identifier Stealth ESSID Stealth MAC address filtering Multiple Service Set Identifiers Multiple SSIDs Encryption SSID 1 Selectable among no encryption WPA PSK TKIP WPA PSK AES WPA2 PSK TKIP WPA2 PSK AES and WPA PSK WPA2 PSK TKIP AES SSID 2 Selectable among no encryption WEP 64 bits WEP 128 bits WPA PSK TKIP WPA PSK AES WPA2 PSK TKIP WPA2 PSK AES and WPA PSK WPA2 PSK TKIP AES Other Automatic...

Page 51: ...ction including without limitation the rights to use copy modify merge publish distribute sublicense and or sell copies of the Software and to permit persons to whom the Software is furnished to do so subject to the following conditions The above copyright notice and this permission notice shall be included in all copies or substantial portions of the Software THE SOFTWARE IS PROVIDED AS IS WITHOU...

Page 52: ...http www openssl org 4 The names OpenSSL Toolkit and OpenSSL Project must not be used to endorse or promote products derived from this software without prior written permission For written permission please contact openssl core openssl org 5 Products derived from thissoftware may notbe called OpenSSL nor may OpenSSL appear in their names without prior written permission of the OpenSSL Project 6 Re...

Page 53: ...y form must reproduce the above copyright notice this list of conditions and the following disclaimer in the documentation and or other materials provided with the distribution 3 All advertising materials mentioning features or use of this software must display the following acknowledgement This product includes cryptographic software written by Eric Young eay cryptsoft com The word cryptographic ...

Page 54: ...pon request a medium containing source code subject to GPL and LGPL may be provided to the requestor If you wish to obtain such a medium follow instructions at http www hitachi co jp products it network gpl_emsgw index html This provision of medium may be a paid service inclusive of cost for medium postage packaging labor tax and other fees as applicable ...

Page 55: ...ion stored in the Gateway by taking note thereof on paper or similar method Third party products mentioned in this manual if any are for reference only and not intended for mandatory use The content of this manual the hardware the software and the external appearance of the Gateway may be revised in future without prior notice Analysis including but not limited to reverse compiling reverse assembl...

Page 56: ...e by one or more of following measures Reorient or relocate the receiving antenna Increase the separation between this device and receiver Connect this device into an outlet on a circuit different from that to which the receiver is connected Consult the dealer or an experienced radio TV technician for help Modifications The FCC requires the user to be notified that any changes or modifications to ...

Reviews: