3
.
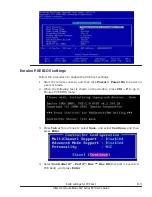
Select Boot Manager, and then press Enter.
4
.
Select Add Boot Option or Add WOL Boot Option on Boot Manager
window, and then press Enter.
5
.
Select Generic Boot Option on Add Boot Option window, and then press
Enter.
6
.
Select PXE Network on Generic Boot Option window, and then press
Enter. PXE Network is deleted from the list.
Note: It may take one or two minutes to delete PXE Network from the
list.
Do not perform another operation until deleting PXE Network from the
list.
7
.
Press ESC to go back the Boot Manager window.
8
.
Select Change Boot Order or Change WOL Boot Order on Boot
Manager window, and then press Enter.
9
.
Select Change the Order on Change Boot Order window, and then press
Enter.
10
.
Select PXE Network, and select a item that is one line below Legacy
Only, and then press Enter.
BIOS settings for PXE boot
8-5
Hitachi Compute Blade 500 Series EFI User's Guide
Summary of Contents for Compute Blade 500 Series
Page 8: ...viii Hitachi Compute Blade 500 Series EFI User s Guide ...
Page 14: ...xiv Preface Hitachi Compute Blade 500 Series EFI User s Guide ...
Page 445: ...SAS configuration utility 7 11 Hitachi Compute Blade 500 Series EFI User s Guide ...
Page 468: ...7 34 SAS configuration utility Hitachi Compute Blade 500 Series EFI User s Guide ...
Page 475: ...BIOS settings for PXE boot 8 7 Hitachi Compute Blade 500 Series EFI User s Guide ...
Page 476: ...8 8 BIOS settings for PXE boot Hitachi Compute Blade 500 Series EFI User s Guide ...
Page 504: ...10 12 Fibre channel over Ethernet FCoE Hitachi Compute Blade 500 Series EFI User s Guide ...
Page 505: ...Hitachi Compute Blade 500 Series EFI User s Guide ...


