background image

*2238935*

2238935

English

17

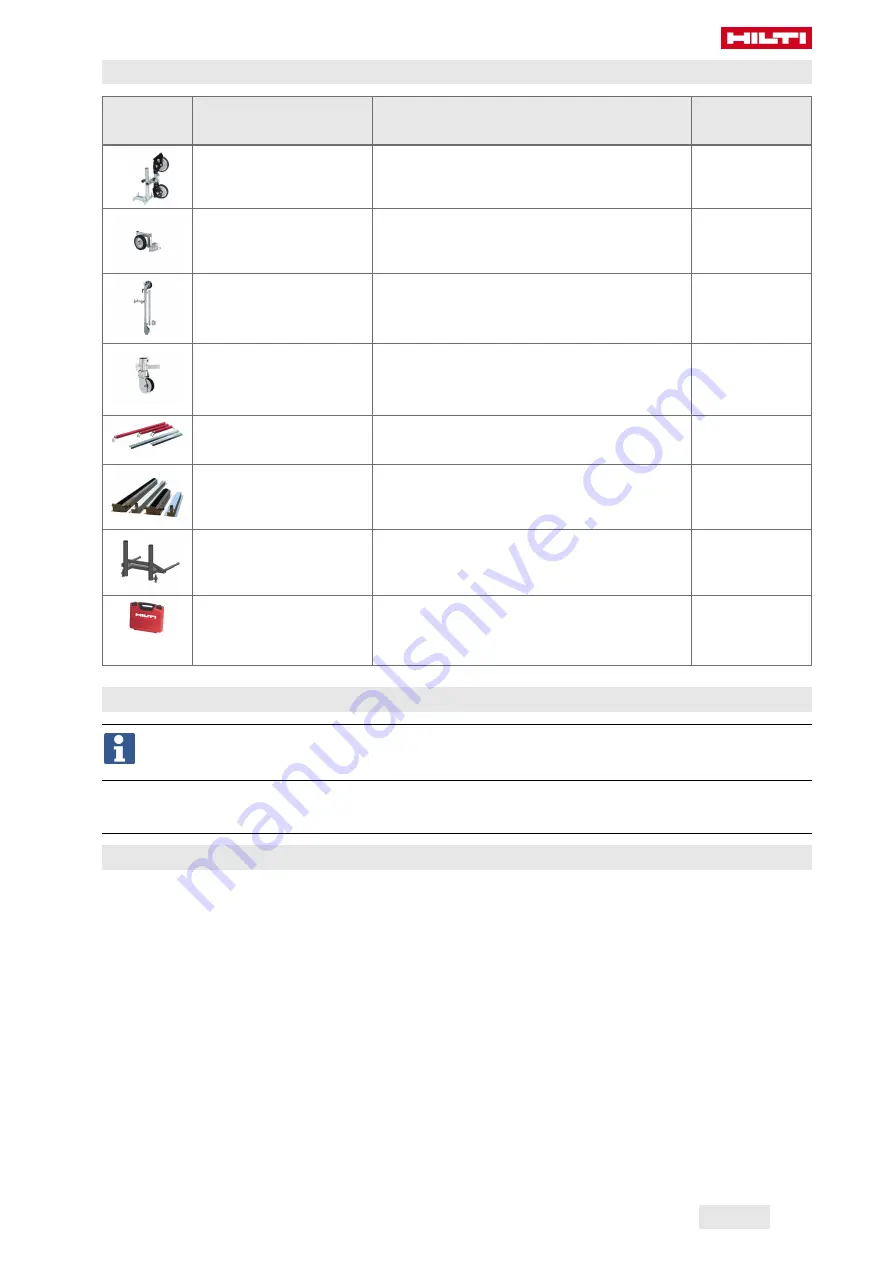
5.2 Accessories for diamond wire saws

Acces-

sories

Designation

Description

Material

number

Single-pulley stand

DSW-SPP

Guides the diamond wire from the

drive unit to the structure to be cut.

2205152

Release pulley

DS-WSRW

At the start of a new cut, reduces

friction at the edges.

315834

Plunge wheel

DSW-PW

Permits a plunging initial cut (plunge

cut) whenever there is no access to

the rear of the structure.

365428

Plunge wheel

(pivoting)

DSW-PW

Permits cutting of the bottom, final

section after cutting with the plunge

wheel.

247620

Guards

DSW-WG 250

Reduces the risk of injury at exposed

runs of the diamond wire.

2205155

Dust cover

DSW-DH 1.1-2.0

Reduces the quantity of dust pro-

duced, for example when dry cutting.

2012573

Vertical-cut rig

DSW-PW1510-CA

Permits cutting of columns and

beams.

2301713

Hilti

tools set

Contains anchor-setting tools and

accessories.

2048470

2048471

(US)

5.3 Accessories and wear parts for the wire saw system

Hilti

approved wear parts and other accessories for your product can be found in

your local

Hilti Store

or at:

www.hilti.group

6

Preparations at the workplace

6.1 Planning and safety

6.1.1 Planning the cuts to be made

Ask the site engineer or architect for confirmation of the exact position of the cuts to be

made and make sure that any pipes, conduits or tensioning cables etc. that are to be cut

through do not present any risks or hazards.

Bear in mind that the parts cut away might have to be divided into smaller, more easily

manageable sections for removal and transport (i.e. on account of permissible floor

loads, loading capacity of lifting equipment, size of door openings, etc.).

6.1.2 Planning wire guidance and sequence of cuts

Thorough training and experience are the most important prerequisites for optimum

planning of the sequence of cuts and wire guidance system.

Do not exceed the system’s performance rating when planning the length of the cut. Avoid

cutting in a very flat arc (slow rate of progress) and in over-tightly radiused arcs and do not

try to turn the diamond wire at a sharp angle (possibility of damaging the diamond wire).

Summary of Contents for DSW 1510-CA

Page 1: ...DSW 1510 CA English...

Page 2: ......

Page 3: ...DSW 1510 CA Original operating instructions...

Page 4: ......

Page 5: ...warnings 5 2 2 Proper arrangement of the workplace 7 2 3 Protection against electric shock 8 2 4 Safety during operation 8 2 5 Safety concept for working with wire saws 9 2 5 1 Description of the dan...

Page 6: ...and connections 22 7 1 1 Requirements to be met by the set up location 22 7 1 2 Setting up drive unit 23 7 1 3 Drilling through holes for wire guidance 23 7 1 4 Fastening a pulley stand 23 7 1 5 Conn...

Page 7: ...Observe the safety instructions and warnings in this documentation and on the product Always keep the operating instructions with the product and make sure that the operating instructions are with th...

Page 8: ...and refer to the numbers used in the product overview section This symbol is intended to draw special attention to certain points when han dling the product 1 3 Additional symbols for this product 1...

Page 9: ...ity that the product described here complies with the applicable directives and standards A copy of the declaration issued by the certification department can be found at the end of this documentation...

Page 10: ...tools that have the switch on invites accidents Remove any adjusting key or wrench before turning the power tool on A wrench or a key left attached to a rotating part of the power tool may result in...

Page 11: ...out of service Ensure that good lighting is in use Make sure that the workplace is well ventilated Poorly ventilated workplaces can result in damage to health because of exposure to dust Keep the work...

Page 12: ...ppliance repaired only by a trained electrical specialist Hilti Service using genuine Hilti spare parts Failure to observe this point can put the user at risk Connect the machine and its ancillary equ...

Page 13: ...g platforms or ladders is used check that this equipment complies with regulations that it is undamaged and set up in accordance with regulations Avoid awkward postures Maintain firm footing and balan...

Page 14: ...es Make sure that no one enters the danger zones 2 5 3 Danger zone B shown here colored gray Protection against flying fragments In regular operation and in the event of a wire break parts e g fragmen...

Page 15: ...taking protective measures guards etc as necessary National regulations and laws as well as the operating instructions and the safety information applicable to the accessories used e g sawing wire fas...

Page 16: ...le Box for electrical components Drive motors Connections water supply for water nozzles Starting lock Compressed air cylinder guide Compressed air cylinder 3 1 3 Transport devices Lifting eyes Transp...

Page 17: ...Clamping lever for adjustment of guide pulleys Guide pulley axle with mounting adapter protective tubes 3 2 Intended use The product described is an electro pneumatic wire saw with integrated wire sto...

Page 18: ...when the wire saw is in operation 3 5 Operating principle The wire is driven by two electric motors fitted with drive pulleys The diamond wire is looped round the two drive pulleys and the wire storag...

Page 19: ...280 mm Diameter guide pulley 9 4 in 240 mm Protection class in accordance with IEC 60529 IP 54 Ambient temperature operation 14 113 10 45 Ambient temperature storage 5 122 15 50 Wire storage capacity...

Page 20: ...ing of anchor Uncracked con crete HKD M16x65 5 Tools and accessories 5 1 DS W diamond wires The use of high grade diamond wires and connectors matched to the application and the wire saw is essential...

Page 21: ...aw system Hilti approved wear parts and other accessories for your product can be found in your local Hilti Store or at www hilti group 6 Preparations at the workplace 6 1 Planning and safety 6 1 1 Pl...

Page 22: ...of taking up the resulting loads Can the possibility of hazards or damage as a result of the cooling water used be ruled out Can the work zone be secured to such an extent that persons cannot be injur...

Page 23: ...2238935 2238935 English 19 Vertical cut release pulley Fast cutting process with high load and lesser longevity of diamond wires Horizontal cut Doorway cut right Doorway cut bottom Doorway cut top...

Page 24: ...vice Beam cut with horizon tal vertical device Plunge cut Bottom cut with plunge cut device using the plunge pulley accessory 6 3 Determination of storage capacity needed and necessary wire length Key...

Page 25: ...the electric socket supplied Pin assignment 3P E X Phase 1 Y Phase 2 Z Phase 3 E Ground conductor earth The wire saw will run even if the electricity supply has only 4 conductors 3 phases and 1 ground...

Page 26: ...re pressure in the water supply line is low a non return valve should be fitted in order to prevent dirty water finding its way into the water supply Use a pressure reduction valve if the line pressur...

Page 27: ...t so that it is firm and steady 4 Secure the drive unit with anchors at the feet anchoring or with ratchet straps so that it cannot slip 7 1 3 Drilling through holes for wire guidance When sawing thro...

Page 28: ...e clamping spindle and bring it into correct alignment 7 Screw the clamping nut on to the clamping spindle and tighten it firmly with an open ended wrench I 8 Tighten the leveling screws evenly until...

Page 29: ...or use in the operating instructions of the compressor max 10 bar 10 Remove the guard from the electricity connector by turning the locking sleeve counter clockwise to disengage it 11 Using a suitable...

Page 30: ...ire to a minimum The length and height of the wire arc influence the rate of progress and the service life of the diamond wire Note the cutting direction indicator on the diamond wire You can also ide...

Page 31: ...tion the drive unit closer to the structure 11 Feed the diamond wire through the hollow axle of the guide pulley taut wire side 8 12 Twist the diamond wire counter clockwise 1 to 1 5 turns per running...

Page 32: ...used Use a closed water circuit and pipe the discharged water to a drain or reservoir It might be necessary to re adjust the water spray nozzles as sawing progresses 1 Connect the water supply to the...

Page 33: ...y the wire Do the electric power and water connections meet the necessary requirements 8 2 Starting drive unit and beginning sawing The following preconditions must be satisfied before you start the s...

Page 34: ...he alignment of the guide pulleys and if necessary change wire speed and advance pressure Toward the end of the cut the arc followed by the wire becomes flatter with corresponding reductions in the di...

Page 35: ...etracted As soon as you release the Wire tension operating button the cylinder stops retracting and remains in its current position 5 Lay the diamond wire round the next storage levels 6 Adjust the po...

Page 36: ...components may lead to serious injuries including burns Repairs to the electrical section of the tool or appliance may be carried out only by trained electrical specialists Check all visible parts and...

Page 37: ...wer supply 3 Remove residues adhering to the housing 4 Open the cover of the drive unit 5 Clean the wire storage pulleys and drive pulleys 6 Clean the pneumatic cylinder and guide unit 9 2 Blow remain...

Page 38: ...stand 1 Remove the pulley 2 Remove the worn sealing rings 2 of 1 3 Remove the ball bearings by using a suitable tool to press out the ball bearings from the inside toward the outside 2 4 Press in the...

Page 39: ...ts and controls for signs of damage and make sure that they all function correctly Storage Always store this product with the electric supply cable unplugged from the electricity supply Bear in mind t...

Page 40: ...n into position The catch is re engaged 6 Repeat these steps on the opposite side The drive unit is now ready for transport Where access is awkward the drive unit can also be maneuvered into position...

Page 41: ...not used Use the starting lock lock the sleeve directly at the air cylinder Sawing wire installed wrong way round Check the sawing wire is installed for the correct direction of travel Uneven one sid...

Page 42: ...ates very strongly at a high frequency Wire tension too high in rela tion to length of cut Increase the length of cut Reduce tension on the wire Wrong speed Set the correct speed Excessive sawing wire...

Page 43: ...he electricity supply on the jobsite Er207 Automatic cut out due to overload Sustained overload opera tion of the drive unit Make sure that the diamond wire can pass freely through the cut Reduce the...

Page 44: ...which can be determined by turning the equipment off and on the user is encouraged to try to correct the interference by taking the following measures Re orient or relocate the receiving antenna Incr...

Page 45: ......

Page 46: ......

Page 47: ......

Page 48: ...Hilti registered trademark of Hilti Corp Schaan 20210317 2238935 2238935...

Reviews: