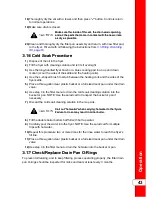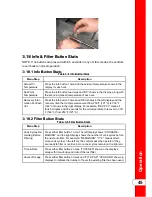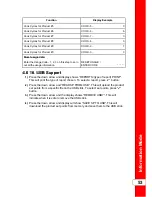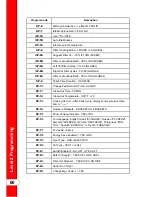
56
8
8))
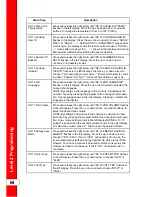
Press the right arrow until “ASSIGN BTN” shows in the display, along with the
product (ex: NUGGETS). If this product already has a product button assigned
to it, that LED will be lit. To assign other product buttons to that product, press
and hold the product button for 3 seconds and that LED stays lit. To remove a
product from a button, press and hold the product button with a lit LED and the
LED goes out.
C
Ch
ha
an
ng
ge
e T
Tiim
me
ess &
& T
Te
em
mp
pe
erra
attu
urre
e
9
9))
Press the right arrow until “COOK TIME” shows in the display, and then use the
product buttons, or the up or down arrow, to change the time in minutes and
seconds, to a maximum of 59:59.
1
10
0))
Press the right arrow and “TEMP” shows in the display, along with the preset
temperature on the right side of the display. Press the product buttons, or the up
or down arrow, to change the temperature. The temperature range is 190°F (88°
C) to 375°F (191°C).
C
Co
oo
okk IID
D C
Ch
ha
an
ng
ge
e
1
11
1))
Press the right arrow until “COOK ID” shows in the display along with the
product ID. For example, “NUG” would be the ID for nuggets. Use the product
buttons, or the up or down arrow, to change the ID.
A
Alla
arrm
mss ((1
1 &
& 2
2))
1
12
2))
Press the right arrow until “ALRM 1” shows in the left display, and an alarm time
in the right display. Press the product buttons, or the up or down arrow, to set an
alarm. Ex., If a Cook Cycle was set at 3 minutes, and an alarm was to go off
after 30 seconds into the Cook Cycle, “2:30” would be set in the display at this
time. When the timer counts down to 2:30 the alarm sounds. After alarm time is
set, press the right arrow and “ALRM 2” shows in display, and a second alarm
can be programmed.
Q
Qu
ua
alliittyy T
Tiim
me
err ((H
Ho
olld
d T
Tiim
me
e))
1
13
3))
Press the right arrow until “QUAL TMR” shows in the display along with the
preset holding time. Press the product buttons, or the up or down arrow, to
adjust holding time, up to 2 hours: 59 minutes.
F
Fiilltte
err T
Trra
acckkiin
ng
g
1
14
4))
A
A.. G
Gllo
ob
ba
all F
Fiilltte
err T
Trra
acckkiin
ng
g -- IIn
nccllu
ud
de
e IIn
n F
Fiilltte
err C
Co
ou
un
ntt
Press the right arrow until “INCL IN FLTR CNT” flashes in display along with
“YES” or “NO”. Using the up or down arrow, change the display to “YES” if that
product’s Cook Cycles are to be counted as part of the recommended filter
process. Set to “NO” if it is not to be included.
B
B.. M
Miixxe
ed
d F
Fiilltte
err T
Trra
acckkiin
ng
g -- F
Fiilltte
err A
Afftte
err ““X
X”” N
Nu
um
mb
be
err O
Off L
Lo
oa
ad
dss
Press the right arrow until “FILTER AFTER ...” flashes in the left display, and the
number of cook cycles between filters shows in the right display. Press the
product buttons, or the up or down arrow, to change this value of 0 to 99 loads.
This needs set for each product.
L
Lo
oa
ad
d C
Co
om
mp
pe
en
nssa
attiio
on
n
1
15
5))
Press the right arrow until “LD COMP” shows in the display along with the load
compensation value. This automatically adjusts the time to account for the size
and temperature of the cooking load. Press the product buttons, or the up or
down arrow, to change this value of 0 to 20.
L
Lo
oa
ad
d C
Co
om
mp
pe
en
nssa
attiio
on
n R
Re
effe
erre
en
ncce
e
Summary of Contents for Wendy's Evolution Elite EEG-251
Page 2: ......
Page 5: ...Contents iii...
Page 14: ...Introduction 2...
Page 19: ...Installation 7 Figure 2 1 Flexible Gas Line Cable Restraint Installation...
Page 22: ...Figure 2 2 1 Well Dimensions Figure 2 3 2 Well Dimensions Installation 10...
Page 23: ...Figure 2 4 3 Well Dimensions Figure 2 5 4 Well Dimensions Installation 11...
Page 24: ...Installation 12...
Page 51: ...Operation 37...
Page 62: ...Operation 48...
Page 68: ...Information Mode 54...
Page 72: ...Product Program Mode 58...
Page 87: ...Troubleshooting 73...
Page 88: ...Troubleshooting 74...
Page 89: ...blank page...


