Henkelman Atmoz 2-75 User Manual Download Page 50

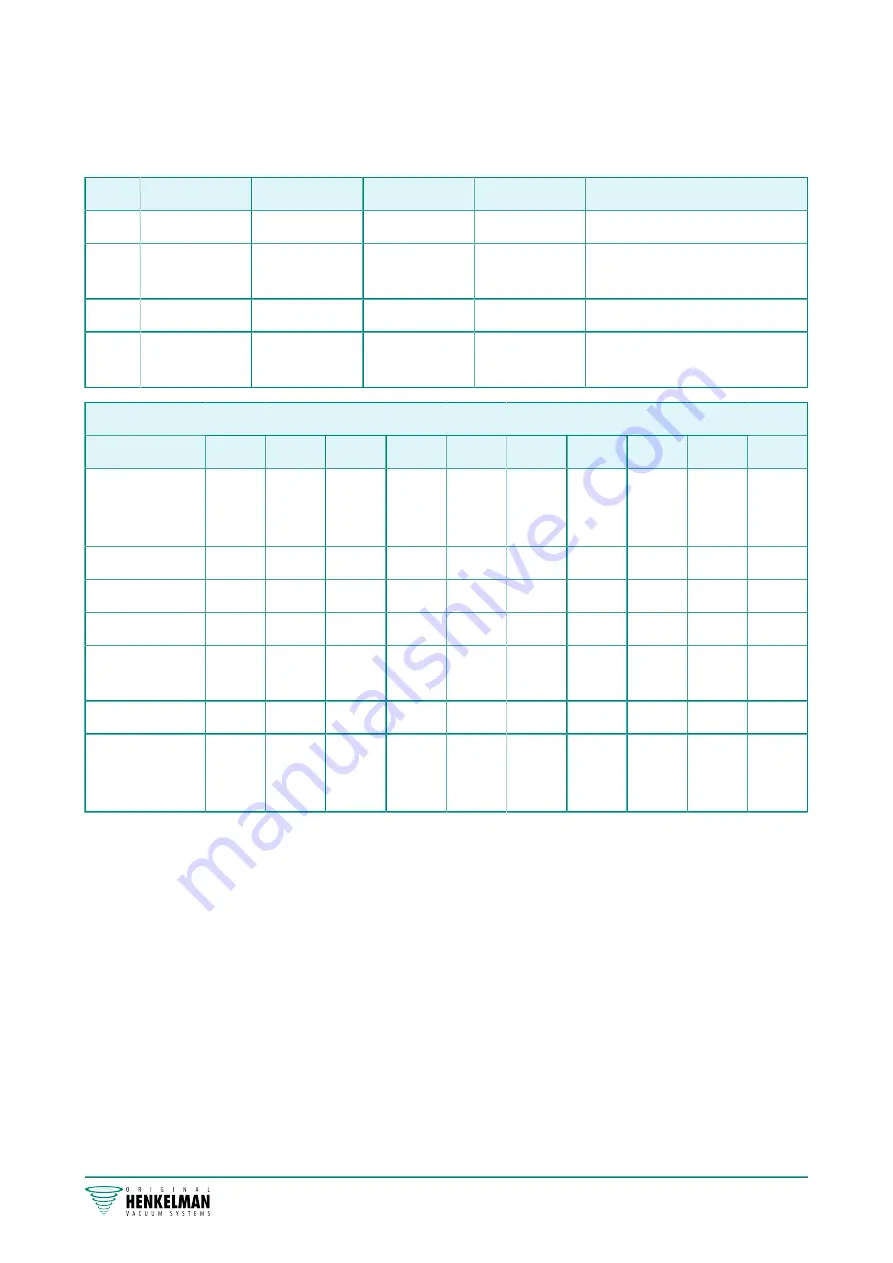
6.2.8    Example programmes

The vacuum packaging machine is equipped with sample programmes with pre-set parameters. It
is possible to optimise a program for your products by modifying the parameters.

Prog

Vacuum

Seal

Soft-air

Type of product

1.

99.8%

OFF

2.2 s

3 s

Solid products

2.

97%

N/A

2.2 s

OFF

Liquids/liquid-con-

taining products

3.

99.8%

OFF

2.2 s

8 s

Fragile/sharp products

4.

99.8%

4 s

2.2 s

3 s

Product that may con-

tain entrapped air

Set as sensor-controlled controlled by Liquid Control sensor (optional)

Prog no.

1

2

3

4

5

6

7

8

9

10

Vacuum

99.8% 99.8%

93% /

99.8%*

90% /

99.8%

**

99.8% 99.8% 99.8% 99.8%

95%

99,8%

OFF

OFF

OFF

OFF

OFF

OFF

OFF

5 s

OFF

Gas (optional)

OFF

OFF

40%

OFF

OFF

OFF

OFF

OFF

OFF

OFF

Seal

2.2 s

2.2 s

2.2 s

2.2 s

2.2 s

2.2 s

2.2 s

2.2 s

2.5 s

OFF

Seal 2 (option-
al)

2.2 s

2.2 s

2.2 s

2.2 s

2.5 s

2.5 s

4.0 s

3.5 s

2.5 s

OFF

Soft-air

OFF

5 s

OFF

OFF

OFF

OFF

OFF

OFF

5 s

OFF

Option on

Red

meat

Mari-

nade

Se-

quen-

tial

Jars

* Vacuum percentage when the gas option is enabled.

** Vacuum percentage when the liquid control sensor is enabled.

Operation     50

Summary of Contents for Atmoz 2-75

Page 1: ...Vacuum Packaging Machine Atmoz User Manual Art No 0895036 Original Instructions for Use Henkelman 2019...

Page 2: ...equirements as set out in Safety on page 10 at all times The correct operation and safety of the system can only be guaranteed if the recommended maintenance is performed on time and properly Illustra...

Page 3: ...n Components 15 4 2 Description of the Packaging Process Machine Functions 16 4 2 1 Packaging Process Machine Functions 16 4 2 2 General Functions 19 4 3 Sealing System 20 5 Installation 21 5 1 Transp...

Page 4: ...PC 39 6 2 5 2 Functions 40 6 2 5 3 Vacuum 40 6 2 5 4 Vacuum automatic 40 6 2 5 5 Vacuum optional 41 6 2 5 6 Gas optional 41 6 2 5 7 Gas optional 42 6 2 5 8 Liquid Control optional 42 6 2 5 9 Liquid Co...

Page 5: ...ew pump 63 300 m 3 h 59 7 7 2 Removing Oil Replacing Oil Filter Refilling Oil 59 7 7 3 Replacing the Oil Exhaust Filter 60 7 7 4 Running the Pump Cleaning Program 61 8 Troubleshooting and Error Codes...

Page 6: ...Exported Data Log 37 Figure 10 Screen shot of the navigation mode and the operating buttons of the ACS 38 Figure 11 Replacing the Printer Roll 48 Figure 12 Aligning the Printer 49 Figure 13 Printing...

Page 7: ...injury or death and or material damage if one does not obey the safety instructions Indicates a hazardous situation that if not avoided could result in minor or moderate injury and or material damage...

Page 8: ...therefore hereby excluded The responsibility of Henkelman BV is limited to replacing defective parts we shall not acknowledge claims for any other kind of damage or costs The warranty automatically ex...

Page 9: ...g lost profits damage to movable or immovable property or personal injury We are in no way liable for damages arising from or resulting from the use of the product used or the unsuitability thereof fo...

Page 10: ...ctograms on the Machine Pictograms and warnings have been fitted on the machine to warn users of the possible risks Warning sign High Voltage Is located on the back of the machine Warning sign Heat Is...

Page 11: ...ne has been designed in such a way that production is safe under normal ambient conditions The owner of the machine must ensure that the instructions in this manual are actually complied with The avai...

Page 12: ...may cause oil leaking back to the vacuum chamber 2 4 Warnings for Operating Personnel Operating personnel must be 18 years or older Only authorised persons are allowed to perform work on or with the...

Page 13: ...eloped and manufactured to meet the highest standards They combine a sleekly build and functional design with optimal ease of use and a long service life After mounting the plug it is just a matter of...

Page 14: ...e referred to the specific sections 4 1 Atmoz series Available as a single or double chamber vacuum packaging machine The Atmoz series is a full range of single and double chamber vacuum packaging mac...

Page 15: ...surface with the openings of the vacuum bags in the sealing position On machines with two vacuum chambers the already packaged product can be removed and new products can be placed on the free work su...

Page 16: ...e before they can be enabled Contact your supplier for more details 4 2 1 Packaging Process Machine Functions This section describes the packaging process and the machine functions See Operation on pa...

Page 17: ...h the optional Liquid Control sensor With the Liquid Control option the system is controlled by a highly sensitive sensor The sensor is able to detect the mo ment that liquids from the product or the...

Page 18: ...the last step The last vacuuming step has an ad justable value of up to 99 8 This also allows setting Vacu um The intermediate ventilation steps have a fixed value of 42 After the last step sealing t...

Page 19: ...emove the excess foil Depending on the selec ted model the cut off wire is controlled simultaneously with or independent from the sealing wire Seal 1 2 cut off Decompressing The vacuum is removed from...

Page 20: ...bag partially melts allowing the excess foil of the vacuum bag to be removed easily Teflon tape sealing and cut off wires are covered with Teflon tape to prevent the bag from sticking to the sealing...

Page 21: ...ve the machine slowly and carefully 1 Place the machine on a flat level surface This is essential to ensure a trouble free operation of the machine Do not position machines with plastic covers in the...

Page 22: ...ng the machine to a different three phase power supply the direction of rotation should be checked again If the direction of rotation is incorrect two phases in the plug must be interchanged Figure 3...

Page 23: ...rol System 1 Program display Shows the selected program 2 PROG 0 9 button This is used to select the desired program 3 REPROG button This is used to enable the programming mode The parameters can be c...

Page 24: ...um 11 On Off button Serves to turn the control panel on or off 6 1 2 Starting the Machine 1 Plug in the machine 2 Press the on off button on the control panel to enable the operation 3 dashes may be s...

Page 25: ...o activate the new parameter The function display will stop flashing 6 1 6 1 Vacuum During the cycle the air is removed from the chamber until the set time or pressure has been reached depending on th...

Page 26: ...ay indicates OFF The LED of the function display will remain on Vacuum 6 Press the STOP button and the VACUUM STOP button to adjust the value of Vacuum When setting a value a dot will appear in the bo...

Page 27: ...until H2O is shown on the parameter display The parameter display indicates H2O 4 Press the REPROG button to activate the new parameter The function display will stop flashing The Liquid Control func...

Page 28: ...ase contact your supplier for this To enable the Red Meat option on your machine please contact your supplier 6 1 6 9 Multi Cycle Vacuum optional The Multi Cycle Vacuum option allows you to vacuum and...

Page 29: ...button to activate the new parameter The function display will stop flashing To change the Cut off time 6 Press the Cursor key again The LED in front of Seal will still be lit Repeat steps 4 and 5 6...

Page 30: ...can be set for each function In order to understand the consequence of the set value the table below explains the consequences of giving a low or high value for each function For the values in the ta...

Page 31: ...ng process The value that can be set is the maximum achievable vacuum value Please keep in mind that this maximum vacuum value can only be achieved as long as the product does not start boiling Liquid...

Page 32: ...the next step in the cycle See Proceeding to the Next Step in the Cycle on page 24 By letting products cool down sufficiently prior to starting the vacuuming process a higher vacuum can be achieved I...

Page 33: ...ine It also displays the installed software version The user cannot take any action Navigation mode displays a program and its functions The user can navigate through the various programmes and view t...

Page 34: ...r code has been entered the machine settings menu will be opened When logged in the function settings can also be changed To do so return to the navigation mode by pressing The machine remembers the l...

Page 35: ...te format Time format 12h 24h Year Month Day Hour Minutes 1 4 Language English Espa ol Nederlands Francais Deutsch Additional language 1 5 Screen saver Screen saver On Off Waiting time in min 1 6 Opti...

Page 36: ...ata Log on page 37 6 2 1 3 1 Setting and Using the Data Log ID This setting is disabled by default This option can be enabled after logging in using the owner code 5 possible users can be set Owner Fo...

Page 37: ...settings 2 Within the menu go to Import Export and select Export 3 Insert a USB stick into the USB port Various options will appear on the screen 4 Select Export Data log The log will be downloaded to...

Page 38: ...Place the vacuum bag in on the vacuum chamber Make sure the opening s is are correctly placed with regard to the seal position s 3 Close the lid The packaging cycle will start 6 2 4 Proceeding to the...

Page 39: ...Enter to view and adjust the function settings Users can view the pre set configuration and the owner is also authorised to change it 4 Select the Machine Settings menu and press Enter to adjust the...

Page 40: ...e various programmes can then be programmed 6 2 5 3 Vacuum During the cycle the air is removed from the chamber until the set pressure has been reached sensor controlled To set the vacuum level follow...

Page 41: ...rn to the menu 5 Close the lid to start the vacuum cycle 6 2 5 6 Gas optional For the protection of the product it may be desirable to insert a gas into the packaging after vacuuming Optionally the ma...

Page 42: ...d to turn ON Liquid Control Press Enter 4 Use the cursor keys and to go to the value for Liquid Control and press Enter 5 Set the desired value using the cursor keys and and press Enter 6 Press the cu...

Page 43: ...he Pause Time and press Enter 7 Set the desired value using the cursor keys and and press Enter 8 Press the cursor key to return to the menu 9 Close the lid to start the vacuum cycle A Red Meat functi...

Page 44: ...s of 80 vacuum and 42 ventilation Then vacuuming will continue until the set vacuum of the last step If for instance 3 steps have been set with an end vacuum of 90 vacuuming will take place as follows...

Page 45: ...ess Enter 6 Press the cursor key to return to the menu 7 Close the lid to start the vacuum cycle 6 2 5 15 Seal This is the time that the sealing wire and or the cut off wire are heated The longer the...

Page 46: ...any time 1 Terminate the program Press the STOP button The program will be terminated and the vacuum chamber is decompressed 6 2 7 Printer A printer can be connected to the machine to print package la...

Page 47: ...ion for the label is entered the printer can be activated on each separate program To do this go to the main menu all the way to the right Here you can enable or disable the printer and select the lab...

Page 48: ...oll Follow the steps below to place the label roll in the printer Despite the inner diameter of the label roll being bigger than the holder the roll can be used without any issues Figure 11 Replacing...

Page 49: ...ltaneously for 2 seconds Figure 12 Aligning the Printer The printer will print several labels and determine the correct position 3 Press the Feed and Cancel button simultaneously for 2 seconds Figure...

Page 50: ...entrapped air Set as sensor controlled controlled by Liquid Control sensor optional Prog no 1 2 3 4 5 6 7 8 9 10 Vacuum 99 8 99 8 93 99 8 90 99 8 99 8 99 8 99 8 99 8 95 99 8 Vacuum OFF OFF OFF OFF OF...

Page 51: ...Vacuum 30 99 8 Rule of thumb the higher the vacuum the less oxygen remains in the package and the longer the shelf life of the product There are exceptions to this rule Vacuum 0 60 seconds This is the...

Page 52: ...ufficiently ef fective for the entrapped air to escape the Sequential Vacuum Multi Cycle Vacuum Step must be enabled In maximum five steps vacuuming is alternated with maintaining time Each step incre...

Page 53: ...monitor the vacuuming process The moment bubbles are formed or the product starts to bubble you should immediately proceed to the next step in the cycle See Proceeding to the Next Step in the Cycle o...

Page 54: ...r specific descriptions for performing maintenance activities consult the appropriate section Activity 1 D 1 W 6 M 1 Y 4 Y Cleaning Cleaning the machine X Inspections Check the oil level X Run the pum...

Page 55: ...d wash it with clean water 7 3 Replacing the Sealing Wire Depending on the specifications of your machine you can have one of the following combinations of sealing wires Wide seal one wide sealing wir...

Page 56: ...ing wire or cutting wire at the length of the sealing bar plus approximately 15 cm b First place the wire on one side of the sealing bar by tightening the screws 2 c Place the other end of the wire in...

Page 57: ...of silicone rubber by pressing it into the recess of the silicone holder Ensure that the silicone rubber is fully and uniformly placed in the recess It is also important that the surface of the silic...

Page 58: ...akage 3 Install the new gasket by pressing it into the gasket slot The lip of the gasket must face downwards and outwards The gasket should be placed in the slot evenly and without any tension The edg...

Page 59: ...o be refilled 6 Oil filter Filters the oil 7 7 2 Removing Oil Replacing Oil Filter Refilling Oil This section describes how to remove oil from the pump replace the oil filter and refill the oil See Ov...

Page 60: ...vents oil vapours from being emitted from the vacuum pump with the exhaust air If the filter becomes saturated the maximum vacuum level can no longer be reached Replace the filter in case of vacuum pr...

Page 61: ...rogram before using the machine for the first time after the machine has been stationary for a lengthy period of time and especially prior to changing oil Run the pump cleaning program every week If y...

Page 62: ...tivity after closing the lid Check or adjust the switch of the lid Contact your supplier Insufficient end vacuum Check the vacuum settings of the program and adjust them Make sure that the extrac tion...

Page 63: ...n F1 in display Check or adjust the switch of the lid Verify that the vacuum pump is running Contact your supplier F2 in display of the 10 PCS with sensor control Check whether the lid is open and res...

Page 64: ...y Check whether the lid is open Oil Notification if activated A service check is needed Contact your supplier Oil Alert if activated A service check is needed Contact your supplier Pump Cleaning Alert...

Page 65: ...of oil and components as household waste When repla cing oil or components at the end of the service life ensure that all ma terials are collected and disposed or reused in a legal and environment all...

Page 66: ...oduct height 280 mm 280 mm 280 mm Sealing pressure optional Connection size 6 mm 8 mm 8 mm Maximum supply pressure 1 bar 1 bar 1 bar Gas flush system optional Dimensions connector 8 mm 13 mm 13 mm Gas...

Page 67: ...k on the electrical installation The machine consists of the following electrical components Figure 20 Overview of the Electrical Installation 1 Control panel This serves to operate the control functi...

Page 68: ...10 3 Vapour Pressure Curve of Water Figure 21 Vapour Pressure Curve of Water Appendices 68...

Page 69: ...l maintenance work Major replacements and emergencies Modifications Tests of the emergency stop buttons and safety devices Date Performed by authority technician Description nature of the activities w...

Page 70: ...Date Performed by authority technician Description nature of the activities which parts have been replaced Appendices 70...

Page 71: ...71...

Page 72: ...Henkelman BV Titaniumlaan 10 5221 CK s Hertogenbosch 31 0 73 621 3671 31 0 73 622 1318 www henkelman com info henkelman com...

Reviews: