16
2: Installing LiteStar II Air
a. Secure the left and right flat panel plates to the lightbar
using the enclosed captive screws.
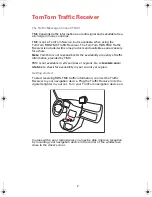
Notice the capitve screw holes are offset to the outside edge of
the plate. Also notice that the front of the lightbar should face
the thin edge of the plate; the rear of the lightbar rests on the
thick edge of the plate.
b. Tighten the captive screws using a 3/16” Allen wrench.
c.
Assemble the 2 sets of 1” brackets using the #10-32 x
5/8” bolt, nut, and washer sets. You can substitute the
WARNING!
If you have the left and right plates reversed, it is still
possible to line up the plates so the arrows are pointing
“outside.” However, the screw holes on the lightbar and the
flat panel plate will not line up if you have them reversed.
Right
Left
Front
Rear
Left and right flat
panel plates
Front of lightbar faces thin
edge of plate (plates are
sloped)
LiteStar II Air.book Page 16 Thursday, June 7, 2007 4:02 PM
Summary of Contents for LiteStar II Air
Page 1: ...LiteStar II Air User Guide Part No 875 0103 001 Rev B1 ...
Page 3: ...LiteStar II Air book Page 2 Thursday June 7 2007 4 02 PM ...
Page 19: ...LiteStar II Air book Page 10 Thursday June 7 2007 4 02 PM ...
Page 35: ...LiteStar II Air book Page 26 Thursday June 7 2007 4 02 PM ...
Page 49: ...LiteStar II Air book Page 40 Thursday June 7 2007 4 02 PM ...
Page 63: ...LiteStar II Air book Page 54 Thursday June 7 2007 4 02 PM ...
Page 77: ...LiteStar II Air book Page 68 Thursday June 7 2007 4 02 PM ...
Page 116: ...LiteStar II Air User Guide 107 LiteStar II Air book Page 107 Thursday June 7 2007 4 02 PM ...
Page 126: ...APPENDIX B GLOSSARY LiteStar II Air book Page 117 Thursday June 7 2007 4 02 PM ...
Page 135: ...www hemispheregps com e mail info hemispheregps com ...