background image

v

17  THERMOMETER (TEMPERATURE GAUGE)  


55

18 

ELECTRICAL 


56


A Electrical 

Supply          56

 B 

Electrical 

Supply 

Junction 

Box 

        56

 C 

Double 

Electrical 

Outlets 

at 

rear        57

 D 

Water 

Temperature 

Probe 

        57

 E 

High 

Water 

Temperature 

Safety 

Shutoff 

Controller 


     57

 F Front 

Light 

and 

Fan 

Power 

Switch 

       58

 G 

In 

The 

Event 

of 

Power 

Failure        59

19 

ELECTRONICS 

          60


A Controller 

          60

20   EXTERIOR CLADDING AND INSULATION   


61


A Outer 

Door 

of 

HEATMOR™ 

        61

 B 

Roof 

of 

the 

HEATMOR™ 

        61

 C 

Sides 

of 

the 

HEATMOR™ 

        62

 D 

Insulation 

          62

21 

AIR 

LEAKS         


63


A Checking 

For 

Air 

Leaks         63

 B 

Why 

do 

we 

not 

want 

any 

air 

leaks? 

       63

22 

WATER 

LEAKS 


64

23 

DOMESTIC 

COIL        


65

24  SEASON START UP & SHUT DOWN CHECKLISTS 


66-67 

25 

FREQUENTLY 

ASKED 

QUESTIONS 


69-70

26 

TROUBLESHOOTING 

AND 

SOLUTIONS    


71-83


HEATMOR™ STAINLESS STEEL LIMITED WARRANTY  


84-85

 NEW 

FURNACE 

DELIVERY 

CHECK 

LIST 

     86

 HEATMOR™ 

FOR 

LIFE       


87

 NOTES 


88

 WIRING 

DIAGRAM 

         89-90 


Summary of Contents for 400-4S

Page 1: ...Outdoor Furnaces TM SAVE THESE INSTRUCTIONS...

Page 2: ...lert you to the possibility of damage to your HEATMORTM Stainless Steel Outdoor Furnace if you do not comply with the corresponding instructions Please read the instructions carefully The HEATMORTM St...

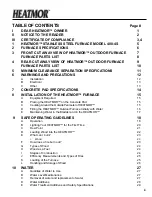
Page 3: ...R on the Concrete Pad 15 C Caulking Around the Outside Perimeter of HEATMOR 15 D Filling the HEATMOR Outdoor Furnace Initially with Water 16 E Maintaining Water in the Bladder and in the HEATMOR 17 9...

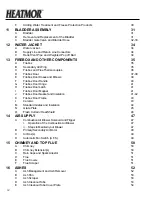
Page 4: ...e 41 H Firebox Door Latch 41 I Firebox Door Magnet 41 J Firebox Door Gasket and Insulation 41 42 K Firebox Door Frame 43 L Ceramic 43 M Standard Grates and Insulation 44 N Grate Plate 45 O Flash Curta...

Page 5: ...60 A Controller 60 20 eXTERIOR CLADDING AND INSULATION 61 A Outer Door of HEATMOR 61 B Roof of the HEATMOR 61 C Sides of the HEATMOR 62 D Insulation 62 21 AIR LEAKS 63 A Checking For Air Leaks 63 B W...

Page 6: ...hope you enjoy the comforts of burning wood This manual contains the manufacturer s recommendations for operation and maintenance of the HEATMOR Stainless Steel Outdoor Furnace Also included are some...

Page 7: ...in this manual The methods of operation described within this Operations and Maintenance Manual have proven to be effective for HEATMOR Inc for the sole purpose of the operation of a HEATMOR Stainless...

Page 8: ...3 Units are Safety Listed by Omni Test Laboratories Report 275 O 09 2 Listed to UL2523 2009 and CSA B366 1 11...

Page 9: ...4 Units are Safety Listed by Omni Test Laboratories Report 275 O 09 2 Listed to UL2523 2009 and CSA B366 1 11...

Page 10: ...5 HEATMOR Stainless Steel Outdoor Furnace Model 400 4S Chapter 1...

Page 11: ...Ft 56 BTU s maximum 400 000 Water Jacket Steel Gauge 409 Stainless 10 Firebox Steel Gauge 409 Stainless 10 Integrated Base Steel Gauge 409 Stainless 10 Base of Unit to Bottom of Loading Door Inches 2...

Page 12: ...7 CHAPTER 3 front Cut Away view of HEATMOR Outdoor Furnace For parts not shown on the cut away view please refer to the appropriate chapter for further details...

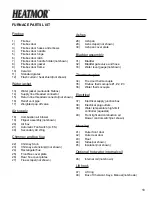
Page 13: ...ney Stub 23 Chimney extension s not shown 24 Rectangular flue 25 Front flue cover plate 26 Rear flue cover plates not shown 27 Flue scraper not shown Ashes 28 Ash pan 29 Ash scraper not shown 30 Ash p...

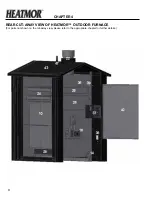
Page 14: ...9 CHAPTER 4 rear Cut Away view of HEATMOR Outdoor Furnace For parts not shown on the cut away view please refer to the appropriate chapter for further details...

Page 15: ...top flue 22 Chimney Stub 23 Chimney extension s not shown 24 Rectangular flue 25 Front flue cover plate 26 Rear flue cover plates 27 Flue scraper not shown Ashes 28 Ash pan 29 Ash scraper not shown 30...

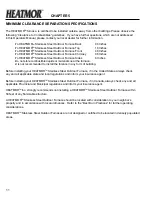
Page 16: ...ot recommended to install the furance in any form of building Before installing your HEATMORTM Stainless Steel Outdoor Furnace if in the United States always check any and all applicable state and loc...

Page 17: ...a HEATMORTM Stainless Steel Outdoor Furnace within 50 feet of any flammable structure 5 A HEATMORTM Stainless Steel Outdoor Furnace should be located with consideration to your neighbor s property and...

Page 18: ...ATMOR Outdoor Furnace 5 Always disconnect any existing electrical connections to any in house heating system before installing the outdoor furnace to any existing indoor heating system or appliances O...

Page 19: ...4 or any figure in between Patio stones or separate cement pad in front of the loading door should NOT be attached to main base of furnace It is recommended to use steel mesh or R bar in pad for stren...

Page 20: ...the HEATMOR on the Concrete Base 2 Before setting the HEATMOR onto the concrete base it is a good idea to place a solid sheet of the proper reflective air foil also called bubble foil between the conc...

Page 21: ...through and remove the air out of the return line as the water flows into the HEATMOR 8 Continue adding water until water flows out the relief vent pipe onto the roof of the HEATMOR 9 Turn off the so...

Page 22: ...ball back onto the relief vent pipe 8 Turn on the green bladder gate valve and let the bladder fill half full You can check this by feeling the bladder with your hand inserted through the bladder ins...

Page 23: ...ct a roaring hot fire inside the firebox 2 Never open firebox door immediately after the combustion air blowers have shut off If the water temperature is very close to the high setting you should assu...

Page 24: ...other inappropriate materials 14 Store ashes outside in a metal container with a metal tight fitting lid away from the outdoor furnace and other buildings No other waste should be placed in this cont...

Page 25: ...ing The firebox door should only need to be open about two inches At this point the smoke should go up the chimney and not out the firebox door 9 Once the fire is burning rather briskly close the fire...

Page 26: ...out of the flue covers and even out the ash cover plate THE HEATMOR IS NOT LEAKING Just as moisture collects on the inside of a warm house window on a cold outside day the same thing is occurring ins...

Page 27: ...sibility of the exhaust igniting and creating a flash back before you open the main firebox door 4 Turn on the light switch The light should turn on and the combustion air blowers should turn off if t...

Page 28: ...dual Types of Wood will aid in your decisions How does a fire burn out When the temperature of the water has reached its high limit 185 degrees Fahrenheit the combustion air blower s shut off At this...

Page 29: ...ted to drive off the moisture The higher the moisture content the greater the amount of heat needed and subsequently lost for heating purposes The drier the wood the more rapidly it can be heated and...

Page 30: ...ency Output Based The percentage of the heat produced that was actually absorbed into the water and transferred into the house from the HeatmorTM Net Efficiency This is the product of the combustion a...

Page 31: ...a The HEATMOR is designed to be placed outside away from all buildings to maintain optimum safety Refer to the Clearance to Combustibles section 4 Q What is the best method of handling wood A Handle w...

Page 32: ...ter the water jacket of your HEATMOR Refer to Filling your Furnace Initially for further details or contact your local dealer Removal Replacement of System Water Before removing more than five gallons...

Page 33: ...t into the relief vent pipe 4 Pour the entire contents of the water treatment chemical as supplied into the HEATMOR furnace 5 Top up your HEATMOR furnace with water and fill the bladder Refer to Filli...

Page 34: ...ct Immediately flush eyes with plenty of water for at least 15 minutes Inhalation Move to fresh air Ingestion Harmful or fatel if swallowed Give several glasses of water followed by citrus juice then...

Page 35: ...Before draining the water please refer to Removal Replacement of System Water When installing a completely new system we recommend that the system first be filled with water only After two or three da...

Page 36: ...n the water within the water jacket expands as it is heated Similarly when the water within the water jacket cools down water is drawn out of the bladder Operation of the Bladder The bladder has a cap...

Page 37: ...ides a means for the water to freely flow from the water jacket to the bladder allowing expansion and contraction WHEN THE HEATMOR FURNACE IS OPERATING THE BLADDER GATE VALVE MUST BE OPEN Maintenance...

Page 38: ...ew bladder gate valve 6 Attach the bladder hose to the bladder gate valve and tighten the hose clamp 7 Keeping the bladder gate valve closed add water until furnace is full 8 Open the bladder gate val...

Page 39: ...e through both lines under very little pressure 3 psi Always attach a BRASS fitting into the STAINLESS STEEL spud to prevent galvanic corrosion Relief Vent Pipe and Weighted Pop off Ball Principles Th...

Page 40: ...o the wood for a cleaner and hotter burn Operation of the Secondary Air Wing The secondary air wing works on a hinge design with a cable and pulley system to the handle to the front of the furnace If...

Page 41: ...roller at the back of the furnace will flash a screen that looks like Maintenance Result Wood should not be thrown into the firebox in a rough manner The thermocouples can become dislodged or damaged...

Page 42: ...d firebox door will not allow smoke to enter or escape the firebox Maintain a tight seal all around the perimeter of the firebox door at all times There may be times when the perimeter of the firebox...

Page 43: ...w these steps 1 Replace the handle onto the new door just as it was removed 2 Hang the firebox door on the hinges Note Ensure there is a tight seal around the firebox door frame while it is closed and...

Page 44: ...e build up Removal and Replacement To remove and replace the door hoses use the following steps 1 Turn off power to the air combustion blowers 2 Ensure that the fire in the firebox is extinguished whi...

Page 45: ...of controlling the opening and closing of the firebox door By opening the firebox door only until the door handle hits the second stage of the safety latch gives a space for fresh air to enter the fi...

Page 46: ...into the HEATMOR Operation 1 Open the firebox door as you step backwards towards the exterior door This allows you to be out of the way if there is a flash back or smoke exiting the door opening 2 Sti...

Page 47: ...ld gasket from underneath the old silicone 3 Remove all old silicone with a wire wheel or steel brush 4 Replace with a single length of new gasket material Do not pack or over stretch the new gasket O...

Page 48: ...burning temperature of 1100 degrees Fahrenheit much faster Maintenance Result Wood should not be thrown into the firebox in a rough manner Do not scrape the ceramic as the ceramic can become dislodged...

Page 49: ...esult in hot coals slipping under the grates causing warpage of the grates 3 Make sure the narrow side of the slot is next to the fire 4 Replace broken grates immediately or a chain reaction of broken...

Page 50: ...plate is always resting at the bottom of the firebox on top of the grates 4 Replace a warped grate plate immediately or non efficient fire may result 5 The grate plate will not break under reasonable...

Page 51: ...e flash curtain restricts the amount of direct heat that contacts the firebox door directly Maintenance Result Leaving the flash curtain in place is effective for the principles outlined above Removal...

Page 52: ...oid it will open the flipper and force air into the firebox The flipper must completely open and close all of the time When it is closed it must seal completely If more than a wiff of smoke is coming...

Page 53: ...ctly it causes a snowball effect of problems Primary Secondary Air Motor Principles The primary secondary air motor regulates the air flow to under the grates primary air or to the top of the airbox s...

Page 54: ...tly for safe operation of the Heatmor Principle The fan switch turns the fan on while the outer door is opened to clear the possible excess fuel build up in the firebox Along with normal recommended s...

Page 55: ...to higher levels Discharging smoke at a higher level helps keep smoke above property level especially on low pressure or cloudy hazy or wet days When installing chimney extensions you must have no les...

Page 56: ...g into the up position 4 Using the flue scraper provided with the HEATMORTM furnace push the dust to the back of the flue and then from the back of the furnace push the dust into the firebox Remove th...

Page 57: ...moving the ashes from the ash pan before it is completely full ensures the proper airflow from below the grates is maintained and also ensures the ashes can drop through the grates into the ash pan As...

Page 58: ...ion air that flows upwards through the grates A reasonable amount of ashes two to four gallons should be removed during each ash removal Ash Scraper Principles The scraper provides a convenient and cl...

Page 59: ...e in the relatively cool chimney flue of a slow burning fire As a result creosote residue accumulates on the flue lining When ignited this creosote makes an extremely hot fire The chimney connector an...

Page 60: ...emperature gauges have different sized wells Often they are not interchangeable Replace with the correct unit from your local dealer NOTE The temperature reading on the temperature gauge may not coinc...

Page 61: ...hould be connected to it s own circuit Electrical Supply Junction Box Principles The electrical components of the HEATMOR furnace are pre wired at the factory All the wiring becomes centralized in the...

Page 62: ...t 1 Turn off the main power supply to the HEATMOR 2 Pull the thermocouple straight out of the well 3 Disconnect the thermocouple wire connection from the controller and re wire the new thermocouple 4...

Page 63: ...the power 11 Adjust the dial and white wheel to the preferred settings Front Light and Fan Power Switch Principles 1 To provide light while fueling 2 To provide a means of turning off the combustion...

Page 64: ...ce the wires as in the diagram 6 Secure the cover plate 7 Turn the main electrical power supply back on to the HEATMOR Note It is recommended to contact a licensed electrician to perform the above ope...

Page 65: ...When the switch is closed the fan will turn on and the primary secondary motor will be set to the initial loading setting The 400 4S is considered Loaded when the light switch is flipped up then down...

Page 66: ...al and Replacement To remove the outer door the lock handle must be unlocked and opened Pick up the old door from the hinges and place and secure the new door into position Test the door to ensure a t...

Page 67: ...ge the color of your unit they can be replaced with different steel siding Follow the following steps or contact your local dealer 1 Remove all the screws holding the damaged steel siding secure 2 Lif...

Page 68: ...into the furnace When the furnace is smoking cover the chimney and turn off the blower and watch for smoke leaks Air leaks cause the fire to not burn as hot or efficiently In result you will use more...

Page 69: ...64 WATER LEAKS If you suspect that your HEATMOR Stainless Steel Outdoor Furnace has developed a water leak please contact your local dealer for verification and further details CHAPTER 22...

Page 70: ...aled to the outer face of the water jacket by a sealing gasket As water passes through the domestic coil the water in the water jacket heats it Maintenance Result Make sure a tight seal is maintained...

Page 71: ...in firebox and bring your furnace up to temperature Refer to the Lighting the HeatmorTM for the first time section of the HeatmorTM Operations and Maintenance Manual 3 Once your furnace is up to temp...

Page 72: ...t or something similar will cover the chimney keeping unwanted moisture and visitors away 6 Properly clean Fan s Refer to the Air Supply section of the HeatmorTM Operations and Maintenance Manual 1 Tu...

Page 73: ...68...

Page 74: ...ng normal operation the atmosphere inside the firebox will exceed the dew point causing condensation Refer to Furnace has excessive moisture in firebox Located in Trouble Shooting and Solutions Dew Po...

Page 75: ...contact your local dealer Refer to Firebox Door Hoses and Elbows Located in Firebox and Other Components 9 Q My furnace combustion blower continues to run but the fire will not burn until I open the d...

Page 76: ...al Dealer Blower Flipper Assembly plate not tight Tighten wing nuts Refer to Steps to Maintain your Blower and Flipper Assembly Firebox door ajar not shut tight Close Fire Door Tight Refer to Firebox...

Page 77: ...Replace Pump or Cartridge Contact your Local Dealer Air trapped in water lines Bleed lines Contact your Local Dealer Malfunction of heating appliances in building Repair adjust or replace Contact you...

Page 78: ...ement and Ash Removal Restricted air flow into Blower air inlet Clean Blower Refer to Steps to Maintain your Blower Solenoid and Flipper Too much heat draw on Heatmor Furnace Verify HEATMOR furnace si...

Page 79: ...ess cured wood Refer to Wood Firebox Door pops or rattles Elbow s or hoses are clogged restricting water flow through door hoses Unclog or replace elbow s or hoses Refer to Firebox Door Hoses and Elbo...

Page 80: ...temperatures are warmer and supply controls have not been adjusted Adjust water flow Contact your Local Dealer High limit switch set too low Adjust setting Refer to Electrical Water Temperature Range...

Page 81: ...rmometer temp gauge exceeds 212 degrees Fahrenheit Furnace is not boiling Low water level Add water Let Furnace cool first Refer to Water Level Maintenance Charcoal build up in rear of firebox Excessi...

Page 82: ...ycle to start Refer to Loading Wood into the HEATMOR Firebox air leak Check all seals for or air leaks Run a smoke check Refer to Air Leaks Flash Curtain Heat Shield has been removed Install Flash Cur...

Page 83: ...ng Replace door hoses Refer to Firebox Door Hoses and Elbows Bladder gate valve needs adjusting Adjust and tighten gate valve Refer to Bladder Gate Valve and Bladder Hose Hose clamps are leaking Tight...

Page 84: ...nd hard Refer to Types of Wood Wood is too small of pieces Add larger pieces of wood Refer to Wood Flue is clogged Clean Flue Refer to Flue Using more heat in building than you realize heating more sq...

Page 85: ...pliance getting more than it s share of the total flow of hot water Balance the system by adjusting the flows of water to the different heating appliances Contact your Local Dealer Defective in house...

Page 86: ...instead of pure hotwater Contact your Local Dealer Manifold not balanced properly One appliance getting more than its share of the total flow of hot water Balance the system by adjusting the flow of w...

Page 87: ...at least eight gallons per minute Check pump and installation Contact your Local Dealer No contact paste applied to well of Temperature Gauge Remove Temperature Gauge from well and apply paste Refer...

Page 88: ...83 PROBLEM CAUSE SOLUTION PROCEDURE...

Page 89: ...steel limited LIFETIME warranty If you have any questions please contact your local dealer Complete and send the furnace registration to your local dealer distributor or heatmor inc Within 30 days of...

Page 90: ...ide of front door for data plate that has model information Model _________________________________________________________________ Referred By ________________________________________________________...

Page 91: ...ve been presented with a key for my locked Heatmor and assume the responsibility of operation and maintenance of it ________________________________________________ Customer Signature ________________...

Page 92: ...87 Outdoor Furnaces...

Page 93: ...88 NOTES...

Page 94: ...89 wiring diagram...

Page 95: ...90 Revised Manual on 07 11 12...

Reviews: