background image

Heatilator • Caliber CD Series • 4040-263 Rev M • 06/08

54

A. Remove Fixed Glass Assembly

See Section 14.J.

B. Remove the Shipping Materials

Remove shipping materials from inside or underneath the 

fi

 rebox.

C. Clean the Appliance

Clean/vacuum any sawdust that may have accumulated 
inside the 

fi

 rebox or underneath in the control cavity.

D. Accessories

Install approved accessories per instructions included 
with accessories. 

Contact your dealer for a list of ap-

proved accessories

.

WARNING! Risk of Fire and Electric Shock! 

Use ONLY 

Hearth & Home Technologies-approved optional acces-
sories with this appliance. Using non-listed accessories 
could result in a safety hazard and will void the warranty. 

G. Place the Rockwool

WARNING! Risk of Explosion! 

Follow rockwool placement 

instructions. 

DO NOT

 place rockwool directly over burner 

ports. Replace rockwool material annually. Improperly placed 
rockwool interferes with proper burner operation.

•  Rockwool is shipped with this gas appliance.
•  Place a small amount of 1/2 in. diameter pieces (dime0-

size) rockwool on the burner pan so that rockwool 
touches but does not cover the holes in the burner 
pan.

H. Install the Refractory

A weathered brick refractory is available as an optional 
accessory. Install the WTBC36D in the CD4236 Series 
appliances and the WTBC42D in the CD4842 Series ap-
pliances. Follow the installation instructions provided with 
the speci

fi

 c accessory part.

14 

14 

Appliance Setup 


I.  Install the Log Assembly

Rock wool
placement

(shaded areas)

Vermiculite and 
lava rock 
placement on 
sides and front 
of hearth pan.

Vermiculite and 
lava rock 
placement on 
sides and front 
of hearth pan.

Figure 14.1  Placement of Rockwool, Lava Rock, Vermiculite

F.  Place the Vermiculite

•  Sprinkle vermiculite over lava rock. See diagram, Figure 

14.1.

E. Place the Lava Rock

•  See diagram, Figure 14.1.

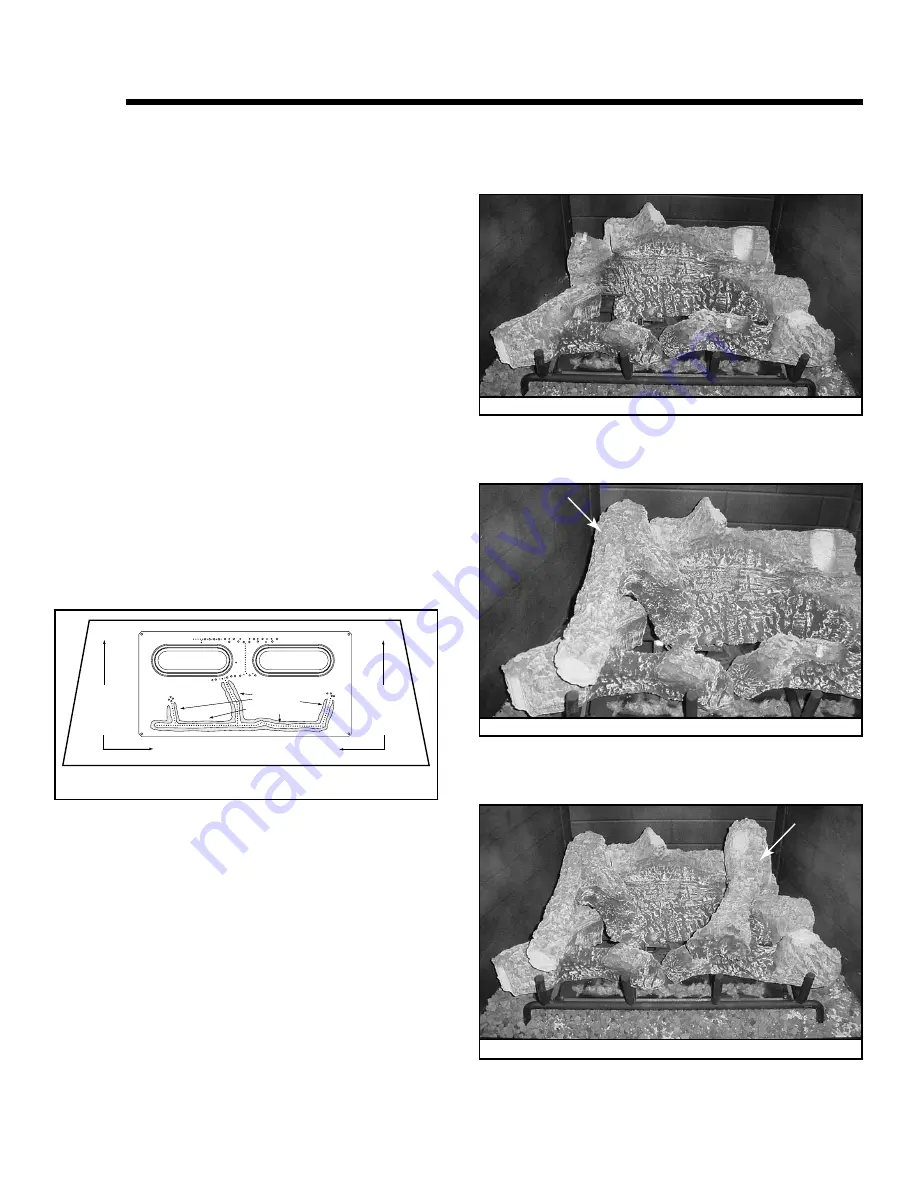
•  Base logs have been permanently mounted on the grate 

assembly and should not be moved. See Figure 12.5.

Figure 12.5  Base Logs

Figure 12.7  Placing Right Top Log

Figure 12.6  Placing Left Top Log

•  Install “Y” log on left hand side of grate using locating 

pins to position. See Figure 12.6

•  Install right top log as shown in Figure 12.7 using locating 

pins to position log properly.

Summary of Contents for Direct Vent Gas Appliance CD4236ILR

Page 1: ...rer s instructions and the manufactured home construction and safety standard Title 24 CFR Part 3280 or Standard for Installation in Mobile Homes CAN CSA Z240MH This appliance is only for use with the...

Page 2: ...Your new Heatilator gas fireplace will give you years of durable use and trouble free enjoyment Welcome to the Heatilator family of fireplace products We recommend that you record the following perti...

Page 3: ...ce and Components 16 5 Framing and Clearances A Select Appliance Location 17 B Construct the Appliance Chase 18 C Clearances 18 D Mantel and Wall Projections 19 6 Termination Locations A Vent Terminat...

Page 4: ...the Vermiculite 54 G Place the Rockwool 54 H Install the Refractory 54 I Install the Log Assembly 54 J Fixed Glass Assembly 55 K Install Louvers and Trim 55 L Install Hood 55 M Air Shutter Setting 55...

Page 5: ...irs 4 environmental conditions inadequate ventilation or drafting caused by tight sealing construction of the structure air handling devices such as exhaust fans or forced air furnaces or other causes...

Page 6: ...entirely of steel iron brick tile concrete slate glass or plasters or any combination thereof Materials that are reported as passing ASTM E 136 Standard Test Method for Behavior of Materials in a Ver...

Page 7: ...led heating appliance or equipment The sign shall read in print size no less than one half 1 2 in in size GAS VENT DIRECTLY BELOW KEEP CLEAR OF ALL OBSTRUCTIONS Inspection The state or local gas inspe...

Page 8: ...staysafe To prevent unintended operation when not using your fireplace for an extended period of time summer months vacations trips etc Remove batteries from remote controls Turn off wall controls Unp...

Page 9: ...r decorative door or front G Remote Controls Wall Controls and Wall Switches Follow the instructions supplied with the control installed to operate your fireplace For safety Install a switch lock or a...

Page 10: ...e to high surface temperatures keep children clothing and furniture away Keep burner and control compartment clean See installation and operating instructions accompanying the appliance WARNING If you...

Page 11: ...and furniture away Keep burner and control compartment clean See installation and operating instructions accompanying the appliance WARNING If you do not follow these instructions exactly a fire or ex...

Page 12: ...tion will disappear Blue flames This is a result of normal operation and the flames will begin to yellow as the fireplace is al lowed to burn for 20 to 40 minutes Odor from fireplace When first operat...

Page 13: ...your fireplace will give you many years of trouble free service We recommend an nual service by a qualified service technician Doors Surrounds Fronts Frequency Annually By Homeowner Tools needed Prot...

Page 14: ...cessary B Maintenance Tasks Qualified Service Technician The following tasks must be performed by a qualified service technician Logs Frequency Annually By Qualified Service Technician Tools needed Pr...

Page 15: ...SECTION 10 Attic insulation shield not shown must be used here to keep insulation away from vent pipe if attic is insulated SECTION 8 Vent pipe penetrates roof preferably without affecting roof rafte...

Page 16: ...ded Before beginning the installation be sure that the following tools and building supplies are available Tape measure Framing material Pliers High temperature caulking material Hammer Phillips screw...

Page 17: ...gn preference In addition to these framing dimensions also reference the following sections Clearances and Mantel Projections Section 3 C Vent Clearances and Framing Section 6 Rear vent One 45 elbow H...

Page 18: ...regional codes for the rest of the home Additionally in regions where cold air infiltration may be an issue the inside surfaces may be sheetrocked and taped for maximum air tightness Figure 5 2 Clear...

Page 19: ...specified Framing or finishing material closer than the minimums listed must be construct ed entirely of noncombustible materials i e steel studs concrete board etc Figure 5 3 Minimum Vertical and Ma...

Page 20: ...oof Pitch H Min Ft Roof Pitch H Min Ft Flat to 6 12 1 0 Over 11 12 to 12 12 4 0 Over 6 12 to 7 12 1 25 Over 12 12 to 14 12 5 0 Over 7 12 to 8 12 1 5 Over 14 12 to 16 12 6 0 Over 8 12 to 9 12 2 0 Over...

Page 21: ...N Vertical clearance between two horizontal termination caps 12 in 30 cm minimum O Horizontal clearance between two horizontal termination caps 12 in 30 cm minimum P 6 Non vinyl sidewalls 12 Vinyl sid...

Page 22: ...A length of straight pipe is allowed between two 45 elbows see Figure 7 1 Figure 7 1 Using Two 45 Elbows 7 7 Vent Information and Diagrams B Vent Table Key The abbreviations listed in this vent table...

Page 23: ...orizontal runs may be level E Vent Diagrams Figure 7 3 One Elbow 1 Top Vent Horizontal Termination Note The CD series appliances can adapt to SLP series vent pipe when venting off the top of the appli...

Page 24: ...d Vertically H2 Figure 7 5 Two Elbows 1 Top Vent Horizontal Termination continued Figure 7 4 Two 45 Elbows replacing One 90 Elbow V1 min V1 max H1 H2 max H1 H2 H3 max ft m ft m ft m ft m 0 5 0 15 6 1...

Page 25: ...ies 4040 263 Rev M 06 08 25 Figure 7 6 1 Top Vent Horizontal Termination continued Three Elbows H1 V1 V2 H2 Installed Vertically V1 min V1 V2 max H1 H2 max ft m ft m ft m DVP 1 0 30 24 7 32 19 5 79 SL...

Page 26: ...nt termination off the top of the appli ance the vertical termination baffle should be used 12 ft 3 66 m min 60 ft 18 29 m max 12 ft 3 66 m min 60 ft 18 29 m max Maximum horizontal run is 100 of verti...

Page 27: ...Vertical Termination continued Three Elbows 12 ft 3 66 m min 60 ft 18 29 m max Maximum horizontal run is 100 of vertical but cannot exceed 26 ft 7 92 m Note If installing a vertical vent termination o...

Page 28: ...Heatilator Caliber CD Series 4040 263 Rev M 06 08 28 3 Rear Vent Horizontal Termination Figure 7 10 Figure 7 11 No Elbow One 45 Elbow 18 in 457 mm max 18 in 457 mm max...

Page 29: ...H1 Installed Horizontally H1 max V1 min H1 H2 max ft m ft m ft m 2 0 61 1 0 30 3 0 91 4 1 22 2 0 61 6 1 83 6 1 83 3 0 91 9 2 74 8 2 44 4 1 22 12 3 66 8 2 44 5 1 52 15 4 57 8 2 44 6 1 83 18 5 49 H1 max...

Page 30: ...Vent Vertical Termination One Elbow Figure 7 14 Two Elbows Figure 7 15 12 ft 3 66 m min 60 ft 18 29 m max 0 min 6 ft 1 83 m max 12 ft 3 66 m min 60 ft 18 29 m max 0 min 6 ft 1 83 m max Maximum horizo...

Page 31: ...es 4040 263 Rev M 06 08 31 4 Rear Vent Vertical Termination continued Three Elbows Figure 7 16 12 ft 3 66 m min 60 ft 18 29 m max 0 min 6 ft 1 83 m max Maximum horizontal run is 100 of vertical but ca...

Page 32: ...f the baffle is above the bead on the inside of the collar See Figure 7 19 Release pressure on the baffle so that it is wedged against the sides of the flue collar See Figure 7 20 Replace the glass re...

Page 33: ...clearance to vent DO NOT pack insulation or other combustibles Between ceiling firestops Between wall shield firestops Around vent system Failure to keep insulation or other material away from vent p...

Page 34: ...es a ceiling floor see Figure 8 4 SLP pipe only Frame opening 9 in x 9 in 229 mm x 229 mm whenever the vent penetrates a ceiling floor see Figure 8 4 Frame the area with the same sized lumber as used...

Page 35: ...hield on the ceiling firestop and attach to the firestop Bend all tabs inward 90 around the top of the shield These tabs must be used to prevent blown insulation from getting between the shield and ve...

Page 36: ...set aside See Figure 9 1 Remove three remaining screws holding the plate surrounding flue See Figure 9 3 Remove plate and set aside Remove four screws holding inner plate surrounding the flue See Figu...

Page 37: ...5 Remove outer collar Remove four screws holding inner collar to appliance top See Figure 9 6 Remove inner collar Remove four screws holding outer shell cover See Figure 9 7 Remove outer shell cover...

Page 38: ...d collars and replace four screws to hold plate in place See Figure 9 12 Place inner cover plate on appliance top and replace four screws to hold inner cover plate in place See Figure 9 14 Make sure g...

Page 39: ...of heat shield Replace four screws to hold this plate in place See Figure 9 16 Locate outer shell cover removed in the sixth step Figure 9 7 Place the cover on top of appliance See Figure 9 17 Replace...

Page 40: ...fire The diagram shows how to properly position level and se cure the appliance see Figure 9 20 Nailing tabs are pro vided to secure the appliance to the framing members Bend out nailing tabs on each...

Page 41: ...and 45 elbows that are changing the vent direction from horizontal to vertical one screw minimum should be put in the outer flue at the horizontal elbow joint to prevent the elbow from rotating Use s...

Page 42: ...to the horizontal termination cap Apply a bead of silicone sealant inside the female outer pipe joint prior to joining sections See Figure 10 1 Only outer pipes need to be sealed All unit collar pipe...

Page 43: ...support Vent support or plumber s strap spaced 120 apart may be used for support See Figures 10 8 and 10 9 SLP ceiling firestops have tabs that may be used to provide vertical support WARNING Risk of...

Page 44: ...to mark the center line of the venting system on the ceiling and drill a small hole through the ceiling and roof at this point Locate the hole and mark the outline of the cathedral ceiling support bo...

Page 45: ...hing Figure 10 14 Minimum Height From Roof To Lowest Discharge Opening NOTICE Failure to properly caulk the roof flashing could cause water entry Caulk the gap between the roof flashing and the outsid...

Page 46: ...of the rubber boot to ensure a good fit Draw around flashing remove Apply silicone sealant to roof inside the lines Figure 10 20 Lubricate pipe or flue with water and slide flashing down Seat firmly...

Page 47: ...f Fire To prevent overheating and fire heat shields must extend through the entire wall thick ness DO NOT remove the heat shields attached to the wall shield firestop and the horizontal termination ca...

Page 48: ...uidelines as prescribed by current ANSI Z223 1 and CAN CGA B149 installation codes and refer to Section 6 of this manual CAUTION Risk of Burns Local codes may require installation of a cap shield to p...

Page 49: ...Pressure Natural Gas Propane Minimum inlet pressure 5 0 in w c 11 0 in w c Maximum inlet pressure 7 0 in w c 14 0 in w c Manifold pressure 3 5 in w c 10 0 in w c Note Have the gas supply line install...

Page 50: ...DO NOT wire 110V to the valve or to the appliance wall switch Incorrect wiring will damage controls Determine if the appliance uses an Intellifire ignition sys tem or standing pilot ignition system O...

Page 51: ...WHT WHT RED GRN GRN wire only for use with optional wall switch WSK MLT Figure 12 3 Intellifire Pilot Ignition IPI Wiring Diagram Pilot Ignitor To Burner Gas Inlet Inlet Tap ORG SILVER TO PILOT TH TP...

Page 52: ...re 12 4 Junction Box Detail NOTICE DO NOT wire 110 VAC to wall switch Red Switch Switch Box Red Black Black Green Green White Power Supply Wires White Red Black Green White Minimum 14 3 AWG with Groun...

Page 53: ...ojections Acceptable on both sides of opening Mantels Combustible 0 in 0 in 0 in Finish wall material may be combustible Top and Sides High Temperature Sealant 300 F 149 C min Top and Side Seal Joint...

Page 54: ...1 2 in diameter pieces dime0 size rockwool on the burner pan so that rockwool touches but does not cover the holes in the burner pan H Install the Refractory A weathered brick refractory is available...

Page 55: ...in model Quick Access Latches Rotate bottom of screen assembly away from appliance and lower out of top retainers Release top and bottom access latches and rotate top of the glass assembly away from t...

Page 56: ...hermocouple connection at the gas valve is fully inserted and tight hand tighten plus 1 4 turn Verify proper voltage output from the thermocouple to the valve Place one millivolt meter lead wire on th...

Page 57: ...exhaust gases back into the system Check venting system for damage Replace repair improperly assembled pipe sections D Glass installed improperly Check to ensure glass is installed properly Replace gl...

Page 58: ...d and plugged into module Check voltage of transformer under load at spade connection on module with ON OFF switch in ON position Acceptable readings of a good transformer are between 3 2 and 2 8 volt...

Page 59: ...nsing rod should glow shortly after ignition Verify correct pilot orifice is installed and gas inlet is set to pressure specifications C Module is not grounded Verify module is securely grounded to me...

Page 60: ...in 51 mm Alternative Gas Line Access Electrical Access 38 1 4 in 972 mm B 3 in 76 mm 27 1 4 in 692 mm 6 1 2 in 165 mm Gas Line Access A Appliance Dimension Diagram Dimensions are actual appliance dim...

Page 61: ...Effective Height Length 10 1 2 in 267 mm 10 7 8 in 276 mm DVP45 45 Elbow 45 4 7 8 in 124 mm Assembled Height 24 in 610 mm Diameter 10 in 254 mm DVP AS2 10 in 254 mm 1 in 25 mm DVP FS Ceiling Firestop...

Page 62: ...5 mm 13 1 4 in 367 mm RF12M Roof Flashing Multi pak BEK Trap Cap Brick Extension 13 3 4 in 349 mm 5 in 127 mm 13 3 4 in 349 mm DVP BEK2 DVP HPC Cap Brick Extension 13 7 8 in 352 mm 5 in 127 mm 11 7 8...

Page 63: ...98 mm DVP TV Vertical Termination Cap PVK 80 For use with IPI and DSI appliances only 1 in 25 mm 14 in 356 mm 3 8 in 10 mm 1 in 25 mm 7 1 4 in 184 mm 7 3 4 to 10 3 8 in 197 to 264 mm DVP FBHT Fire Bri...

Page 64: ...Length Note Heat shields MUST overlap by a minimum of 1 1 2 in 38 mm The heat shield is designed to be used on a wall 4 in to 7 1 4 in 102 mm to 184 mm thick If wall thickness is less than 4 in 102 mm...

Page 65: ...ams continued Figure 16 6 DVP Vent Components 13 in 330 mm 15 in 381 mm 8 1 8 in 206 mm DVP HRC SS 10 7 8 in 276 mm 10 1 2 in 267 mm 3 87 Effective Length 5 3 4 to 8 3 8 in 146 to 213 mm 5 1 2 in 140...

Page 66: ...w Effective Height Length Effective Height Length Pipe inches mm SLP4 4 102 SLP6 6 152 SLP12 12 305 SLP24 24 610 SLP36 36 914 SLP48 48 1219 SLP6A 2 6 51 152 SLP12A 2 12 51 305 SLP FLEX 2 24 610 SLP FL...

Page 67: ...r Vent DVP FBHT Firebrick Termination Cap This termination cap requires an SL 2DVP adapter when used with SLP Pipe SLP TRAP1 Horizontal Termination Cap SLP CCS BK Cathedral Ceiling Sup port Box Black...

Page 68: ...eat Shield 4040 153 4040 153 4040 153 4040 153 1 17 Glass Frame Assembly 4040 087 4040 087 4040 087 4040 087 1 18 Screen Assembly 4040 031 4040 031 4040 031 4040 031 1 19 Hood 29575 29575 29575 29575...

Page 69: ...040 154 4040 154 4040 154 1 17 Glass Frame Assembly 4040 088 4040 088 4040 088 4040 088 1 18 Screen Assembly 4040 032 4040 032 4040 032 4040 032 1 19 Hood 29576 29576 29576 29576 1 20 Upper Grille Ass...

Page 70: ...e Bracket Pre GA1563745 31824 31824 31824 31824 1 Post GA1563745 30060 30060 1 5 Bulkhead Insulation 4021 043 4021 043 4021 043 4021 043 1 6 3 8 Flare x 3 8 NPT Elbow 4021 045 4021 045 4021 045 4021 0...

Page 71: ...563745 31824 31824 31824 31824 1 Post GA1563745 30060 30060 1 5 Bulkhead Insulation 4021 043 4021 043 4021 043 4021 043 1 6 3 8 Flare x 3 8 NPT Elbow 4021 045 4021 045 4021 045 4021 045 1 7 Bulkhead 4...

Page 72: ...4040 263 Rev M 06 08 72 D Optional Components Arts Crafts Faux Front FFCAC Modernist Faux Front FFCM Jamestown Faux Front FFCJ WTBC36D 36 in Weathered Brick Refractory Liner Kit WTBC42D 42 in Weathere...

Page 73: ...25BN Brushed nickel accent trim kit 2 pieces TK7B Polished brass louver trim kit 4 bars TK7S Stainless steel louver trim kit 4 bars TK7PT Pewter louver trim kit 4 bars TK7BN Brushed nickel louver trim...

Page 74: ...Heatilator Caliber CD Series 4040 263 Rev M 06 08 74 This page intentionally left blank...

Page 75: ...Heatilator Caliber CD Series 4040 263 Rev M 06 08 75 This page intentionally left blank...

Page 76: ...__ ________________________________________________________________________________ This product may be covered by one or more of the following patents United States 4593510 4686807 4766876 4793322 48...

Reviews: