background image

This section describes the hardware installation procedures for the HNC300 and HNC320W. 

HNC300

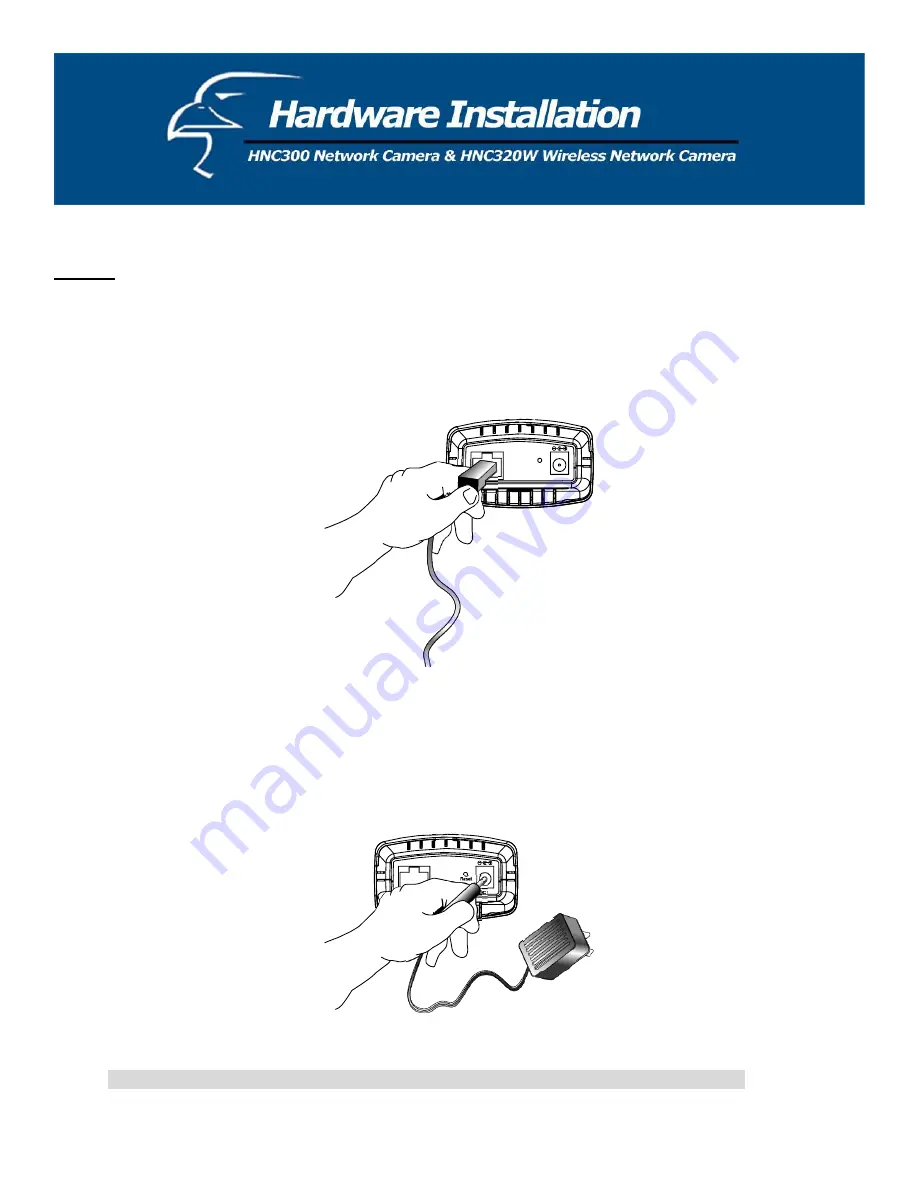
Connect an Ethernet Cable 

Connect an Ethernet cable to the Ethernet cable port located on the rear panel of the camera, and attach the other end to 
the network. 

10/100 Ethernet

DC 5V

Reset

Attach the External Power Supply

Attach the external power supply to the DC power input connector located on the rear panel of the camera. The input
connector is labeled “DC 5V”.  Connect it to your local power supply.

10/100 Ethernet

DC 5V

Reset

Note:

Confirm that the device is receiving power by making sure that the “Power” LED is illuminated.

17

Summary of Contents for HNC300

Page 1: ...1...

Page 2: ...eception which can be determined by turning the equipment off and on the user is encouraged to try to correct the interference by one or more of the following measures x Reorient or relocate the recei...

Page 3: ...n number clearly on the outside of the package and include your original proof of purchase IN NO EVENT SHALL HAWKING TECHNOLOGY S LIABILTY EXCEED THE PRICE PAID FOR THE PRODUCT FROM DIRECT INDIRECT SP...

Page 4: ...0W Front Panel 13 Power LED 13 Link LED 13 Rear Panel 14 Network Cable Connector 14 DC Power Connector 14 Reset Button 14 Antenna Connector 14 Top Panel 15 Screw Hole 15 Bottom Panel 15 Screw Hole 15...

Page 5: ...tarted 49 IPView SE Control Panel 49 How to Add Camera 50 How to Change Cameras 53 How to Connect Disconnect the Image 54 How to Delete a Camera 55 Extera Information 56 How to Adjust the Property Set...

Page 6: ...300 Wired Network Camera and HNC320W Wireless Network Camera including a description of features installation procedures web configuration and other functions Also included in the user s manual are th...

Page 7: ...m conventional PC cameras in that they are standalone systems with built in CPUs and web servers Therefore they connect directly to the local area network LAN and do not need to be connected to a desi...

Page 8: ...emory Size 32 MB 64 MB recommended VGA card resolution 800x600 or above Web Browser x Internet Explorer 5 0 or above ActiveX JAVA Mode Image View for Windows OS and JAVA Mode Image View for other OS x...

Page 9: ...sswords via the privilege settings HNC320W The administrator can set up to 64 usernames and passwords via the privilege settings Remote Utility The powerful IPView SE application assigns the administr...

Page 10: ...Configuration section for detailed information and usage Link LED The Link LED is located on the far right side of the network camera s lens when facing the network camera It is located to the right...

Page 11: ...ated on the rear panel of the network camera and is labeled DC 5V with a single jack socket to supply power to the camera Power will be generated when the power supply is connected to a wall outlet Re...

Page 12: ...camera by attaching the screw head on the camera stand into the screw hole of the camera Bottom Panel Screw Hole Screw Hole Located on the bottom panel of the network camera the screw hole is used to...

Page 13: ...nfiguration section for detailed information and usage Link LED The Link LED is located on the far right side of the network camera s lens when facing the wireless network camera It is located to the...

Page 14: ...wall outlet Reset Button Reset will be initiated when the reset button is pressed once and the Power LED begins to flash Factory Reset will be initiated when the reset button is pressed continuously...

Page 15: ...mera by attaching the screw head on the camera stand into the screw hole of the wireless camera Bottom Panel Screw Hole Screw Hole Located on the bottom panel of the wireless camera the screw hole is...

Page 16: ...make sure that the unit was not damaged during shipping and that no items are missing If you encounter a problem please contact your dealer Please read this manual thoroughly and follow the installati...

Page 17: ...a and attach the other end to the network 10 100 Ethernet DC 5V Reset Attach the External Power Supply Attach the external power supply to the DC power input connector located on the rear panel of the...

Page 18: ...era screw into the antenna connector the single external antenna that was included in the product packaging Connect an Ethernet Cable Connect an Ethernet cable to the Ethernet cable port located on th...

Page 19: ...er supply to the DC power input connector located on the rear panel of the camera The input connector is labeled DC 5V Connect it to your local power supply Note Confirm that the device is receiving p...

Page 20: ...a public user name and password so that when remote users access the HNC300 or HNC320W they will have access to view the images transmitted by the cameras Note When the HNC300 or HNC320W is used for...

Page 21: ...x If you have already used the Setup Wizard to change the camera s IP address then enter the new IP address in the web address bar The numbered portion of the address is the IP address of your camera...

Page 22: ...and HNC320W HNC300 1 System 2 Image 3 Users 4 DateTime 5 Upload 6 Information 7 Tools HNC320W x System x Image x Users x DateTime x Trigger x Upload x Information x Tools System HNC300 The System menu...

Page 23: ...criptive name for the device The default setting for the Camera Name is CS xxxxxx where xxxxxx is the last six digits of the MAC Address The maximum length is 32 characters Printable ASCII Location Th...

Page 24: ...either Manually Assign or Assign Automatically Using Manually Assign You can click Manually Assign and directly enter the IP address The default settings are as follows x Default IP 192 168 0 20 x Sub...

Page 25: ...bilities to the network camera The three options allow the Administrator to configure and camouflage the illumination of the LED indicator In Normal mode the LED indicator functions as normal Under Of...

Page 26: ...81 map to 192 168 0 101 Port 82 map to 192 168 0 102 Port 83 map to 192 168 0 103 Port 84 map to 192 168 0 104 Port 85 map to 192 168 0 105 The Transfer Image field allows you to open a second port f...

Page 27: ...tings for key details that are required for the wireless network camera s setup Click on System in the system administration menu bar and the System screen will appear as illustrated on the following...

Page 28: ...ible to enable security options for the wireless network camera IP Assignment Important Information Access to the Wireless Internet Camera is done through assigning a proper IP address Please make sur...

Page 29: ...environment The default Network Name is a blank space NULL String This default setting will let the wireless network camera connect to ANY access point under the infrastructure network mode To connec...

Page 30: ...me as the 128 bit ASCII input of 1234567890123 These character counts result in bit counts of 40 and 104 respectively the wireless network camera will automatically pad your input to a bit count of 64...

Page 31: ...or the wireless network camera This will permit users routers to support multiple network cameras By default Port 80 on the router is always open for network camera web server access Select Yes and in...

Page 32: ...A higher video compression rate eo quality and a lower compression rate will do the opposite he default setting is at Medium rame Rate et the default setting to Auto for an optimal frame rate he defau...

Page 33: ...and the User Password is Guest anyone who has this user name and for the User Name is 12 characters Printable ASCII Enter the user name in this field A maximum of 64 users names is allowed However eac...

Page 34: ...h Time Server or Set Manually ateTime in the System Administration menu bar and the DateTime screen will appear as illustrated on the llowing page Important Information access the network camera s vid...

Page 35: ...e Time manually select Set Manually The system administrator must manually enter the Date and S ti I E Server in this field e Protocol or Time are available for y e zone for the region P T T T S P T T...

Page 36: ...x Sending Interval is being sent to the receiver If the setting is at 10 seconds a new e mail will be sent to the receiver in 10 second intervals x Sending Time is the number of times the e mail will...

Page 37: ...s also the default setting If the FTP server uses a specific port please confirm this with the IT manager x User Name Enter the user name in this field x Password Enter the user password in this field...

Page 38: ...such as the schedule im You can 1 Choose Always to always upload the images to the FTP server or 2 Set the nage the uploading task In the Schedule option you can set the Day and Time Period There are...

Page 39: ...Reset com Do you really want to reset this device and a YES button If you do not want to reset the camera exit the panel without clicking YES Otherwise click on the YES button and the reset process wi...

Page 40: ...low t Camera Name The Camera name will be display when the Camera Name field is entered in the Web Configuration setting under System L Configura Date Time The date time of the video server will show...

Page 41: ...ion setting under System Location The location of the Internet Video Server will be displayed when the Location field is entered in the Web guration settings under System Date Time The date time of th...

Page 42: ...de and includes some asic knowledge to assist pplications x Monitoring of local usement parks schools and day x ages a cameras are standalone systems with built in CPUs along with web based solutions...

Page 43: ...SOHO Small Office Home Office Applications SOHO 43...

Page 44: ...Installation Insert the CD ROM into the CD ROM drive to initiate the auto run program Once completed a menu screen will ppear as follows a 44...

Page 45: ...tallation procedure for the pplication program nce executed a p nd click on OK a rompt will appear and request the input of the desired language selection Make the desired selection to continue O a Th...

Page 46: ...to continue with the installation procedure Destination Location dialog box you may click on Next to accept the recommended estination location or click on Browse to select another location After spe...

Page 47: ...Click on Next to continue If you wish to modify your settings click on Back to return to the previous creens art the computer to complete the installation procedure s Please wait until one of the two...

Page 48: ...ion the application program for the HNC300 HNC320W is o start running IPView SE click on Start Menu Programs IPView SE IPView SE nce you log in the IPView SE application will execute and the applicati...

Page 49: ...control panel Play Play Scan Searches for all network cameras available on the LAN At minimum this function will locate any ameras that have the code HCVT located beneath the UPC code on the product p...

Page 50: ...the Internet you must key in a physical IP Address 2 When f the router gateway function is enabled the Gateway IP address must be entered with the Port Number as below icon to add a new camera An Add...

Page 51: ...t view format 3 At the same time the 4 ou wish to add a dialog box will appear to notify f you are unsure of the camera s IP address you can click on the Browse button and the Browse Camera di I w You...

Page 52: ...ion setting you forget to highlight the camera y you of the error ake sure to save any changes y ote 2 If the Login Camera dialog box appears make sure to enter the correct User in administrator has a...

Page 53: ...Assign IP of New Camera ype in a new IP address This will connect to the new camera Assign IP Address to Camera Schedule record H T Camera Config Connect Disconnect Erase Extera Information Manual rec...

Page 54: ...play screen of the network camera p of the window View list Checks the network camera s event list Snapshot Commands the network camera to take a snapshot picture Rotate image Rotates the image of the...

Page 55: ...gain to disconnect the camera ow to Delete a Camera Erase Camera To delete a camera you must select the camera to delete from the IPView SE control panel w SE control panel will appear as below H Then...

Page 56: ...sts camera information ow to Adjust the Property Setting System Configure Log Storage 1 Single HDD Reserve Space The Single HDD Reserve Space permits reserved space by memory size from 500 MB to 1000...

Page 57: ...Recycle the sy es less than the size defined he defined size can be from roxy Server his can be selected to support a amera Scan Delay his allows full screen display era can be from 1 second to 20 co...

Page 58: ...nvoke Alarm options to work with the motion function can also be enabled when motion is detected The user can define the time interval to send emails Motion Setting Adjusts detection function if avail...

Page 59: ...date button and enter the File Path The firmware will then be updated automatically you are unsure of the File path y dialog box will appear with a blank creen as illustrated below If ou can click on...

Page 60: ...d Recording is triggered when motion is detected if the motion detection feature is available You can adjust the sensitivity level and choose the warning options when motion is detected from the motio...

Page 61: ...ed from any PC Notebook over the Intranet o Q A The m that th overall performance of the transmission speed w Q Can I change the wireless antenna that is attached to the HNC320W A The wireless antenna...

Page 62: ...port 80 is open for ordinary data communication However since the HNC300 HNC320W transmits image data the default port 8481 is also required Therefore it is necessary to open port 8481 on the network...

Page 63: ...ower for the devices are well connected and functioning F A3 The wireless connection might be at fault In ad hoc mode make sure the HNC320W SS ID are set to match the PC Notebook wireless channel and...

Page 64: ...Property n to proceed with the updating process Once completed click on the OK button as illustrated below A2 The configuration of the HNC300 HNC320W image display is incorrect Through the Web Config...

Page 65: ...E Time Zone Table 65...

Page 66: ...ctiveX From input web server location http www web server location com I Important Information It is highly recommended to install the Xplug Control application to the Web Server for IE 5 0 It must be...

Page 67: ...nu screen will ppear as follows To insta all X Plug button to activate the installation procedure for the plug in rogram In a ll the Xplug Control click on the Inst p Once executed a prompt will appea...

Page 68: ...installation The License Agree button to continue ith the installation Click on the Finish button to complete the setup of the Xplug Control Utility program for the network camera ment prompt will app...

Page 69: ...wish to replace the lens do not unscrew the lens more than 1 0mm apart from the Fixed Lens Assembly Note You can further adjust the network camera s image quality via the Web Configuration under Syste...

Page 70: ...Rate selection Auto Frame rate setting 1 5 7 15 20 auto depends on the video format Video resolution 320x240 640x480 Brightness control Range 1 128 Contrast control Range 1 128 Saturation control Yes...

Page 71: ...ove J View Image cation CP VGA card reso x Inter E r above ActiveX Im x Netsca e a AVA Mode IPView SE Appli Supported OS Win 98 SE Win 2000 Win ME Win XP System requirements for IPView CPU Pentium III...

Page 72: ...dware Interface Frame rate Compression Rate selectio Auto Frame rate setting 1 5 7 15 20 Video resol 320x240 640x480 B Contra S H AN Connector One RJ 45 port to connect to 10 100Mbps Ethernet auto sen...

Page 73: ...x600 or above x Inte E er above Act Images fo O x Netscape 6 0 or above JAVA Mode View Image IPView SE Appli Supported OS Win 98 SE Win 2000 Win ME Win XP nts fo PView Hz or above Memory Size 128 MB 2...

Page 74: ...dy obtained a local IP address via the Setup Wizard or web browser You can go back to the Setup Wizard or the camera s web page at any time to change the camera s IP address On the camera s web page y...

Page 75: ...remotely Again the Open Second Port option in the System section of the camera s hom ou need to use ports other than the default Port 80 and Port 8481 for viewing and b when m era is being installed...

Page 76: ...5 amera 5 IP 192 168 0 105 second Transfer Image port 8486 ltiple cameras if you choose to use the default IP address of 192 168 0 20 it is recom o the last camera you install This will help you avoid...

Page 77: ...gn Virtual Server Ports Typically ou can find a our camera y ilar for most routers i Once you have located the Virtual Server or similar section select the By Port method if this option is available i...

Page 78: ...e Port 83 to Port 83 Please also remember that for multiple cameras you will need to open two ports for each camera as discussed earlier in this Appendix Therefore for the camera for which you just op...

Page 79: ...d medium In networks devices and application tasks processes communicate messages to each other over media They represent the senders and receivers The data they send is the message The cabling or tra...

Page 80: ...at use different data formats together DHCP different IP address every time it connects to the network In some systems the device s IP dynamic IP addresses This simplifies the task for network adminis...

Page 81: ...system which consists of 16 unique symbols the numbers 0 to 9 and the letters A through F For example the decimal number 15 is represented as F in the hexadecimal numbering system The hexadecimal syst...

Page 82: ...s For routing messages properly within your network each device requires a unique IP address But your network request information from the Internet the requests are forwarded to the Internet under the...

Page 83: ...create the subnet are called the subnet mask T Transmission Control Protocol Internet Protocol is a widely used transport protocol that connects diverse computers of various transmission methods It wa...

Page 84: ...methods It consists of several pairs of wires enclosed in an unshielded sheath WAN Network A wide area network consists of groups of interconnected computers that are separated by a wide distance and...

Reviews: