background image

33

19. 

Reinigung

Nettoyage
Pulizia
Cleaning
Reiniging

Čištění

Czyszczenie

Čistenie

ATTENZIONE! 

Pulire la stufa camino solo quando è fredda. Peri-

colo di ustioni.

Controllare la stufa camino ed i canali da fumo almeno 

una volta l‘anno per verificare l‘eventuale presenza di 

depositi ed eventualmente pulirla. 

Per effettuare la pulizia aprire le aperture per la pulizia 

poste sul canale da fumo (102) e con una spazzola eli-

minare gli eventuali depositi, in basso in direzione della 

stufa camino e verso dietro in direzione del camino. Ap-

rire il focolare per prelevare le pietre refrattarie (77-84). 

Eliminare i depositi con una spazzola o con un aspi-

rapolvere. Inserire quindi nuovamente le componenti.

WARNING! 

Only clean the stove when it is completely cool, 

otherwise there is a danger of getting burnt.

Check the stove and flue pipes for deposits at least 

once a year and clean them, if necessary. 

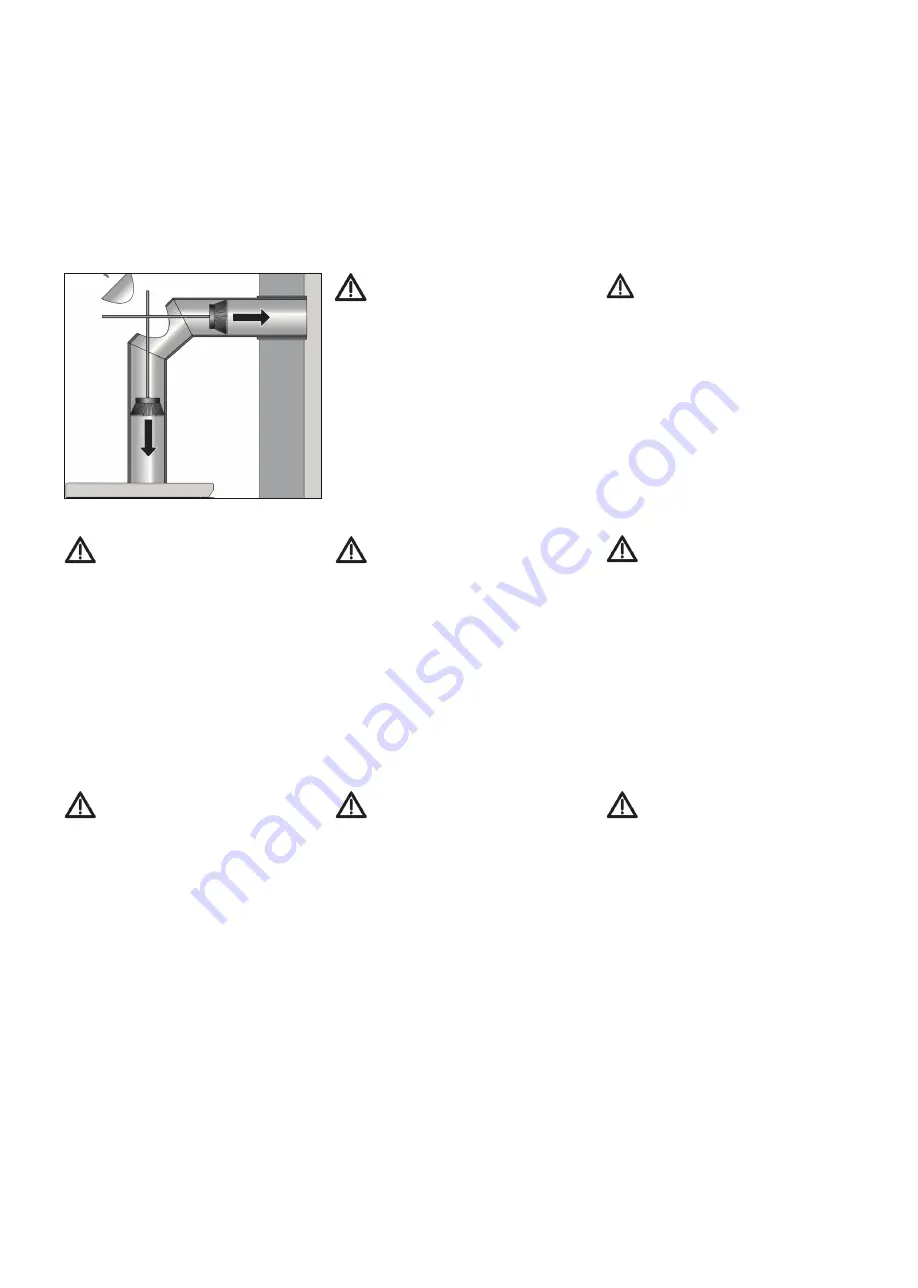
To clean, open the cleaning ports located on the flue 

pipe (102) and brush away any deposits downward 

into the stove and backwards into the chimney. Open 

the combustion chamber to remove the thermal bricks 

(77-84). Brush off or vacuum up any deposits and then 

replace the components.

OPGELET! 

De kachel enkel reinigen wanneer die is afgekoeld, 


anders bestaat het gevaar dat u zich verbrandt.

De kachel en de rookbuizen moeten ten minste één 

keer per jaar worden gecontroleerd op roetvorming. 

Indien nodig moet men ze reinigen. Om te reinigen de 

reinigingsopeningen aan de rookbuis openen (102) en 

met een borsteltje het roet in de schoorsteen en in de 

kachel naar beneden en naar achteren verwijderen. 

Open de verbrandingskamer om de thermostenen 

(77-84) eruit te halen. Verwijder het roet met een bors-

teltje of zuig het weg en monteer daarna opnieuw de 

componenten.

WARNUNG!

 Kaminofen  nur  im  abgekühlten  Zustand  reinigen, 

es besteht Verbrennungsgefahr.

Der Kaminofen und die Rauchrohre sollten mindestens 

einmal jährlich auf Ablagerung untersucht und bei Be-

darf gereinigt werden.

Zur Reinigung öffnen Sie die am Rauchrohr befindli-

chen Reinigungsöffnungen (102) und bürsten vorhan-

dene Ablagerungen nach unten in den Kaminofen und 

nach hinten in den Kamin. Öffnen Sie den Feuerraum, 

um die Thermosteine (77-84) zu entnehmen. Bürsten 

oder saugen Sie die Ablagerungen ab und setzen an-

schließend die Bauteile wieder ein.

ATTENTION! 

Pour nettoyer le poêle, attendez qu‘il soit


froid. Risque de brûlure.

Vérifier les dépôts dans le poêle et les conduits de fu-

mée au moins une fois par an et, le cas échéant, les 

nettoyer. 

Pour le nettoyage, ouvrez l‘ouverture (102) prévue à 

cet effet sur le conduit de fumée et brossez les dépôts 

vers le bas pour les faire tomber dans le poêle et vers 

l‘arrière dans la cheminée. Ouvrez le foyer afin de reti-

rer les briques thermiques (77-84). Enlevez les dépôts 

avec une brosse ou un aspirateur, puis remettez les 

composants en place.

VAROVÁNÍ!

Krbová kamna se smí čistit až po vychladnutí,

jinak hrozí nebezpečí popálení.

Krbová  kamna  a  odtah  spalin  zkontrolujte  alespoň  1x 

ročně - případné usazeniny důkladně vyčistěte.

Pro čištění krbových kamen použijte otvor na kouřovodu 

(102)  a  kartáčem  odstraňte  všechny  usazeniny  (usa-

zeniny  musí  padat  dolů  do  topeniště  a  dozadu  do 

komína).  Otevřete  dvířka  topeniště  a  vyjměte  termo 

tvarovky  (77-84).  Poté  usazeniny  odstraňte  kartáčem 

nebo je vysajte. Na závěr všechny části kamen vraťte 

na původní místo.

OSTRZEŻENIE!

Piecyk  kominkowy  należy  czyścić  po  ostygnięciu, 

istnieje ryzyko poparzenia.

Piecyk kominkowy i rury dymne powinny być przynajm-

niej  raz  w  roku  sprawdzane  na  obecność  osadów  i  w 

razie potrzeby czyszczone.

Do  czyszczenia  należy  otworzyć  wyczystkę  na  rurze 

dymnej (102) i wymieść istniejący osady w dół do kom-

inka oraz do tyłu do komina. Otwórz komorę spalania, 

aby zdjąć kamienie termiczne (77-84). Wyczyść lub od-

kurz osad i ponownie załóż elementy konstrukcji.

VAROVANIE!

Krbová  piecka  sa  môže  čistiť  až  po  vychladnutí,


inak hrozí nebezpečenstvo popálenia.

Krbovú piecku a dymovod skontrolujte aspoň 1x ročne 

a prípadné usadeniny dôkladne vyčistite.

Pri  čistení  otvorte  čistiaci  otvor  na  dymovode  (102)  a 

kefou  odstráňte  všetky  usadeniny  smerom  nadol  do 

krbovej piecky a smerom dozadu do komína. Potom 

otvorte ohnisko a vyberte akumulačné platne (77-84). 

Usadeniny odstráňte kefou alebo ich vysajte. Následne 

všetky časti piecky vráťte na pôvodné miesto.

107

Summary of Contents for PADUA 160

Page 1: ...e de montage et d entretien Istruzioni di montaggio e manutenzione Maintenance and Installation Instructions Onderhouds en montagehandleiding N vod na mont a dr bu krbov ch kamen Instrukcja monta u i...

Page 2: ...2...

Page 3: ...30 16 Pulizia del vetro 30 17 Sostituzione della guarnizione del portello 31 18 Lubrificazione 32 19 Pulizia 33 I Sommaire 1 Liste des composants 7 2 Retirer la protection de transport 8 3 Montage de...

Page 4: ...Czyszczenie szklanej szyby 30 17 Wymiana uszczelki do drzwi 31 18 Smarowanie 32 19 Czyszczenie 33 PL Obsah 1 Kusovn k 7 2 Odstra te ochranu proti po kozen b hem p epravy 8 3 Mont zadn st ny 9 4 Mont p...

Page 5: ...Nel manuale il focolare rappresentato a destra Il montaggio nella versione con focolare a sinistra avviene analogamente a quello con focolare a destra Fire box can be specified on the right or on the...

Page 6: ...en oplo pen met zelfs de dood tot gevolg VORSICHT Dieses Zeichen weist auf eine m glicherweise ge f hrliche Situation hin Nichtbeachtung kann Sach sch den oder Verletzungen von Personen zur Folge habe...

Page 7: ...tublieft alleen door uw HASE specialist inbouwen Hierdoor vermijdt u schade aan uw kachel die veroorzaakt wordt door onvakkundige inbouw N hradn d ly sm vym ovat jen autorizovan servis HASE vylou te t...

Page 8: ...usw sch tzen Prot ger la surface du po le des risques d endommagement Proteggere la superficie della stufa da danneggiamenti graffi ecc Protect the surface of the stove against damage scratches etc De...

Page 9: ...Montage de la paroi arri re Montaggio parete posteriore Rear panel assembly Montage achterwand Mont zadn st ny Monta tylnej cz ci Mont zadnej steny T07 1x T08 1x T09 1x T01 2x S05 2x S05 2x S03 2x S05...

Page 10: ...10 T08 1x T07 1x S05 2x T08 1x S05 2x S04 1x S06 1x T01 1x T07 1x 10 12 14 11 13...

Page 11: ...rale Side plate assembly only if flue pipe connection and HASE air system mounted on side Montage zijplaten alleen bij rookgaskanaal aansluiting en HASE luchtsysteem aan de zijkant Mont plechov ch bo...

Page 12: ...Pripojenie dymovodu 5 1 Rauchrohranschluss hinten und seitlich Raccordement au conduit de chemin e arri re et lat ral Allacciamento canna fumaria posteriore e laterale Flue pipe connection at rear and...

Page 13: ...mont e WARNUNG ATTENTION AVVERTENZA WARNING WAARSCHUWING VAROV N OSTRZE ENIE VAROVANIE Nicht alle Fl chen und Griffe d rfen zum Verschieben benutzt werden Les surfaces et poign es ne peuvent pas tout...

Page 14: ...glass slate or sheet steel The size of the floorplate must be larg er than the base of the stove by at least 50 cm in front and at least 30 cm at the sides of the stove WAARSCHUWING Wanneer de vloerb...

Page 15: ...en HASE luchtsysteem onderkant achter of aan de zijkant optioneel P ipojen vzduchov ho syst mu HASE dole vzadu nebo zboku voliteln p slu enstv cze instalacji wentylacyjnej firmy HASE na dole z ty u al...

Page 16: ...16 8 Vorbereitung Keramik Finition c ramique Preparazione ceramica Preparation ceramic Voorbereiding keramiek P prava keramiky Przygotowanie ceramiki Pr prava keramika 31 33 32 34 1 2...

Page 17: ...ontage de la c ramique inf rieure Montaggio ceramica in basso Assembly ceramic bottom Montage keramiek onderkant Mont keramiky dole Monta ceramiki na dole Mont keramiky dole S01 2x S06 2x S07 5x S07 3...

Page 18: ...18 1 2 40 42 44 41 43 45 1 2 2 S01 2x S06 2x 3 1 2 4 S07 2x 1 2...

Page 19: ...19 46 1 2 47 48...

Page 20: ...ontage de la c ramique sup rieure Montaggio ceramica in alto Assembly ceramic top Montage keramiek bovenkant Mont keramiky naho e Monta ceramiki na g rze Mont keramiky hore 1 S01 2x S06 2x 2 S07 5x S0...

Page 21: ...21 S01 2x S06 2x 1 2 2 S01 2x S06 2x 3 1 2 4 S07 2x 54 55 56 57 58 59...

Page 22: ...lazione elemento di montaggio facoltativo Assembly add on element optional Montage opbouwelement optioneel Mont prvku n stavby voliteln p slu enstv Monta elementu konstrukcyjnego opcjonalnie Mont kon...

Page 23: ...23 64 65 S07 2x T15 1x 66 1 2 67 S07 2x S08 2x...

Page 24: ...ln akumula n ch kamen voliteln p slu enstv Wk adanie blok w akumulacyjnych opcjonalnie Vlo enie akumul torov ch blokov volite n T16 16x T17 2x optional en option opzionale optional optioneel voliteln...

Page 25: ...25 10 2 Anschluss seitlich Sortie lat rale Uscita laterale Outflow on side Afvoer aan de zijkant V stup zboku Wylot boczny V vod na boku 71 72 73 T17 1x T16 8x...

Page 26: ...du rev tement du four Posizionamento della copertura della stufa Positioning the stove cover Plaatsen van de haard afdekking Um st n horn desky na kamna Ustawianie podpory pieca Umiestnenie podlo ky...

Page 27: ...locs d accumulation Inserimento delle pietre ad accumulo elemento di montaggio facoltativo Inserting the storage blocks add on element optional Plaatsen van de absorptie stenen opbouwelement optioneel...

Page 28: ...stato della guarnizione della porta Sostituite le guarnizioni difettose come descritto al punto 18 3 Procedere all ingrassaggio vedi punto 19 4 Pulizia del sistema di scarico fumi vedi punto 21 I Pou...

Page 29: ...quenza inversa Removing the thermal blocks same as fitting them but in reverse order Uitbouwen van de thermostenen inbouw in omgekeerde volgorde Vyjmut tepeln akumula n ch kamen vestavba v opa n m po...

Page 30: ...es Verwijderen van het linker en rechter keerschot Odstran n lev a prav klapky Zdejmowanie lewej i prawej p ki dymowej Odstr nenie avej a pravej presmerovacej platne 88 89 90 91 16 Reinigung der Glass...

Page 31: ...mplacement du joint de la porte Sostituzione della guarnizione del portello Changing the door seal Vervangen van de deurdichting V m na t sn n dv ek Wymiana uszczelki do drzwi V mena dverov ho tesneni...

Page 32: ...e the door mechanism using a high temperature resistant special grease The special grease 202025 is located in the starting box and can be purchased over your HASE dealer Vet indien nodig het deurmech...

Page 33: ...en Reinigungs ffnungen 102 und b rsten vorhan dene Ablagerungen nach unten in den Kaminofen und nach hinten in den Kamin ffnen Sie den Feuerraum um die Thermosteine 77 84 zu entnehmen B rsten oder sau...

Page 34: ...34...

Page 35: ...35...

Page 36: ...www hase de...

Reviews: