background image


14 

Baling Rate Settings 

– Round Balers 


iPad Operation 


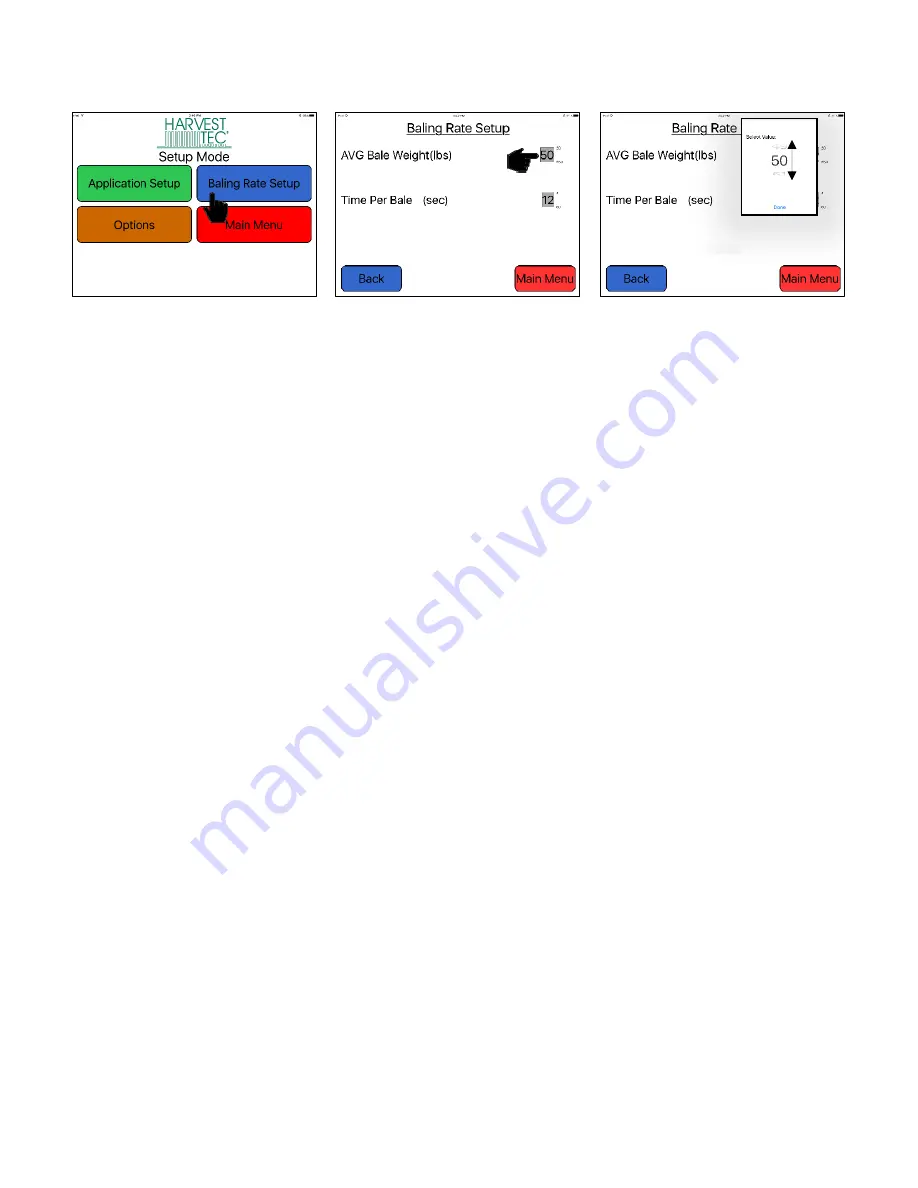
1.  On the setup mode screen press the BALING RATE key.  


2.  Press the grey number value to the right of AVG Bale Weight (Lbs). To adjust the weight of your bales, the 

scroll tool shown on the right will display. Scroll through the values to select correct information, press 
DONE when value has been selected. The information will be saved until updated. Use the same 
procedure for adjusting time per bale. 
Note: Only count time that hay is coming into the baler, do not count tie time or drive time.  

 
3.  Press the BACK key found on the bottom left hand figure of the screen to return to SETUP MODE screen 

or press the MAIN MENU key to return to the opening screen. 


Summary of Contents for 300RB

Page 1: ...1 Operation Manual Model 300RB 300RBC Moisture Only Kit for Round Balers Forage Harvester 300RB 300 RBC 16 OPR 11 19 ...

Page 2: ...2 intentionally blank ...

Page 3: ... Manual Selection 9 Recommended Preservative 9 Tab Descriptions 10 Screen Menus 11 14 Automatic Mode 11 Manual Mode 11 Setup Mode 12 Job Records 13 Software Versions 13 Baling Rate Settings 14 Automatic Mode 15 Manual Mode 16 Job Records 17 Wiring Diagram 300RB 18 Wiring Diagram 300RBC 19 Maintenance Winter Storage 20 Common Questions 20 Troubleshooting 20 iPad Troubleshooting 221 Pin Outs 22 23 P...

Page 4: ... Module 030 6670C Hay App version must be at least 2 5 18 or higher to operate with the iPad Integration Module 030 6672C Safety Carefully read all the safety signs in this manual and on the applicator before use Keep signs clean and visible Replace missing or damaged safety signs Replacement signs are available from your local authorized dealer See your installation manual under the replacement p...

Page 5: ...the Hay App 1 If iPad does not have Wi Fi turned on select the Settings tab then select the Wi Fi tab below 4 Select an available network when detected by the iPad shown in area above that currently says Other 5 Select App Store icon below and open You will need a Wi Fi connection available to view App Store Download the Hay App in the App Store by searching for Hay App in the search bar in the to...

Page 6: ...light regularly Blinking Lights System is waiting for the processor to connect which could take up to 35 seconds Red Light The Bluetooth receiver has power Green Light The Bluetooth receiver is connected to the Hay App 300 Series Applicators with serial number before THS07000 will require the THS to be sent to Harvest Tec for a required update in order to use the iPad Integration Module 030 6670C ...

Page 7: ...our iPad Figure B Note By pressing the home button one time to return to the home screen the Hay App does not shut down The system will however stop applying preservative after 10 seconds 1 Slide the app you want to shut down by sliding the app toward the top of the iPad until the app is no longer visible Figure C Figure A Figure B Figure C ...

Page 8: ...tion Module 030 6672C shown on the previous page When plugging in the iPad cord to the module the app will change to the applicator Main Menu for immediate operation Unplug the cord to return to the Device Menu page Hay App version must be at least 2 5 18 or higher to operate with the iPad Integration Module 030 6672C The In Active Connections section will show applicator systems that have been co...

Page 9: ...l aid no values will be displayed Manual Selection Selecting the Manual button below displayed to the right of the baler name will open the operation manual for your baler You do not need to be connected to a baler to open the manual and recommended preservative tabs after a baler has been connected Recommended Preservative To view recommended preservative information application rates and frequen...

Page 10: ...tion on the go and counting total pounds of product used Manual Mode Allows operator to manually turn pumps on and off This mode also has moisture content displayed Use this mode to prime pump Software Versions Selecting this tab will display the software currently installed Setup Mode This mode allows the operator to adjust bale rate application rate settings and select tip output Job Records Kee...

Page 11: ...p Pressing the home button will cause the system to stop reading moisture after 10 seconds Bluetooth Connection Indicator Green THS is connected Yellow THS connecting Red THS not connected Actual Target and Used will read 0 with moisture only system Bluetooth Connection Indicator Green THS is connected Yellow THS connecting Red THS not connected X Pump is OFF Pump is ON Ensure pumps are shut off w...

Page 12: ...urn on Adjust the moisture default to the moisture of the last bale reading Select X to turn on options shown Indicates Crop Eyes are ON Adjust moisture alarm to desired level Select desired alarm moisture Adjust bale weight information Select desired bale weight ...

Page 13: ...t New Job to create new job Type in Field Name press Create Job Select Job Details to view job records Select the Up and Down arrows to view different jobs Software Versions This is an example Software Versions will change ...

Page 14: ...splay Scroll through the values to select correct information press DONE when value has been selected The information will be saved until updated Use the same procedure for adjusting time per bale Note Only count time that hay is coming into the baler do not count tie time or drive time 3 Press the BACK key found on the bottom left hand figure of the screen to return to SETUP MODE screen or press ...

Page 15: ...ing Rate and Application Rate are shown in the middle of the screen Application rate will read zero with moisture only systems 5 Volume of preservative used will be shown at the bottom of the screen will show accumulated pounds of preservative used on the go There will not be any information shown in the Used section with a moisture only unit 6 The graph shows the moisture trend from the past 90 s...

Page 16: ...rate are shown in the middle of the screen The Actual reading will read zero with a moisture only unit 6 Volume used shown at the bottom of the screen will show accumulated pounds of preservative used on the go This number will reset at power down but remains in the job record screen Used will read zero with moisture only unit 7 The graph in the upper left corner shows the moisture trend from the ...

Page 17: ... UP or Down keys 3 The field name is located under the up arrow 4 The accumulated information from the field will be displayed in the middle of the screen Every time the NEW JOB key is pressed the accumulated pounds on auto and manual modes will be reset to zero After 300 jobs have been stored the next time the NEW JOB key is pressed the system will start over with job one and the old job will be ...

Page 18: ...wer harness on the baler 006 3650B1 will connect to the tractor power harness 006 3650T at the hitch 3 Connect the keyed power wire 006 5650K to a keyed power source on the tractor The keyed power wire must connect to a keyed source or the unit will not power up correctly 4 Attached the iPad Integration Control 030 6672C to the tractor power harness 006 3650T 5 Attach the End of Bale EOB connectio...

Page 19: ...wer harness on the baler 006 3650B1 will connect to the tractor power harness 006 3650T at the hitch 3 Connect the keyed power wire 006 5650K to a keyed power source on the tractor The keyed power wire must connect to a keyed source or the unit will not power up correctly 4 Attached the iPad Integration Control 030 6672C to the tractor power harness 006 3650T 5 Attach the End of Bale EOB connectio...

Page 20: ...Pad Note Not all chargers are designed to charge an iPad verify before purchasing 5 What is the max distance for connection between the iPad and the Bluetooth Receiver Pre 2020 applicators were equipped Bluetooth receivers 030 6672B The range for the connection will depend on the amount of equipment tractor baler ect The max distance will range between 10 20 6 What do the lights on the 030 6672B i...

Page 21: ...cessory back in discovery mode then pair and connect it again By tapping on its name in the Bluetooth accessories tab and then Forget this Device In settings tap on a device s name then Unpair Display connector plug and bale rate sensors plug are switched on THS Switch connections Short in display cable Replace the cable iPad touchscreen is slow or does not respond Screen may be dirty Clean screen...

Page 22: ...wer Pin 4 Not Used Pin 5 Green HT Can Low Pin 6 Yellow HT Can Hi Pin 7 Not Used Pin 8 Black Ground from BLE Pin 9 Black Ground from THS Pin 10 Not Used iPad Integration Control BLE on Harness 006 3650T Pin 1 Red 12V Power for BLE Pin 2 Black Ground for BLE Pin 3 Yellow HT Can Low Pin 4 Not Used Pin 5 Green HT Can Hi Pin 6 Not Used Pin 7 Not Used End of Bale Sensor at 300 Controller Harness Pin 1 B...

Page 23: ...n 4 Not Used Pin 5 Not Used Pin 6 Not Used Pin 7 Not Used Pin 8 Blue Signal for Sensor 1 Pin 9 Blue Signal for Sensor 2 Pump connection at 300 Controller Harness Pin 1 Red Power to Pump Pin 2 Black Ground to Pump Solenoid Connection at 300 Controller Harness Pin A Black Solenoid Pause Pin B White Solenoid Ground V2 DSM Connection at 300 Controller Harness Pin A Black Solenoid Pause Pin B White Sol...

Page 24: ...s 20 006 3650B1 1 4 Control Box 006 3671RB 1 5 Dust Plug Kit 006 5651Plug 1 6 Key Switch Harness 006 5650K 1 NP USB Cable 006 6672USBC 1 Complete Assembly 030 363CPA End of Bale Sensor Kit A Ref Description Part Qty 1 End of Bale Sensor 006 7400 1 2 EOB Extension 006 7400EXT 1 3 End of Bale Bracket 001 4648RB 1 Complete Assembly EOB RB A 1 2 3 4 6 5 2 1 3 ...

Page 25: ... 030 4643 2 Complete Assembly Ref 1 6 MSH RB A Moisture Sensor 300RBC Ref Description Part Qty Ref Description Part Qty 1 RB Isolator 006 4641FX 2 6 1 2 x 4 1 2 Carriage Bolt Hardware 2 2 RB Moisture Pad 006 4641HX 2 7 Sensor Bushing 006 4641G 2 3 1 2 Nut Hardware 4 8 Plastic Isolator 006 4641I 2 4 1 2 Lock Hardware 4 9 Moisture Cable 006 4640GX2 1 5 1 2 D Washer Hardware 6 Moisture Assembly Ref 1...

Page 26: ...USB plug before connecting the wires Black White 5 The wires will then be hooked to the designated terminals on the bottom of the USB plug 6 Drill a 1 1 8 hole in the preferred mounting location Be sure to clean any sharp edges after drilling 7 Feed the wires through the mounting hole 8 If using the round plastic nut to secure plug in place slide the nut back over the wiring before connecting the ...

Page 27: ... to deny the warranty request at their discretion Parts must be returned through the selling dealer and distributor transportation charges prepaid This warranty shall not be interpreted to render Harvest Tec Inc liable for injury or damages of any kind direct consequential or contingent to persons or property Furthermore this warranty does not extend to loss of crop losses caused by delays or any ...

Page 28: ...28 HARVEST TEC INC P O BOX 63 2821 HARVEY STREET HUDSON WI 54016 PHONE 715 386 9100 1 800 635 7468 FAX 715 381 1792 Email info harvesttec com ...

Reviews: