background image

4

SAFETY INFORMATION

Safety Information

Dear Customers

We strongly recommend that you carefully study
the Operating Instructions before attempting to
operate the unit and that you note the listed
precautions.

The model number and serial number of this
product can be found on either the back or the
bottom of the unit. Please note them in the
space provided below and retain this booklet as
a permanent record of your purchase to aid
identification in the event of theft.

MODEL NUMBER

SERIAL NUMBER

Verify Line Voltage Before Use

Your DVD 5 has been designed for use with
220-240-volt AC current. Connection to a line
voltage other than that for which it is intended
can create a safety and fire hazard and may
damage the unit.

If you have any questions about the voltage
requirements for your specific model, or about
the line voltage in your area, contact your selling
dealer before plugging the unit into a wall out-
let.

Handle the AC Power Cord Gently

When disconnecting the power cord from an AC
outlet, always pull the plug, never pull the cord.

Do Not Open the Cabinet

There are no user-serviceable components inside
this product. Opening the cabinet may present a
shock hazard, and any modification to the prod-
uct will void your guarantee. If water or any
metal object such as a paper clip, wire or a
staple accidentally falls inside the unit, discon-
nect it from the AC power source immediately,
and consult an authorized service station.

Installation Location

To assure proper operation, and to avoid the

potential for safety hazards, place the unit on
a firm and level surface. When placing the
unit on a shelf, be certain that the shelf and
any mounting hardware can support the
weight of the product.

Do not place the unit directly on a carpeted
surface.

Avoid moist or humid locations.

Avoid installation in extremely hot or cold

locations, or an area that is exposed to direct
sunlight or heating equipment.

Cleaning

When the unit gets dirty, wipe it with a clean,
soft, dry cloth. If necessary, wipe it with a soft
cloth dampened with mild soapy water, then a
fresh cloth with clean water. Wipe immediately
with a dry cloth. NEVER use benzene, aerosol
cleaners, thinner, alcohol or any volatile cleaning
agent. Do not use abrasive cleaners, as they may
damage the finish of metal parts. Avoid spraying
insecticide near the unit.

Unpacking

The carton and shipping materials used to pro-
tect your new receiver during shipment were
specially designed to cushion it from shock and
vibration. We suggest that you save the carton
and packing materials for use in shipping if you
move, or should the unit ever need repair.

To minimize the size of the carton in storage,
you may wish to flatten it. This is done by care-
fully slitting the tape seams on the bottom, and
collapsing the carton down to a more two-
dimensional appearance. Other cardboard
inserts may be stored in the same manner.
Packing materials that cannot be collapsed
should be saved along with the carton in a plas-
tic bag.

If you do not wish to save the packaging materi-
als, please note that the carton and other sec-
tions of the shipping protection are recyclable.
Please respect the environment and discard
those materials at a local recycling center.

Moving the Unit

Before moving the unit, be certain to disconnect
any interconnection cords with other compo-
nents, and make certain that you disconnect the
unit from the AC outlet.

IMPORTANT NOTE:

To avoid damage to the

DVD 5, which may not be covered by the war-
ranty, be certain that all discs are removed from
the unit before it is moved. Once the DVD 5 is
installed, discs may be left in the unit when it is
turned off, but the unit should NEVER be moved
with discs left in any of the positions of the disc
tray.

Important Information for the User

This equipment generates, uses and can radiate
radio-frequency energy and, if not installed and
used in accordance with the instructions, may
cause harmful interference to radio communica-
tion. However, there is no guarantee that harm-
ful interference will not occur in a particular
installation. If this equipment does cause harm-
ful interference to radio or television reception,
which can be determined by turning the equip-
ment off and on, the user is encouraged to try to
correct the interference by one or more of the
following measures:

Reorient or relocate the receiving antenna.

Increase the separation between the equip-
ment and receiver.

Connect the equipment into an outlet on a
circuit different from that to which the receiv-
er is connected.

Consult the dealer or an experienced radio/TV
technician for help.

CAUTION:

The DVD 5 uses a laser system. To

prevent direct exposure to the laser beam, do
not open the cabinet enclosure or defeat any of
the safety mechanisms provided for your protec-
tion. DO NOT STARE INTO THE LASER BEAM.
To ensure proper use of this product, please
read this Owner’s Manual carefully and retain it
for future use. Should the unit require mainte-
nance or repair, please contact your local
Harman Kardon Service Station. Refer servicing
to qualified personnel only.

Summary of Contents for DVD 5

Page 1: ...250 Crossways Park Drive Woodbury New York 11797 www harmankardon com Harman Consumer International 2 route de Tours 72500 Château du Loir France 2000 Harman Kardon Incorporated Part J9020000300X ...

Page 2: ...DVD5 5 Disc DVD Changer OWNER S MANUAL RESUME TITLE RANDOM CHAPTER REPEAT TRACK 1ALL HOUR DISC A B MIN PROG INTRO SEC DVD CD 1 2 3 4 5 DISC Power for the Digital Revolution ...

Page 3: ...ling a Bookmarked Scene 26 Clearing a Bookmarks 27 Programmed Play with DVD 27 Repeat Play 27 A B repeat Play 27 Random Play 28 Program Play 29 CD Playback 29 Compatibility of Discs 29 To Load and Play an Audio CD 29 Audio CD Playback Features 29 Using the Banner Display 30 Selecting a Track 30 Using IntroScan 30 Using Booksmarks 30 Selecting Time Display 31 Programmed Play with CD 31 Repeat Play ...

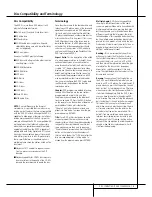
Page 4: ...proper use of the DVD 5 If you have additional questions about this prod uct or its installation or operation that are not answered in this manual please contact your dealer as he is your best source of local information You may also contact Harman Kardon via e mail through our Web site at www harmankardon com High quality video Advanced sophisticated 10 bit MPEG 2 video decoding circuits Direct R...

Page 5: ...re specially designed to cushion it from shock and vibration We suggest that you save the carton and packing materials for use in shipping if you move or should the unit ever need repair To minimize the size of the carton in storage you may wish to flatten it This is done by care fully slitting the tape seams on the bottom and collapsing the carton down to a more two dimensional appearance Other c...

Page 6: ...ormat depending on the features recorded on a disc Chapter DVD programs are divided into chap ters and titles Chapters are the sub sections programmed into a single title on a disc Chapters may be compared to the individual tracks on an audio CD Press the PROG button on the remote to see the numbers of chapters of each individual title on a disc below the Chapter icon after the disc was read and p...

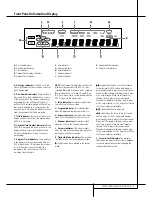
Page 7: ...esired speed release the button and the disc will continue to search at fast speed To resume normal playback speed press the play button 9 Open Close Button Press this button to open or close the Disc Tray 6 10 Skip Forward Reverse Press this button to move forward or backward through the music tracks on a CD disc or the chapters on a DVD disc 11 Stop Press this button once to place the disc in th...

Page 8: ... is loading Bye when the unit is turned off and Disc Error when a disc not compatible with the DVD 5 is put into the play position F Intro Indicator This indicator lights when the Intro Scan function is active G Program Indicator This indicator lights when the programming functions are in use H Repeat Indicators These indicators light when any of the Repeat functions are in use I Random Indicator ...

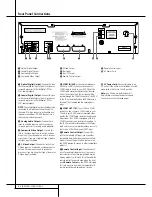
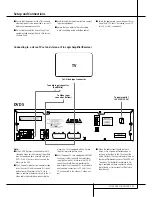
Page 9: ...back unit has a SCART socket you can connect a SCART cable to it and to your DVD Player The SCART cable carries both audio and video sig nals of the external unit These signals will be routed through the SCART connector of the DVD to the TV automatically when the DVD player is turned off to Standby and the external unit plays SCART OUT TV If your TV has a SCART socket you can connect a SCART cable...

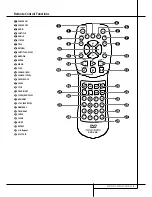
Page 10: ...T PREV SLOW 0 7 A H AUDIO 5 2 9 C PLAY D F NEXT I K M 1 2 3 7 5 6 8 9 0 4 Q P O N L J G E B 8 6 1 4 3 SUBTITLE ANGLE 0 1 2 3 4 5 6 7 8 9 A B C D E F G H I J K L M N O P Q POWER ON POWER OFF AUDIO SUBTITLE ANGLE STATUS TITLE RETURN SUBTITLE ON OFF ARROWS ENTER MENU PLAY SEARCH REV SEARCH FWD OPEN CLOSE PAUSE STOP PREV NEXT SLOW REV FWD RANDOM STEP REV FWD NUMBERS PROGRAM CHECK CLEAR LIGHT REPEAT A ...

Page 11: ...it is in play mode Each time you press this button search speed changes as below DVD F SEARCH1 F SEARCH2 F SEARCH3 F SEARCH4 F SEARCH1 CD F SEARCH1 F SEARCH2 F SEARCH3 F SEARCH1 F OPEN CLOSE Press to open or close the disc tray G PAUSE Freezes a picture when a disc is playing Press again for normal playback H STOP Stops playing a disc When disc is playing if you press STOP and PLAY the disc will r...

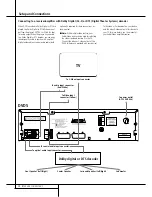
Page 12: ...hem to the TV set in order to achieve a sharper picture Use the S video cable optional when connecting the player to a TV set equipped with an S video input for improved picture clarity Most European TV s are equipped with SCART connectors rather than with a normal video input yellow cinch In that case the SCART connection should be used providing the audio signal too see page 13 Use separate anal...

Page 13: ...or selecting the video signal and routing it to the TV Connect the video or S video output of the DVD5 whatever is provided with your device to the video or S video input on your device and the video S video output of this device to your TV For more details see the manual of your Audio Video amplifier receiver TV To power outlet AC 230V 50 Hz To S Video input connector To audio input connector Red...

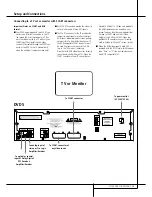
Page 14: ...Configure this connector to RGB e g in the TV s menu if necessary Note that with RGB video the colour intensity cannot be adjusted with most TVs When the SCART connector of your TV cannot be con figured to RGB but to S Video only probably the RGB signal cannot be viewed on your screen Then you should use an adapter from S Video to SCART and link the S Video Output of the DVD5 with the S Video com ...

Page 15: ...ay but return to your dealer or special battery assembly centres Remote control operation range Point the remote control unit from no more than about 7 m from the remote control sensor and within about 60 degrees of the front of the unit The operating distance may vary according to the brightness of the room Notes Do not point bright lights at the remote con trol sensor Do not place objects betwee...

Page 16: ...lby Surround mark Caution for the optical coaxial digital audio outputs When connecting an amplifier with an opti cal coaxial digital input which does not con tain the Dolby Digital AC 3 or DTS decoder be sure to select PCM at Dolby Digital and DTS of the initial setting Digital Audio Output see also page 23 Otherwise any attempt to play DVDs may cause such a high level of noise that it may be har...

Page 17: ...kward through the DVD or CD disc being played at fast speed press the Search Forward Reverse Buttons Once one of these buttons is pressed the fast search will continue until the Play Button is pressed Note that the fast play speeds vary for CD discs and DVDs For DVD playback there are four fast play speeds Each press of the Search Forward Reverse Buttons will cycle to the next speed in the followi...

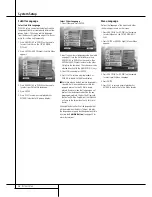
Page 18: ...ct specific Audio Language 4 Press ENTER 5 Press PLAY to resume normal playback or RETURN to delete Set Up Menu display You can exit the Audio menu at any time by pressing the ARROW left Select Other Language 1 Select Other and Press ENTER 2 Input first number of language code see table on page 33 into the first digit by pressing ARROW UP or DOWN on the remote then ENTER or ARROW right and enter t...

Page 19: ... the NUMBER 0 9 keys 3 Select OK icon and press ENTER 4 Press PLAY to resume normal playback or RETURN to delete Set Up Menu display Note that when a default subtitle language is selected it will be used whenever that lan guage is present on the DVD disc being played However when that language is not present the language used will be the one preprogrammed into the disc itself typically that defaul...

Page 20: ...a will have free access 4 Press ENTER The rating menu will disappear and rating level selected will be indicated in the Set Up Menu If any password was memorized see next page rating menu is available only after cor rect password has been entered The rating levels The rating system is based on information encoded on the DVD disc being played so movies may carry a rating symbol the disc may or may ...

Page 21: ...rd for con firmation 7 When incorrect password is entered new password menu appears and you can enter and confirm the password again This time as help the correct password is repeated in each digit of the upper Try Again menu and the incorrect password in the lower Confirm Password menu appearing after the upper is passed 8 After the correct password is entered in all menus press ENTER the main pa...

Page 22: ...Press the ARROW UP or DOWN or NUMBER 0 9 on the remote to enter same password for confirmation 7 After new password is entered correctly in all menus press ENTER The main password menu will return To return to Set Up Menu press ARROW left Clear Password Password can be cleared easily but at first the current password must be entered 1 Press ARROW UP or DOWN on the remote to select Password on the ...

Page 23: ... in the cen ter with black columns on the left and right side of the screen But true widescreen discs anamorph recordings i e those shown spread vertically when DVD5 is set to 4 3 Pan Scan mode see above will be shown optimally i e with full vertical resolution With some 4 3 TVs set to 16 9 format discs with 4 3 format may be played compressed verti cally With those discs the TV must be set to 4 3...

Page 24: ... selected optionally by pressing the Audio button on remote see page 25 that will feed a PCM signal to the digital output DTS Choose this setting if you connected a receiver or decoder with Dolby Digital and DTS decoding to your DVD player Then all recordings will be output and played optimally whether PCM Dolby Digital or DTS format To select Digital Audio Output format follow these steps 1 Press...

Page 25: ...e disc you re playing To make the Banner Display dis appear from the screen press STATUS or CLEAR on the remote control Selecting a Title Some discs contain more than one title For example intros and making of often are divid ed into several titles You can press PROG to view the number of titles recorded on a disc in parenthesis below the Title icon after a disc was read and the player is in Stop ...

Page 26: ...tter S is highlighted Press ENTER the Subtitle menu appears 3 Press ENTER on the remote to change subtitle language 4 Each time subtitle on off is pressed the subti tle appears and a check mark icon to the right of the Subtitle menu as confirmation or disappears on the screen 5 To make the menu disappear from the screen press the CLEAR or STATUS on the remote Notes If you press SUBTITLE on remote ...

Page 27: ... scene you want to mark is reached 5 Press CLEAR or STATUS on the remote to make the Banner Display disappear from the screen Recalling a Bookmarked Scene 1 While playing a disc press STATUS on the remote the Banner Display appears 2 Press the ARROW LEFT OR RIGHT on the remote until the Bookmark icon is highlighted 3 Press ENTER 4 Press the ARROW UP on the remote to move to the Go To parts of the ...

Page 28: ...tion press the Repeat Button until the Repeat Off Banner appears in the on screen display or the Repeat Indicators in the Information Display go out Repeat Play may also be stopped by pressing the Stop Button twice A B Repeat Play The Repeat A B function allows you to select any portion of a DVD or CD and have it repeat con tinually unit the unit is manually stopped To initiate a Repeat A B playba...

Page 29: ...OWN to select the Title Chapter to be deleted When it is high lighted grey press CLEAR or select DELETE icon on the Program Edit Display and press ENTER selected Value will be deleted Insert Chapter Inserting chapters is possible only if chapters are already programmed on the playlist and will change the order of playback 1 Press PROGRAM on the remote to insert Chapter Program Edit Display appears...

Page 30: ...utton To select a specific disc in the player press the Direct Access Button corresponding to the slot where that disc is loaded Note that all playback basics and transport func tions are described in detail on page 16 of the manual Audio CD Playback Features When playing audio CDs your DVD player has the same features as a CD player including track skip repeat play and programmed playback The on ...

Page 31: ...sing Bookmarks Bookmarks are a feature of the DVD5 that allows you to mark up to nine different points on a disc and to quickly return to those points later The Bookmarks feature works on both DVD and CD discs To Enter a Bookmark Follow These Steps 1 While a disc is playing press STATUS on the remote to see the Banner Display if not already on 2 Use the ARROW RIGHT or LEFT until the Bookmark icon ...

Page 32: ...cators in the Information Display go out Repeat Play may also be stopped by pressing the Stop Button twice If Repeat Disc is selected with Program play the complete program will be repeated Note that Repeat Track is not available with Program play A B Repeat Play The Repeat A B function allows you to select any portion of a CD and have it repeat continually unit the unit is manually stopped To ini...

Page 33: ...isplay and press ENTER or press PLAY on the remote to start program play A red PROG indicator will light in the front panel display and program will be played Delete Program 1 To delete any programmed Track press ARROW RIGHT or LEFT on the remote to move Arrow icon to the playlist 2 Press ARROW UP or DOWN on the remote to select the Track to be deleted until it s high lighted grey and press CLEAR ...

Page 34: ... 7185 Hausa 7265 Hebrew 7387 Hindi 7273 Hungarian 7285 Icelandic 7383 Indonesian 7378 Interlingua 7365 Interlingue 7369 Iunpiak 7375 Irish 7165 Italian 7384 Japanese 7465 Javanese 7487 Kannada 7578 Kashmiri 7583 Kazakh 7575 Kinyarwanda 8287 Kirghiz 7589 Kirundi 8278 Korean 7579 Kurdish 7585 Laothian 7679 Latin 7665 Latvian Lettish 7686 Lingala 7678 Lithuanian 7684 Macedonian 7775 Malagsy 7771 Mala...

Page 35: ...ttings DVD disc is in fast or slow mode There is no audio playback on DVD discs during fast or slow modes Picture is distorted or jumps during MPEG 2 decoding It is a normal artifact of DVD playback for pictures fast forward or reverse play to jump or show some distortion during rapid play Some remote buttons do not operate Function not available for this disc Some discs do not include all DVD fea...

Page 36: ... Ohms AC Power 220 240 V 50 Hz Power Consumption 25 Watts On Dimensions WxHxD 440x130x420 mm Weight 7 6 Kg All specifications subject to change without notice Harman Kardon and Power for the digital revolution are trademarks of Harman Kardon Inc Manufactured under license from Dolby Laboratories Dolby AC 3 ProLogic and the double D symbol are trademarks of Dolby Laboratories Confidential Unpublish...

Reviews: