background image

3 - Description

1. 7

Fluid System

Main Product Pump

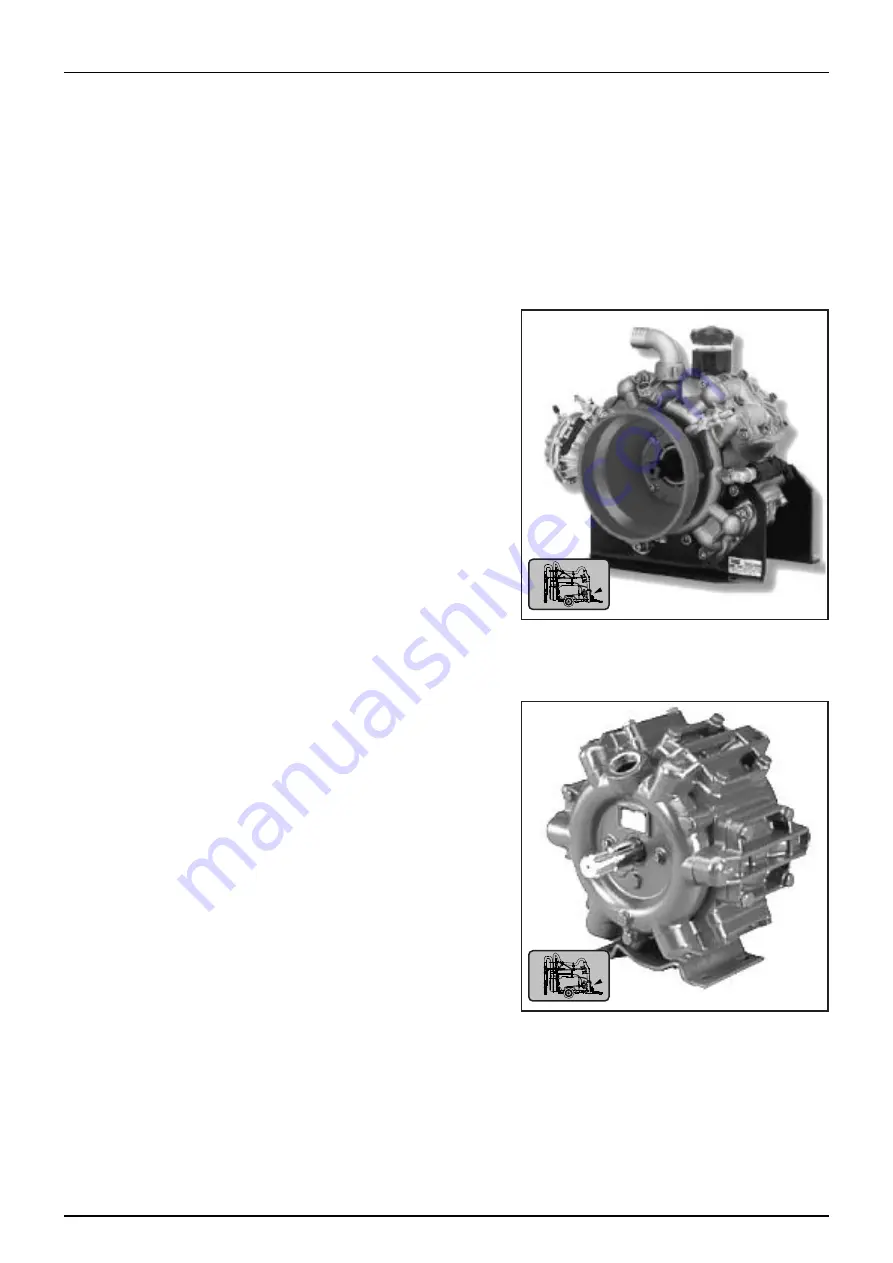
The main product pump is available in two different models;

AR Pumps BHS200 - Four Diaphragm Brass Head High Pressure Pump

HARDI 363 - Six Diaphragm Positive Displacement Pump

BHS200 Pump

High pressure diaphragm pumps with positive displacement, external bronze manifolds and brass heads with 4 
diaphragms. It has a maximum pressure of 50 bar (775 PSI) and operating at 550 RPM will deliver 193.7 litres per 
minute.

Four diaphragm positive displacement pump

High Pressure 50 bar (725 PSI)

193.7 Litres per min delivery rate.

Self priming

Oil bath lubrication

Cast alloy construction

363 Pump

The Hardi 363/7 pump has a 6 splined 1 3/8” shaft for connection to the tractor PTO. The normal operating 
revolutions are 540 RPM. The HARDI 363 is a self priming diaphragm pump with 6 diaphragms and a maximum 
pressure of 20 bar (294 PSI).

Six diaphragm positive displacement radial pump with base 
plate.

Self-priming.

Can rotate clockwise or anti-clockwise.

One grease point for lubrication.

Dry sump to simplify maintenance.

Polyurethane diaphragms and seals.

Cast iron crankcase and covers.

Stainless steel bolts and plates for diaphragms.

1 1/2” suction port, 1” pressure port.

Capacity range of 140 l/pm @ 0 bar to 122 l/pm @ 20 bar

BHS200 Product Pump

363 Product Pump

Summary of Contents for Mercury Covamax series

Page 1: ...MERCURY COVAMAX Operator Instruction Manual 67002404 100 HAU 08 2009 www hardi com au...

Page 2: ...supply operational information and is to be read in conjunction with the Spray Technique book and any other manuals supplied with your sprayer Illustrations technical information and data in this boo...

Page 3: ...Y DRIFT 1 MECHANICAL SAFETY 2 DISPOSAL OF CHEMICAL CONTAINERS 2 CHEMICAL SAFETY 3 Safety Equipment 3 Contaminated Clothing and Equipment 3 Australian Safety Standards 3 Chemical Information 3 SPRAYER...

Page 4: ...in Product Pump 7 Manifold System 8 Filters 8 BoomZone Selection Valves 9 Operating Units 10 MC 2 Manual Operating Unit 10 CB 2 Electric Control Unit 10 EVC Operating Control Unit 11 HARDI CB 2 Switch...

Page 5: ...ty 1 Transporting Mistblower 2 Truck transport 2 Connecting Mistblower to tractor 3 Adjusting drawbar length 3 Hitching Drawbar 4 Sprayer levelling with wide angle drawbar 5 Connecting Hydraulics 6 Br...

Page 6: ...Unit Distribution Stack Outlet Spouts 5 Boom Operations 6 Lift 6 Individual Fold Manual Hydraulic Tilt 6 Electric over Hydraulic Tilt EOH 6 Filling of water 7 Filling the clean water tank 8 Cleaning 8...

Page 7: ...3 O Ring and Filter lubrication 4 Gearbox lubrication 4 Pump Maintenance 4 Servicing 5 10 Hour Servicing 5 50 Hour Servicing 7 250 Hour Servicing 8 1000 Hour Servicing 9 Occasional Maintenance 10 Boo...

Page 8: ...1 Sensors 4 Flow Sensor Inspection 4 Technical Specifications Section 8 Weights and Measures 1 Conversion factors Metric to Imperial units 2 Filter mesh specifications 2 Recommended Tyre Sizes Load R...

Page 9: ...conditions 1 Risk Assessment Section 10 Entanglement 1 Cutting Stabbing Puncturing or Striking 1 Shearing 1 Crushing 2 Electrical 3 Explosion 3 Friction 3 Pressure 4 Slips Trips Falls 4 Ergonomics 5...

Page 10: ...Table of Contents TOC 8...

Page 11: ...1 Welcome 1 1 MERCURY COVAMAX Operator Instruction Manual 67002404 100 HAU 08 2009 HARDI Australia 534 538 Cross Keys Road Cavan South Australia 5094...

Page 12: ...ections and warnings in this publication and all related material must be thoroughly read and understood before attempting to operate this equipment DANGER Failure to comply with the above may result...

Page 13: ...result of spray drift Certain climatic conditions can increase the risk of spraydrift onto neighbouring crops Although calibration information is provided in the Mistblowing Techniques Manual it is v...

Page 14: ...r local authorities before commencing operation WARNING When using an arc welder disconnect any power leads to the sprayer prior to welding and remove any flammable or explosive material from the area...

Page 15: ...so be safely isolated and carefully washed and decontaminated Australian Safety Standards Protective clothing and equipment must conform to Australian Safety Standards and must always be used when han...

Page 16: ...uct tank before leaving the field Do not attempt to drive this vehicle at high speeds with product in the tank Fill product tank once you have reached the area of operation WARNING Turn on the hazard...

Page 17: ...rical components generate heat To avoid serious burns never touch internal components immediately after use DANGER Disassembly or attempted repairs if accomplished incorrectly can create electrical sh...

Page 18: ...2 Safety 2 6...

Page 19: ...boom design is a simple but sturdy construction utilising maintenance free no grease bushes for trouble free operation The boom is a perfect platform for supporting the COVAMAX air delivery system It...

Page 20: ...Drawbar 4 Main Tank 5 Blower Fan 6 Tool Box Main Tank Lids 7 EC Control Valves 8 Tilt Cylinder If fitted 9 Upper Nozzle Spouts Outer Arm 10 Lower Nozzle Spouts Outer Arm 11 Fold Cylinder 12 Lift Cylin...

Page 21: ...ocated at the rear of the machine Sprayer Details It is important to record details of your sprayer for future reference These details may help to identify your sprayer when requiring spare parts or r...

Page 22: ...time also to fill out your warranty form and return it to HARDI Australia within fourteen days of delivery Road worthiness When driving on public roads and other areas where the highway code applies o...

Page 23: ...ation and prevent chemical from becoming trapped in tight spots The main tank also features a fluid level indicator The Handwash tank has a nominal capacity of 15 litres and is situated at the front o...

Page 24: ...the PTO make sure that the diameter and number of splines on the driveshaft is the same as that of the tractor s output shaft Make sure that the tractor s PTO output speed is matched to the speed of...

Page 25: ...er min delivery rate Self priming Oil bath lubrication Cast alloy construction 363 Pump The Hardi 363 7 pump has a 6 splined 1 3 8 shaft for connection to the tractor PTO The normal operating revoluti...

Page 26: ...pressure filters Suction Filter The suction filter captures impurities in the liquid system in order to protect the machines components It is located at the front of the sprayer in the lower left hand...

Page 27: ...boom These filters are located directly in front of the fan and are connected immediately before the boomzone selection valves BoomZone Selection Valves Located immediately after the pressure filters...

Page 28: ...pressure valve 1 and a pressure gauge 2 These are connected on to the end of the supply manifold and serve to regulate and read the system pressure With the use of two control handles connected to th...

Page 29: ...the pressure Its constituent elements are Pressure Gauge Electro Valves for section control Electro Valve for pressure control Spray Box 2 pressure section ON OFF Pressure Equaliser Valves The power...

Page 30: ...ontrols the system pressure allowing excess fluid to bypass back to the main tank Pressure Gauge The pressure gauge gives a visual indication of the system pressure and can easily be viewed from the t...

Page 31: ...des user feedbackof spray applicationin addition to visual and audio alarms that notify the operator when conditions have changed HC 5500 Display Like the HC 2500 the HC 5500 display gives valuable fe...

Page 32: ...nt and rear of the machine that is then divided and directed into the boom tubes by the distribution stack Warning Do not put hands or other objects near fan Fan operates at high speeds and can draw n...

Page 33: ...CURY COVAMAX is a two speed gearbox This gearbox is mounted directly in front of the fan unit and controls fan speed between the PTO shaft and the blower by positioning the lever in one of three posit...

Page 34: ...it from moving Carry out this operation with empty tanks Loosen the nuts and bolts on the axle housing Extend the half axle to the desired length without exceeding the maximum Tighten the nuts and bol...

Page 35: ...r and life from the mistblower s wheels and to avoid punctures and unnecessary strain In areas of difficult access with many slopes or for working on tall crops always choose a wheel that guarantees s...

Page 36: ...s time spent on trips for filling etc The suspension is ACTIVE when the machine is load free and it gets lower as the tank is filled When the tank of the mistblower reaches half full the suspension is...

Page 37: ...hepowdermixing feature with thelidremovedaschemicalproductmay beforced from the basket and cause chemical contamination to surrounding areas or contact with operator Activate the powder mixer by turni...

Page 38: ...itted to the MERCURY COVAMAX has numerous features that enable flexibility for operators when setting up and operating Some of the benefits are Lift Fold Tilt Breakaway Arms Adjustable nozzle position...

Page 39: ...time Tilt The MERCURY COVAMAX has two options available for tilting of the boom Electric over Hydraulic EOH Manual Hydraulic Electric over Hydraulic EOH The electric tilt option allows independent til...

Page 40: ...aroftheboomcentre allows the boom tubes to independently move out should the boom arm come in contact with an object Adjustable Nozzles Independent control The nozzle bodies fitted to the Covamax allo...

Page 41: ...ur work area has lifting and safety equipment of a suitable load bearing capacity Always wear safety eye protection overalls safety boots and gloves where appropriate Keep animals and people away from...

Page 42: ...k trailer make sure the trailer is of adequate size and properly placarded with safety signs should they be required Do not allow heavy objects to be loaded on top of the mistblower as this may cause...

Page 43: ...sted The basic steps to follow are Support mistblower on jockey wheel Loosen bolts C where the drawbar passes through the chassis Remove nut bolt B Slide drawbar in or out of the frame to desired posi...

Page 44: ...Wide Angle Drawbar connected to linkage arms Standard Drawbar The standard drawbar is hitched to the tractor and secured with a pivot pin Wide Angle Drawbar The wide angle drawbar is directly connecte...

Page 45: ...ide angle drawbar By having the drawbar hitched to the tractors linkage arms it provides the ability to level the sprayer as shown below this will provide a better ride and more accurate readings when...

Page 46: ...d to only four hoses two hoses control the boom lift function and two supply the EOH hydraulic manifold the EOH switchbox controls operate the independent boom fold and tilt operations through electro...

Page 47: ...r s hydraulic braking system because they permit progressive braking before the wheels are blocked in the case of emergency Attention The tractor s proportional outlet should be adjusted to a maximum...

Page 48: ...r Prevent protection guards from rotating by attaching the chains allowing sufficient slack for turns Make sure that protection guards around tractor P T O and implement shaft are intact Always STOP E...

Page 49: ...rtened equally Use a saw and file the profiles afterwards to remove burrs Grease the profiles and assemble male and female parts again Fit the shaft to tractor P T O and sprayer pump shaft Fit the cha...

Page 50: ...RY COVAMAX is working in the unfolded position a chain and brace is fitted to the wide angle drawbar to prevent the sprayer from tipping up when rearward weight conditions are present The brace is att...

Page 51: ...yer for detailed information on connection and operation Electric over Hydraulic Tilt This optional extra allows the tilt and fold functions of the boom to be remotely controlled from the tractor cab...

Page 52: ...h either the HC 2500 or the HC 5500 and allows for operator control of spray zone selection and remote pressure regulation HC2500 HC5500 Displays The HC 2500 and HC 5500 displays offer spray data to t...

Page 53: ...been chosen retighten clamps to prevent any movement of the bar Note Both the inner and outer boom sections may be repositioned to suit user requirements Crop Height Adjust As with the adjustment it i...

Page 54: ...andnozzleshroudsarefluidsupply lines and nozzle body assemblies Care should be taken not to damageanyoftheseitemswhenmakingadjustmentstotheboom tubes Nozzle Positioning The ball and socket joint desig...

Page 55: ...n be considered in two parts Fluid Delivery Air Delivery Fluid Delivery Pump Operation Pump operation is controlled by the power take off connection at the tractor An input shaft on the pump transmits...

Page 56: ...se the first section valve 1 by turning off at the switchbox When system pressure has stabilised adjust the first equalisation valve A until the original spraying pressure is restored then reopen the...

Page 57: ...sure Filters Optional Operation of the suction filter is by turning the handle to point towards the desired fluid source Pressure filters are simple inline filters that do not require any opening or c...

Page 58: ...are clashing Move the gearbox lever to the off neutral position and turn over the PTO when PTO has come to a stop attempt to engage gearbox again Blower Unit Distribution Stack Outlet Spouts The HF60...

Page 59: ...ydraulic tilt is fitted then the fold function is made by connecting the four hydraulic fold hoses and four manual hydraulic tilt hoses to the double acting outlets on the tractor Fold and Tilt contro...

Page 60: ...of the tank B at all times and only point it towards the inside If the hose were inside the tank and the pressure from the water supply point dropped the chemical products could be siphoned from the...

Page 61: ...rea can be obtained from the Department of Primary Industries and the Environmental Protection Agency Cleaning Guidelines Read the whole chemical label Take note of any particular instructions regardi...

Page 62: ...wder mixer lines Turn tap OFF after cycling for several minutes 6 Open the section control valves boom zone valves and outlet nozzle valves to allow clean water to spray through boom lines and nozzles...

Page 63: ...tem surfaces are rendered neutral before spraying a new crop or changing chemicals Chemical labels contain important information regarding safety cleaning neutralising agents and decontamination proce...

Page 64: ...Option 13 Distribution Valves EVC or CB 2 14 Pressure Filters 15 Boom Spray Zone Selector Valves 16 Left Boom Outer Nozzles 17 Left Boom Inner Nozzles 18 Right Boom Inner Nozzles 19 Right Boom Outer N...

Page 65: ...Covamax Air Delivery System 1 Product Pump 2 Drive Shaft 3 Main Tank 4 Gearbox 5 Blower Fan 6 Distribution Stack 7 Left Boom Outer Nozzles 8 Left Boom Inner Nozzles 9 Right Boom Inner Nozzles 10 Righ...

Page 66: ...en driven through the pump 8 and onto the manifolds as no taps are open the fluid will be bypassed to the main tank Agitation may be left on during this procedure External Fill Suction 1 Main Tank 5 A...

Page 67: ...old When the agitation handle is opened the fluid flows through line 20 and is ejected through the agitators in the tank 5 Mercury Covamax Agitation 1 Main Tank 5 Agitators 6 Suction Filter 7 External...

Page 68: ...lose tap when not in use DANGER Do not operate the powder mixing feature with the lid removed as chemical product may be forced from the basket and cause chemical contamination to surrounding areas or...

Page 69: ...main tank via the bypass agitation line 21 Spray Distribution 1 Main Tank 5 Agitators 6 Suction Filter 8 Main Pump 9 Manual Pressure Relief 10 Manifold 11 Pressure Regulator 12 Flow Meter Option 13 D...

Page 70: ...sure regulator 11 which allows electronic control of system pressure and a bypass agitation line 21 from the rear of the regulator which diverts excess fluid back to the main tank agitators Pressure R...

Page 71: ...here appropriate Keep animals and people away from the service area at all times unless involved in the procedure Keep children away Position the sprayer on a suitable flat surface with enough room fo...

Page 72: ...eral oil products for long periods Always follow the directions concerning recommended quantity If no recommended quantity is given feed the lubricator until new grease becomes visible Pictogram in lu...

Page 73: ...10 working hours and the tubes and axles B every 20 hours Drawbar lubrication To avoid the wear and seizing up of the drawbar s rotating parts keep them greased at all times Both the ring drawbar and...

Page 74: ...to maintain boom efficiency Fold Cylinder Pivots Tilt Cylinder Pivots Axle lubrication The hub is the part of the axle that must be greased Remove hub cap and grease the inside of the rotating head In...

Page 75: ...on the fill point on top of the gearbox and extends to the boom centre frame where it has a capped fitting in an easily accessible area Pump Maintenance On HARDI363pumps grease thepump every50 working...

Page 76: ...suction filter when servicing Extreme care should be taken to avoid contact or contamination from spray chemicals Please refer to chemical manufacturers safety advice when dealing with spray chemical...

Page 77: ...boom may be equipped with optional In Line Filters when fitted should be serviced at 10 hourly intervals Unscrew the filter bowl to inspect and clean the filter When reassembling the O ring should be...

Page 78: ...243 ft lb Tightening sequence See illustration and tighten in order of numbering Tyre Pressures 50 hour intervals Check the tyre pressures every 50 hours Only inflate to recommended pressure of tyre...

Page 79: ...rvals WARNING If you do not feel totally confident changing wheel bearings contact your HARDI dealer s workshop Check for play in the wheel bearings Place stop wedges in front of and behind LH wheel a...

Page 80: ...rythem Replace if worn or damaged Fill the hub and bearings with fresh grease Assemble the hub and bearings using a new sealing ring 7 Fit castle nut Rotate hub and tighten castle nut until a slight r...

Page 81: ...Flow Meter Inspection Pressure Regulator checks Section valve checks Drain valve seal replacement Drain valve cord replacement Off Season storage Tyre Changing Should it be necessary to replace tyres...

Page 82: ...3 Reinstall components and torque Valve Cover to 45 ft lb 60 Nm Diaphragms Remove the diaphragm bolt 4 Change the diaphragm 5 Reinstall components and torque Diaphragm Bolt to 45 ft lb 60 Nm Diaphragm...

Page 83: ...litres per minute the valve cylinder C piston F and o ring D must be changed Remove the screws and lift the motor housing off the valve housing Undo the nut E and replace the valve cylinder C piston...

Page 84: ...e cord is damaged or broken the cord can be replaced the following way Remove U Clip and remove Drain Valve Remove old cord and handle Attach new cord to handle Working from the top of the tank feed t...

Page 85: ...e regardless of intervals stated When the sprayer is dry remove rust from possible scratches or damages in the paint and touch up the paint Remove the glycerine filled pressure gauges and store them f...

Page 86: ...Lubricate boom grease nipples X X Lubricate boom pivots X X Retorque wheel nuts to 330Nm 243 ft lb X Lubricate wheel bearing caps X Lubricate product pump input shaft grease nipple HARDI 363 X Adjust...

Page 87: ...17 Record maintenance activities on the following pages whenever it is performed This will help to record the servicing history of your trailer for future reference Maintenance Activity Record Date Se...

Page 88: ...6 Maintenance 1 18 Maintenance Activity Record Date Service Performed...

Page 89: ...ers are clean Check hoses for leaks and cracks paying particular attention to suction hoses Check gaskets and O ring seals are present and in good condition Check that the pressure gauge is in good wo...

Page 90: ...tem Fault Possible cause Suggested action No spray from boom when turned on Air leak on suction line Check if suction filter O ring is sealing Check suction tube and fittings Check tightness of pump d...

Page 91: ...eck tightness gaskets O rings of all fittings on suction side Excessive liquid agitation Reduce agitation Make sure that returns inside tank are present Use foam damping additive Liquid leaks from the...

Page 92: ...7 Fault Finding 1 4...

Page 93: ...3875Kg SIZE Overall Length 4 6m Max height during transport 3 8m Max height boom fully lifted 4 1m Max width Folded 2 6m Max width Unfolded 7 0m 3300L CONDITION MEASURE WEIGHT Weight on Drawbar Empty...

Page 94: ...th Full Tank Load Per Tyre Max Speed Max Pressure PSI 2300 L 12 5 80 x 15 3 14 ply 3350Kg 1675Kg 30 Km h 33PSi 3300 L 12 5 80 x 15 3 14 ply 4195Kg 2097Kg 30 Km h 46 PSi 3800 L 400 60 x 15 5 14 ply 462...

Page 95: ...8 Technical Specifications 8 3 50 mesh 0 30 mm BLUE 80 mesh 0 18 mm RED 100 mesh 0 15 mm YELLOW...

Page 96: ...torque shown Threa d Size Nut Size across flats Torque Value Turns to Tighten After Finger Tightening In In Nm lb ft Flats Turns 3 8 1 2 8 6 2 1 3 7 16 9 16 12 9 2 1 3 1 2 5 8 16 12 2 1 3 9 16 11 16 2...

Page 97: ...5 16 18 11 9 17 13 25 18 5 16 24 12 9 19 14 25 20 3 8 16 20 15 30 23 45 35 3 8 24 23 17 35 25 50 35 7 16 14 32 24 50 35 70 55 7 16 20 36 27 55 40 80 60 1 2 13 50 35 75 55 110 80 1 2 20 55 40 90 65 12...

Page 98: ...posal of the sprayer When the equipment has completed its working life it must be thoroughly cleaned and de contaminated before disposal The tank hoses and synthetic fittings can be incinerated at an...

Page 99: ...st and most innovative spray products to the Australian market In addition our spare parts and field support staff are working closely with our regional dealer network to provide you the best after sa...

Page 100: ...8 Technical Specifications 8 8...

Page 101: ...al or replacement of components The customer will be responsible for and bear the costs of Normal maintenance such as greasing maintenance of oil levels minor adjustments etc Decontamination and Trans...

Page 102: ...ormed or warranty shall be void Parts requested must be returned prepaid within thirty 30 days for warranty settlement Warranty claims must be COMPLETELY filled out properly or will be returned DISCLA...

Page 103: ...ate guards are in place and not allow anyone near the wheels underneath sprayerorinboomoperating zone when in motion C Plant parts of plant or work pieces disintegrating No D Work pieces being ejected...

Page 104: ...ay gather speed during downhill turn manoeuvres so reduce speed accordingly Operator to make sure the sprayer is operated at a safe turning speed taking into consideration field conditions and terrain...

Page 105: ...ections E Damaged electrical switches Yes Low voltage only Inspect and replace damaged leads switches or connections F Water near electrical equipment Yes operating near electrical equipment is danger...

Page 106: ...ace will affect safety Use handrails provided Operator to perform risk assessment of task and conditions B Poor housekeeping e g spillage not cleared build up of waste Yes Operator to maintain a safe...

Page 107: ...n climbing ladder with boom in transport position Operator should take care when using ladder RISK ITEM RISK ASSESSMENT CONTROL MEASURE A Can anyone be suffocated due to lack of oxygen or atmospheric...

Page 108: ...sure suitability Check with chemical manufacturer before mixing chemicals D Dust No E Noise No F Vibration No G Radiation or Lasers No H Other factors not mentioned No RISK ITEM RISK ASSESSMENT CONTR...

Page 109: ...uidelines and environmental protection authority requirements RISK ITEM RISK ASSESSMENT CONTROL MEASURE A Are there any abnormal situations misuse or fluctuations in operating conditions which you can...

Page 110: ...ularly C What are the arrangements for access and egress to plant during operation for maintenance in an emergency Improper access and egress can create any of the above hazards Proper housekeeping an...

Reviews: