background image

116

 12 

± 

5 mm

Summary of Contents for Luxura V10

Page 1: ...ska znajduje się na płycie CD ROM A magyar változat a CD ROM on található Для русской версии см CD ROM For dansk version se CD ROM Suomenkieltä varten katso CD ROM For den norske versjonen se vedlagte CD För svenska se CD ROMskivan ITA ESP CZE POL HUN RUS DNK FIN NOR SWE Manual Anleitung Handleiding Mode d emploi ...

Page 2: ... International P O Box 73 4420 AC Kapelle The Netherlands Tel 31 0 113 362362 Fax 31 0 113 362399 Office Germany Hapro Deutschland GmbH Graf Zeppelin Str 1 56410 Montabaur Germany Tel 49 0 2602 9400 0 Fax 49 0 2602 9400 49 ...

Page 3: ...r Verantwortlichkeit dass sie die notwendige Hilfe erhalten Deze handleiding geeft alleen de noodzakelijke informatie mbt waarschuwingen instructie en opbouw Gebruik deze handleiding niet alleen voor de noodzakelijke opbouw en of onderhoud van de zonnebank u dient zich te op de hoogte te stellen van alle gegeven informatie Personen die gebruik maken van de zonnebank dienen geïnformeerd en begeleid...

Page 4: ...with the strictest applicable European standards Contents Read this first 5 Golden rules for sensible tanning in the tanning unit 6 Tanning tables 7 Tanning Instructions displayed on the cubicle wall 8 Information on lamps 9 Decorative lighting 10 Operation 11 Qsens optional 23 Symbols 25 Warranty policy 26 Declaration of conformity 27 Removing the acrylic sheets 106 Tanning unit assembly 108 Dime...

Page 5: ...ean the acrylic sheet Neverusecleanersthatcontainalcohol as these can damage the acrylic sheet 12 The UV type of the tanning unit is indicated on the specification sticker 13 Ultraviolet radiation from the sun or UV appliances can cause skin or eye damage These biological effects depend upon the quality and quantity of the radiation as well as the skin and eye sensitivity of the individual 14 Exce...

Page 6: ... which can react when combined with exposure to UV radiation Sulphonamide in various medications including antibiotics Tetracyclines in antibiotics and acne medication Nalidexineacid inurinarytractinfection medication Chlorothiazide in diuretics Sulphonylurea in diabetes medication Phenothiazines anxiety medication Triacetyldiphenylisatine in laxatives Psoralenes in tanning accelerators Cyclamates...

Page 7: ... specification sticker on the back of the appliance 1st session minutes 2nd session minutes 3rd session minutes 4th session minutes 5th session minutes 6th session minutes 7th session minutes 8th session minutes 9th session minutes 10th session minutes All lamps are UV type 3 Important Times listed apply to the specified lamps only see specification sticker on the back of the appliance For replaci...

Page 8: ...re supplied with the sunbed include information that every user should read prior to using the sunbed Therefore these documents should be displayed in a place where they can be easily read This is required by law Tanning Instructions displayed on the cubicle wall ...

Page 9: ...Reflector Mode Type Serial number Rated voltage Rated power input Hapro International B V PO Box 73 4420 AC Kapelle Netherlands Manufactured by xxxxx_xx UV TYPE 50 x Maxlight Ballast W Luxura V10 50 00 xx 001000 400V 3N PE 50Hz kW For UK only Rated voltage Rated power input 420V 3N PE 50Hz kW Face Tanners Lamps Type P o w e r F i l t e r c o m b i n a t i o n F i l t e r r e fl e c t o r T y p e T...

Page 10: ...10 Decorative lighting ...

Page 11: ...CHANNEL 11 VOLUME 12 LIFT 1 5 3 7 2 6 4 8 9 10 11 12 13 1 Display 13 MP3 Line in optional General Operation start confirm decrease down increase up stop cancel pause Face tanner only SLi Body cooler Xsens optional Qsens optional Music channel selection optional Music volume Lift optional ...

Page 12: ...ptional will pause The lift optional will lower Press START 1x to confirm the chosen time The appliance will switch on and the tanning time will start While in pause mode press START 1x to switch the sunbed on again or press STOP 1x to switch the sunbed off This will stop the tanning session and the sunbed wil start the mandatory 3 minute cooling off period The display will continue to show the ta...

Page 13: ...s the bottom Use the MIN and PLUS keys to adjust the level of intensity Xsens optional Press XSENS 1x to switch the function on or off The level will appear scroll at the top of the display and XSENS will scroll across the bottom Note If you do not press any key for 3 seconds you will exit the function mode automatically The remaining tanning time will appear in the display Setting 1 face tanner m...

Page 14: ... top of the display and CHANNEL or MP3 will scroll across the bottom Use the MIN and PLUS keys to select a different channel 0 8 Music volume Press VOLUME 1x to activate the function The volume level will appear at the top of the display and VOLUME will scroll across the bottom Use the MIN and PLUS keys to increase decrease the volume 0 14 Channel 0 MP3 Line in Channel 1 8 music channel Volume 0 m...

Page 15: ...ppear at the top of the display and LIFT will appear at the bottom Reading the lamp hour counter Press the MIN and LIFT keys at the same time for 3 seconds to read the lamp hour counter Reading the appliance hour counter Press the PLUS and LIFT keys at the same time for 3 seconds to read the appliance hour counter Use the MIN key to lower the lift Use the PLUS key to raise the lift Other functions...

Page 16: ...ing cooling off time in seconds Doors open Opening the doors during tanning will activate the pause mode The lamps will switch off automatically The body cooling will remain on 4 minutes Xsens and Qsens will be paused The lift will lower automatically The message PLEASE CLOSE DOORS will scroll across the display If an error occurs ERROR will scroll across the top of the display and a code will appe...

Page 17: ...T 1x Choose a number between 1 and 30 for stand alone use Choose 0 to use the sunbed with a coin op Press START to save the chosen number The parameter 1 will appear at the top of the display and the name of the parameter START TIME will scroll across the bottom Press START 1x The number 1 appears at the top of the display and the current parameter number appears at the bottom This number is the m...

Page 18: ...nfiguration mode The message LUXURA IT S YOUR BODY will appear on the display The parameter 1 will appear at the top of the display and the name of the parameter START TIME will scroll across the bottom The main parameter P1 will appear at the top of the display and the name of the main parameter UNIT will scroll across the bottom Press START 1x Press the following keys successively STOP STOP PLUS...

Page 19: ... and the message LAMPS HOUR COUNTER RESET will scroll 1x across the bottom After this de message RESET LAMP HOUR COUNTER will scroll across the bottom The number 4 will appear at the top of the display and OFF will appear at the bottom Press PLUS 1x to change OFF to ON Press START to reset the hour counter Press STOP 2x to exit the configuration mode The message LUXURA IT S YOUR BODY will appear o...

Page 20: ... of the display and the name of the parameter will scroll across the bottom Use the MIN and PLUS keys to navigate to the following main parameters P1 Unit P2 Display P3 Qsens P4 Xsens P5 Facial P6 Body fan P7 Audio P8 Coin see also Configuration menu overview Use the MIN and PLUS keys to navigate to the various parameters within the main parameter Press START 1x to select a main parameter If you p...

Page 21: ...ber accordingly Press START to save the chosen number If you press STOP 1x you will delete any changes that may have been made and you will return to the parameter selection The parameter 1 will appear at the top of the display and SAVED will scroll across the bottom to confirm that the setting has been saved You will now return to the parameter selection automatically The parameter 1 will appear ...

Page 22: ...e 26 2 Volume channel 2 0 52 default value 26 3 Volume channel 3 0 52 default value 26 4 Volume channel 4 0 52 default value 26 5 Volume channel 5 0 52 default value 26 6 Volume channel 6 0 52 default value 26 7 Volume channel 7 0 52 default value 26 8 Volume channel 8 0 52 default value 26 9 Volume MP3 0 52 default value 26 10 Volume SmartVoice 0 52 default value 36 11 Treble 0 19 default value 9...

Page 23: ...age before carrying out any maintenance to the sunbed The system should be bled before commissioning the system and if any air is present in the conduit Refer to the section Initialisation in this product description to find out how to bleed the system Residual liquid from the liquid container may be discharged into the regular water drainage system The liquid container is made of PE and can be re...

Page 24: ... appear at the top of the display and OFF will appear at the bottom Press the PLUS key to change OFF to ON Press START to start the initialisation The message INITIALIZING QSENS will scroll across the display Press STOP when the two lowest nozzles produce a constant spray of water mist The system is now bled The number 1 will appear at the top of the display and OFF will appear at the bottom Press...

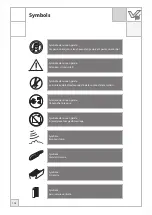
Page 25: ...r a hairnet Warning symbol Attention please Warning symbol Sunbed should be disconnected from power source Warning symbol Remove plug from socket Warning symbol Not for household use Symbol Sunbed bed Symbol Vertical sunbed Symbol Sunbed canopy Symbol Facial tanner ...

Page 26: ... terms of this guarantee you must be able to produce the original invoice or receipt bearing the date of purchase The type and serial number of the appliance should also be indicated The warranty is subordinate to the national regulations on product warranties Warranty Units which have the type serial number and or other identification labels removed damaged or altered Lamps starters and acrylic s...

Page 27: ...tification Product Tanning equipment Model Type Means of conformity The products are in conformity with Directive 89 336 EC of the European Community and the Low Voltage Directive 2006 95 EC of the European Community Testing Electro Magnetic Compatibility Carried out by Hapro Laboratory Fleerbosseweg 33 4420 AC Kapelle The Netherlands Standards used EN 61000 6 3 2001 EN 55022 1998 EN 61000 6 1 200...

Page 28: ...sten geltenden anzuwendenden europäischen Normen Inhalt Bitte zuerst lesen 29 Goldene Regeln für verantwortungsvolles Sonnen mit einem Bräunungsgerät 30 Bräunungstabellen 31 Informationen zu den Aufklebern 32 Besonnungsanleitung an der Kabinenwand ausgehängt 33 Information zu den röhren 34 Dekorative Beleuchtung 35 Bedienungsanleitung 36 Qsens optional 48 Symbol 50 Garantiebestimmungen 51 Konformi...

Page 29: ... Schäden an Augen und Haut verursachen Diese biologischen Effekte sind abhängig von der Strahlungsmenge und stärke sowie der personenspezifischen Empfindlichkeit von Haut und Augen 15 Die Haut kann durch übermäßiges Aussetzen der Strahlen verbrennen Wird die Haut wiederholt übermäßig der UV Strahlung durch die Sonne oder Bräunungsgeräte ausgesetzt kann dies zur vorzeitigen Alterung der Haut sowie ...

Page 30: ...rufen können Auch andere Stoffe haben manchmal die gleiche Auswirkung Nachstehend finden Sie eine Übersicht einiger dieserStoffe dieeineReaktionmitUV Strahlen hervorrufen Sulfonamid in verschiedenen Arzneitmitteln unteranderemAntibiotika Tetracyclinen in Antibiotika Mitteln gegen Akne Nalidexinsäure in Arzneimitteln gegen InfektionenderHarnwege Chlorthiazid inharntreibendenMitteln Sulfonylureum in...

Page 31: ...ld auf der Geräterückwand Für den Austausch der Lampen siehe das Typenschild auf der Geräterückwand 1 Sitzung min 2 Sitzung min 3 Sitzung min 4 Sitzung min 5 Sitzung min 6 Sitzung min 7 Sitzung min 8 Sitzung min 9 Sitzung min 10 Sitzung min Alle Lampen sind UV Typ 3 Die Zeitangaben gelten nur für die spezifizierten Lampen siehe das Typenschild auf der Geräterückwand Für den Austausch der Lampen si...

Page 32: ... Stickers_markering_ENG_B 00 00 KLEUR VERWIJDERD VRIJGAVE 08 08 2007 IN C Hapro International bv P O Box 73 4420AC Kapelle tel 0113 362 362 fax 0113 362 399 Note Mat Drawn Tolerances PART Date Dimensions mm Scale 1 1 1 1 A4 Drawing no Part name Rev Jakub Dzierzak 16 07 2007 Vinyl stickervel A Zwart Pantone Black 95 mm 30 mm R 3 mm B B C 17894_vdl Stickers_markering_ENG_C 00 00 KLEUR VERWIJDERD VRI...

Page 33: ...t werden enthalten Informationen die sich jeder Anwender vor der Nutzung der Sonnenbank durchlesen sollte Daher sollten diese Dokumente an einer Stelle ausgelegt oder aufgehängt werden wo sie leicht einsehbar sind Dies wird vom Gesetzgeber gefordert Besonnungsanleitung an der Kabinenwand ausgehängt ...

Page 34: ... PO Box 73 4420 AC Kapelle Netherlands Manufactured by xxxxx_xx UV TYPE 50 x Maxlight Ballast W Luxura V10 50 00 xx 001000 400V 3N PE 50Hz kW For UK only Rated voltage Rated power input 420V 3N PE 50Hz kW Die aufgelisteten Röhrentypen bietet einen Überblick über die für diese fragliche Sonnenbank geeigneten Röhren Sie können darüber hinaus nicht nur im gekauften Modell eingesetzt werden Für eine g...

Page 35: ...35 DEUTSCH Dekorative Beleuchtung ...

Page 36: ...0 11 12 13 1 Display 13 MP3 Eingangsbuchse optional Allgemein Bedienungsanleitung Starten bestätigen Absenken nach unten scrollen Erhöhen nach oben scrollen Stoppen abbrechen anhalten Gesichtsbräuner nur bei Modell SLi Körperkühler Xsens optional Qsens optional Auswahl des Musikkanals optional Musiklautstärke Lift optional ...

Page 37: ...onal wird abgesenkt Drücken Sie 1 x auf START um die gewählte Zeit zu bestätigen Das Gerät schaltet sich ein und die Bräunungszeit beginnt abzulaufen Drücken Sie im Modus Pause 1 x auf START um die Sonnenbank wieder einzuschalten oder drücken Sie 1 x auf STOP Stopp um die Sonnenbank auszuschalten Die Bräunungssitzung wird gestoppt und die Sonnenbank wird mit der obligatorischen 3 minütigen Abkühlp...

Page 38: ...n Intensitätsgrad einzustellen Xsens optional Drücken Sie 1 x auf XSENS um die Funktion ein oder auszuschalten Der Intensitätsgrad wird oben im Display angezeigt bzw wandert oben über das Display Gleichzeitig wandert die Meldung XSENS unten über das Display Hinweis Wenn Sie innerhalb von 3 Sekunden keine Taste drücken wird der Funktionsmodus automatisch beendet Die verbleibende Bräunungszeit ersch...

Page 39: ...im Display und die Meldung CHANNEL Kanal oder MP3 wandert unten über das Display Verwenden Sie die Tasten MIN und PLUS um einen anderen Kanal 0 8 auszuwählen Musiklautstärke Drücken Sie 1 x auf VOLUME Lautstärke um die Funktion zu aktivieren Der Lautstärkepegel wird oben im Display angezeigt und die Meldung VOLUME Lautstärke wandert unten über das Display Verwenden Sie die Tasten MIN und PLUS um d...

Page 40: ... LIFT unten im Display angezeigt Aufrufen des Röhrenbetriebszeit Zählers Drücken Sie für 3 Sekunden gleichzeitig auf dieTasten MIN und LIFT um den Röhrenbetriebszeit Zähler aufzurufen Aufrufen des Gerätebetriebszeit Zählers Drücken Sie für 3 Sekunden gleichzeitig auf die Tasten PLUS und LIFT um den Gerätebetriebszeit Zähler aufzurufen Verwenden Sie die Taste MIN um den Lift abzusenken Verwenden Si...

Page 41: ...en der Türen während einer Bräunungssitzung aktiviert den Modus Pause Die Röhren werden automatisch ausgeschaltet Die Körperkühlung bleibt jedoch in Betrieb 4 Minuten Xsens und Qsens werden angehalten Der Lift wird automatisch abgesenkt Die Meldung PLEASE CLOSE DOORS Bitte Türen schließen wandert über das Display Falls ein Fehler auftritt wandert die Meldung ERROR Fehler oben über das Display und ...

Page 42: ... Modus Stand alone Eigenständiger Betrieb nutzen wollen Wählen Sie die Zahl 0 wenn Sie das Gerät im Modus Coin op Münzbetrieb nutzen wollen Drücken Sie auf START um die gewählte Zahl zu speichern Der Parameter 1 wird oben im Display angezeigt und der Name des Parameters nämlich START TIME Startzeit wandert unten über das Display Drücken Sie 1 x auf START Die Zahl 1 erscheint oben im Display und di...

Page 43: ...ationsmodus zu verlassen Die Meldung LUXURA IT S YOUR BODY wird im Display angezeigt Der Parameter 1 wird oben im Display angezeigt und der Name des Parameters nämlich START TIME Startzeit wandert unten über das Display Der Hauptparameter P1 wird oben im Display angezeigt und der Name des Hauptparameters nämlich UNIT Einheit wandert unten über das Display Drücken Sie 1 x auf START Drücken Sie nach...

Page 44: ...zurückgesetzt wandert 1 x unten über das Display Danach wandert die Meldung RESET LAMP HOUR COUNTER Röhrenbetriebszeit Zähler zurücksetzen unten über das Display Die Zahl 4 erscheint oben im Display und der Status OFF Aus wird unten im Display angezeigt Verwenden Sie die Tasten MIN und PLUS um vom Status OFF Aus zum Status ON Ein zu wechseln Drücken Sie auf START um den Betriebszeitzähler zurückzu...

Page 45: ... Display Verwenden Sie die Tasten MIN und PLUS um zu den folgenden Hauptparametern zu navigieren P1 Unit Gerät P2 Display P3 Qsens P4 Xsens P5 Facial Gesichtsbräuner P6 Body fan Lüfter Körper P7 Audio P8 Coin Münzbetrieb siehe auch Übersicht über das Konfigurationsmenü Verwenden Sie die Tasten MIN und PLUS um zu den verschiedenen Parametern des jeweiligen Hauptparameters zu navigieren Drücken Sie ...

Page 46: ...ücken Sie auf START um die gewählte Zahl zu speichern Wenn Sie 1 x auf STOP Stopp drücken verwerfen Sie alle zuvor vorgenommenen Änderungen und kehren Sie zur Parameterauswahl zurück Der Parameter 1 wird oben im Display angezeigt und die Meldung SAVED Gespeichert wandert unten über das Display um die Speicherung der Einstellung zu bestätigen Danach kehren Sie automatisch zur Parameterauswahl zurüc...

Page 47: ...ntermenü Option 1 Lautstärke Kanal 1 0 52 Standardwert 26 2 Lautstärke Kanal 2 0 52 Standardwert 26 3 Lautstärke Kanal 3 0 52 Standardwert 26 4 Lautstärke Kanal 4 0 52 Standardwert 26 5 Lautstärke Kanal 5 0 52 Standardwert 26 6 Lautstärke Kanal 6 0 52 Standardwert 26 7 Lautstärke Kanal 7 0 52 Standardwert 26 8 Lautstärke Kanal 8 0 52 Standardwert 26 9 Lautstärke MP3 0 52 Standardwert 26 10 Lautstä...

Page 48: ...ei Arbeiten an der Sonnenbank müssen Sie die Versorgungsspannung ausschalten BeiInbetriebnahmedesSystemsundwennsichLuftinderLeitungbefindet müssenSiedasSystementlüften Wie das System entlüftet wird lesen Sie unter der Überschrift Initialisierung in dieser Produktbeschreibung Restflüssigkeit aus dem Flüssigkeitsbehälter darf über den normalen Ausguss entsorgt werden Der Flüssigkeitsbehälter besteht...

Page 49: ...Aus zum Status ON Ein zu wechseln Drücken Sie auf START um die Initialisierung zu starten Die Meldung INITIALIZING QSENS Qsens wird initialisiert wandert über das Display DrückenSieauf STOP Stopp wenndiezweiunterstenDüseneinenkonstanten Wassersprühnebel produzieren Das System ist nun entlüftet Die Zahl 1 erscheint oben im Display und der Status OFF Aus wird unten im Display angezeigt Drücken Sie 3...

Page 50: ...mbol Bitte beachten Warnsymbol Sonnenbank sollte vom Netz getrennt werden Warnsymbol Ziehen Sie den Stecker aus der Steckdose Warnsymbol Nicht für den Hausgebrauch geeignet Symbol Sonnenbankliegefläche Symbol Vertikale Sonnenbankfläche Symbol Sonnenbankhimmel Symbol Gesichtsbräuner ...

Page 51: ...estellt und sind von hervorragender Qualität Alle Luxura Geräte entsprechen den internationalen IEC EN Normen und tragen das Kema Prüfungsabzeichen Wir gewähren eine Herstellergarantie von 1 Jahr AufIhreneueSonnenbankhabenSieeineHerstellergarantievoneinemJahr welche am Tag des Einbaus beginnt Innerhalb der Garantiezeit werden alle Störungen infolge von Material und oder Herstellungsfehlern reparie...

Page 52: ... Produkt Bräunungsgerät Modell Typ Konformitätserklärung Die Produkte sind konform mit den Richtlinien 89 336 EC und 2006 95 EC über Niederspannung der Europäischen Gemeinschaft Prüfungen elektromagnetische Verträglichkeit Ausgeführt von Hapro Laboratory Fleerbosseweg 33 4420 AC Kapelle Niederlande Zugrunde liegende Normen EN 61000 6 3 2001 EN 55022 1998 EN 61000 6 1 2001 EMV Zertifikatsnr Prüfung...

Page 53: ...53 DEUTSCH ...

Page 54: ...dende van toepassing zijnde Europese normen Inhoudsopgave Lees dit eerst 55 Gouden regels voor verstandig zonnen in een bruiningsapparaat 56 Bruiningstabellen 57 Waarschuwingsstickers 58 Bruiningsinstructies aan de cabine muur 59 Informatie over de lampen 60 Sierverlichting 61 Bediening 62 Qsens optioneel 74 Symbolen 76 Garantiebepalingen 77 Conformiteitsverklaring 78 Verwijderen van de acrylplate...

Page 55: ...pparaat staat vermeld op het type plaatje 13 Ultraviolette straling van de zon of UV apparaten kan huid of oogbeschadigingen veroorzaken Deze biologische effecten zijn afhankelijk van de kwaliteit en de kwantiteit van de straling evenals van de huid en ooggevoeligheid van het individu 14 De huid kan verbranden na buitensporige blootstelling Buitensporig herhaalde blootstelling aan ultraviolette st...

Page 56: ...len tegen infectiesaandeurinewegen Chloorthiazide Plaspillen Sulfonylureum in geneesmiddelen tegen suikerziekte Phenothiazinen in geneesmiddelen tegen stress Triacetyldiphenylisatine inlaxeermiddelen Psoralenen inbruiningversnellers Para aminobenzoëzuur PABA in anti zonnebrand middelen Muskambrette Muskolie inparfums Witmakers inwasmiddelen Eosine inkleurstoffen Gehalogeneerd salicylanilide in sch...

Page 57: ... voor de gespecificeerde lampen zie type plaatje Voor vervanging van de UV lampen zie type plaatje 1e sessie minuten 2e sessie minuten 3e sessie minuten 4e sessie minuten 5e sessie minuten 6e sessie minuten 7e sessie minuten 8e sessie minuten 9e sessie minuten 10e sessie minuten Alle Lampen zijn UV Type 3 Vermelde tijden zijn alleen van toepassing voor de gespecificeerde lampen zie type plaatje Vo...

Page 58: ...erzak 16 07 2007 Vinyl stickervel A Zwart Pantone Black 95 mm 30 mm R 3 mm B 17893_vdl Stickers_markering_ENG_B 00 00 KLEUR VERWIJDERD VRIJGAVE 08 08 2007 IN C Hapro International bv P O Box 73 4420AC Kapelle tel 0113 362 362 fax 0113 362 399 Note Mat Drawn Tolerances PART Date Dimensions mm Scale 1 1 1 1 A4 Drawing no Part name Rev Jakub Dzierzak 16 07 2007 Vinyl stickervel A Zwart Pantone Black ...

Page 59: ...bank bevatten informatie welke door iedere gebruiker gelezen dient te worden alvorens er gebruik wordt gemaakt van de zonnebank De documenten dienen daarom op een plek gehangen te worden alwaar ze moeiteloos gelezen kunnen worden Dit is een wettelijke verplichting Bruiningsinstructies aan de cabine muur ...

Page 60: ...B V PO Box 73 4420 AC Kapelle Netherlands Manufactured by xxxxx_xx UV TYPE 50 x Maxlight Ballast W Luxura V10 50 00 xx 001000 400V 3N PE 50Hz kW For UK only Rated voltage Rated power input 420V 3N PE 50Hz kW De hieronder genoemde lampen zijn een opsomming van lampen die gebruikt kunnen zijn in de door u aangeschafte zonnebank Informatie over welke van de onderstaande lampen in uw zonnebank zijn to...

Page 61: ...61 NEDERLANDS Sierverlichting ...

Page 62: ...FT 1 5 3 7 2 6 4 8 9 10 11 12 13 1 Display 13 MP3 Line in optioneel Algemeen Bediening starten bevestigen verminderen omlaag vermeerderen omhoog stoppen annuleren pauze Gezichtsbruiner alleen SLi Lichaamskoeling Xsens optioneel Qsens optioneel Selectie muziekkanaal optioneel Muziekvolume Lift optioneel ...

Page 63: ... 4 minuten Xsens optioneel en Qsens optioneel worden gepauzeerd De lift optioneel gaat omlaag Druk 1x op START om de ingestelde tijd te bevestigen Het toestel wordt ingeschakeld en de bezonningstijd wordt gestart Druk tijdens de pauze modus 1x op START om de zonnebank weer in te schakelen of druk 1x op STOP om de zonnebank uit te schakelen De bruiningssessie wordt hiermee beëindigd en wordt de ver...

Page 64: ... om de sterkte aan te passen Xsens optioneel Druk 1x XSENS om de functie in of uit te schakelen In het display verschijnt scrollt bovenin de waarde en onderin scrollt XSENS Notitie Als u gedurende 3 seconden geen toets indrukt wordt de functie modus automatisch afgesloten In het display verschijnt de resterende bezonningstijd Stand 1 gezichtsbruiner minimaal Stand 2 gezichtsbruiner maximaal Houd M...

Page 65: ...er van het muziekkanaal en onderin scrollt CHANNEL of MP3 Gebruik de knoppen MIN en PLUS om een ander muziekkanaal te selecteren 0 8 Muziekvolume Druk 1x op VOLUME om de functie te activeren In het display verschijnt bovenin de waarde van het volume en onderin scrollt VOLUME Gebruik de knoppen MIN en PLUS om het volume zachter harder te zetten 0 14 Kanaal 0 MP3 Line in Kanaal 1 t m 8 muziekkanaal ...

Page 66: ...ool voor de neutraal mode en onderin LIFT Uitlezen lampen urenteller Houd de knoppen MIN en LIFT tegelijkertijd 3 seconden ingedrukt om de lampen urenteller uit te lezen Uitlezen toestel urenteller Houd de knoppen PLUS en LIFT tegelijkertijd 3 seconden ingedrukt om de toestel urenteller uit te lezen Gebruik de knop MIN om de lift omlaag te bewegen Gebruik de knop PLUS om de lift omhoog te bewegen ...

Page 67: ...dien de deuren tijdens het zonnen worden geopend wordt de pauze mode geactiveerd De lampen worden automatisch uitgeschakeld De lichaamskoeling blijft ingeschakeld 4 minuten Xsens en Qsens worden gepauzeerd De lift gaat automatisch omlaag In het display scrollt de tekst PLEASE CLOSE DOORS Indien een fout optreedt scrollt er bovenin het display ERROR en verschijnt onderin een code E1 Overrule fout E...

Page 68: ...aarde tussen de 1 en 30 in voor stand alone gebruik Stel de waarde in op 0 om de zonnebank met een muntautomaat te gebruiken Druk op START om de ingestelde waarde op te slaan In het display verschijnt bovenin de parameter 1 en onderin scrollt de naam van de parameter START TIME Druk op 1x op START In het display verschijnt bovenin 1 en onderin de huidige waarde van de parameter Deze waarde is de m...

Page 69: ...STOP om de configuratiemodus af te sluiten Het standby display LUXURA IT S YOUR BODY verschijnt In het display verschijnt bovenin de parameter 1 en onderin scrollt de naam van de parameter START TIME In het display verschijnt bovenin de hoofdparameter P1 en onderin scrollt de naam van de hoofdparameter UNIT Druk op 1x op START Druk opeenvolgend de volgende knoppen in STOP STOP PLUS STOP MIN Reset ...

Page 70: ...LAMPS HOUR COUNTER RESET Vervolgens scrolt de tekst RESET LAMP HOUR COUNTER onder in het display In het display verschijnt bovenin 4 en onderin staat de waarde OFF Druk 1x op PLUS om de waarde van OFF naar ON te veranderen Druk op START om de urenteller te resetten Druk 2x op STOP om de configuratiemodus af te sluiten Het standby display LUXURA IT S YOUR BODY verschijnt Controle Houd de toetscombi...

Page 71: ...derin scrollt de naam van de parameter Door de knoppen MIN en PLUS te gebruiken kan er genavigeerd worden naar de volgende hoofdparameters P1 Unit P2 Display P3 Qsens P4 Xsens P5 Facial P6 Body fan P7 Audio P8 Coin zie ook Configuratiemenu overzicht Door de knoppen MIN en PLUS te gebruiken kan er genavigeerd worden naar de verschillende parameters van de hoofdparameter Druk 1x op START om een hoof...

Page 72: ... de waarde naar wens aangepast worden Druk op START om de ingestelde waarde op te slaan Als u 1x op STOP drukt annuleert u eventuele wijzigingen en keert u terug naar de parameter selectie In het display verschijnt bovenin de parameter 1 en onderin scrollt SAVED ter bevestiging dat de waarde is opgeslagen U keert nu automatisch terug naar de parameter selectie In het display verschijnt de paramete...

Page 73: ...aarde 26 2 Volume kanaal 2 0 52 default waarde 26 3 Volume kanaal 3 0 52 default waarde 26 4 Volume kanaal 4 0 52 default waarde 26 5 Volume kanaal 5 0 52 default waarde 26 6 Volume kanaal 6 0 52 default waarde 26 7 Volume kanaal 7 0 52 default waarde 26 8 Volume kanaal 8 0 52 default waarde 26 9 Volume MP3 ingang 0 52 default waarde 26 10 Smartvoice volume 0 52 default waarde 36 11 Tonen hoog 0 1...

Page 74: ... de zonnebank Bij werkzaamheden aan de zonnebank dient u het toestel spanningsvrij te maken Bij ingebruikname van het systeem en wanneer er lucht in de leiding zit dient u het systeem te ontluchten Hoe het systeem ontlucht dient te worden leest u in de volgende paragraaf Restvloeistof uit de vloeistofbus kan via de gewone riolering worden verwijderd De vloeistofbus bestaat uit PE en is recyclebaar...

Page 75: ...OFF in ON te veranderen Druk op START om de initialisatie te starten In het display scrolt de boodschap INITIALIZING QSENS Druk op STOP wanneer er een constante nevel uit de onderste twee spuitmondjes komt De leidingen zijn nu ontlucht In het display verschijnt bovenin 1 en onderin staat de waarde OFF Druk 3x op STOP om het configuratie menu te verlaten Let op Droog de zonnebank altijd goed af na ...

Page 76: ...Waarschuwingssymbool Zonnebank dient spanningloos gemaakt te worden Waarschuwingssymbool Haal de stekker uit contactdoos Waarschuwingssymbool Niet voor huishoudelijk gebruik Symbool Bank van de zonnebank Symbool Verticale zonnebank Symbool Hemel van de zonnebank Symbool Gezichtsbruiner Symbolen ...

Page 77: ... de originele factuur te overleggen Indien de factuur op enigerlei wijze is veranderd of onleesbaar gemaakt komt de garantie te vervallen Deze garantiebepalingen zijn ondergeschikt aan de nationale regels met betrekking tot de garantie bepaling van produkten Garantie Apparaten waarvan het type serienummer en of andere identificatiegegevens zijn verwijderd beschadigd of gewijzigd Lampen starters en...

Page 78: ...uiningsapparaat Model Type Conformiteitsverklaring De producten zijn in overeenstemming met de Richtlijn 89 336 EC van de Europese Gemeenschap en met de Laagspanning Richtlijn 2006 95 EC van de Europese Gemeenschap Test Electro Magnetische Compatibiliteit Uitgevoerd door Hapro Laboratory Fleerbosseweg 33 4420 AC Kapelle Nederland Gebruikte standaarden EN 61000 6 3 2001 EN 55022 1998 EN 61000 6 1 2...

Page 79: ...79 NEDERLANDS ...

Page 80: ... application les plus strictes Table des matières A lire préalablement 81 Règles d or pour un bronzage raisonnable dans l unité de bronzage 82 Tables de bronzage 83 Les étiquettes 84 Instructions pour le bronzage affichées sur la cabine 85 Information sur les lampes 86 Éclairage décoratif 87 Fonctionnement 88 Qsens en option 100 Les symboles 102 Garantie 103 Déclaration de conformité 104 Démontage...

Page 81: ...pécial pour acrylique Ne jamais employer de produits nettoyants à base d alcool ceux ci pouvant endommager la plaque acrylique 12 Le niveau UV de votre appareil de bronzage est mentionné sur l étiquette de spécificatións 13 La radiation UV du soleil ou des bancs solaires peut causer des dommages des yeus et de la peau Les effects biologiques dépendent de la qualité et de la quantité de la radiatio...

Page 82: ...infectionsdesvoiesurinaires Chlorothiazide danslesdiurétiques Sulfonylurée dans les médications contre le diabète Phénothiazines danslesmédicationsanti stress Triacétyldiphenylisatine dansleslaxatifs Psoralènes danslesaccélérateursdebronzage Cyclamates danslesédulcorants Acidepara aminobenzoïque PABA dansleshuiles crèmesdeprotectionsolaire Ambrettemusc huilemusc danslesparfums Agentsblanchissants ...

Page 83: ...aque si gnalétique derrière l appareil Regardez la plaque si gnalétique qui se trouve derrière l appareil si vous désirez remplacer les lampes 1e séance min 2e séance min 3e séance min 4e séance min 5e séance min 6e séance min 7e séance min 8e séance min 9e séance min 10e séance min Toutes les lampes sont UV Type 3 Important Les temps mentionnés s appliquent seulement aux lampes spécifiées voir pl...

Page 84: ...one Black 95 mm 30 mm R 3 mm B 17893_vdl Stickers_markering_ENG_B 00 00 KLEUR VERWIJDERD VRIJGAVE 08 08 2007 IN C Hapro International bv P O Box 73 4420AC Kapelle tel 0113 362 362 fax 0113 362 399 Note Mat Drawn Tolerances PART Date Dimensions mm Scale 1 1 1 1 A4 Drawing no Part name Rev Jakub Dzierzak 16 07 2007 Vinyl stickervel A Zwart Pantone Black 95 mm 30 mm R 3 mm B B C 17894_vdl Stickers_ma...

Page 85: ...le banc solaire contiennent des informations que l utilisateur doit lire avant toute première utilisation de l appareil Il convient donc d afficher ces documents dans un endroit où leur lecture est grandement facilitée Ces instructions sont imposées par la Loi Instructions pour le bronzage affichées sur la cabine ...

Page 86: ...wer input Hapro International B V PO Box 73 4420 AC Kapelle Netherlands Manufactured by xxxxx_xx UV TYPE 50 x Maxlight Ballast W Luxura V10 50 00 xx 001000 400V 3N PE 50Hz kW For UK only Rated voltage Rated power input 420V 3N PE 50Hz kW Leslampesmentionnéessontunesynthèsedestypesadaptésàl utilisationdubancsolaire en question et donc pas uniquement au modèle acheté Pour les lampes exactement adapt...

Page 87: ...87 FRANÇAIS Eclairage décoratif ...

Page 88: ...8 9 10 11 12 13 1 Ecran 13 MP3 en ligne en option Caractéristiques générales Fonctionnement démarrer confirmer diminuer augmenter arrêter annuler pause Solarium facial uniquement SLi Refroidisseur corporel Xsens en option Qsens en option Sélection de la chaîne musicale en option Volume de la musique Elévateur en option ...

Page 89: ... en option se mettent en pause L élévateur en option baisse Appuyez sur START 1x confirmé le temps de votre choix L appareil se met sous tension et le temps de bronzage commence En mode pause appuyez sur START 1x pour mettre le banc solaire à nouveau sous tension ou sur STOP 1x pour le mettre hors tension La séance de bronzage est interrompue et le banc solaire démarre la période obligatoire de re...

Page 90: ...e niveau d intensité Xsens en option Appuyez sur XSENS 1x pour mettre la fonction sous hors tension Le niveau s affiche défile en haut de l écran et XSENS défile dans la partie inférieure Remarque Si aucune touche n est pressée pendant 3 secondes vous quittez automatiquement le mode de fonction Le temps de bronzage restant s affiche à l écran Configuration 1 solarium facial minimum Configuration 2...

Page 91: ...haut de l écran et CHANNEL ou MP3 défile dans la partie inférieure Utilisez les touches MIN et PLUS pour sélectionner une chaîne différente Volume de la musique Appuyez sur VOLUME 1x pour activer la fonction Le niveau de volume s affiche en haut de l écran et VOLUME défile dans la partie inférieure Utilisez les touches MIN et PLUS pour diminuer augmenter le volume 0 14 Chaîne 0 MP3 en ligne Chaîne...

Page 92: ...et LIFT apparaît en bas Lecture du compteur horaire de la lampe Appuyez sur les touches MIN et LIFT en même temps pendant 3 secondes pour lire le compteur horaire de la lampe Lecture du compteur horaire de l appareil Appuyez sur les touches PLUS et LIFT en même temps pendant 3 secondes pour lire le compteur horaire de l appareil Utilisez la touche MIN pour baisser l élévateur Utilisez la touche PL...

Page 93: ...rtes ouvertes L ouverture des portes durant le bronzage active automatiquement le mode de pause Les lampes s éteignent automatiquement Le refroidissement corporel est toujours actif 4 minutes Xsens et Qsens se mettent en pause L élévateur baisse automatiquement Le message PLEASE CLOSE DOORS défile à l écran En cas d erreur ERROR défile en haut de l écran et un code s affiche dans la partie inférie...

Page 94: ... un nombre entre 1 et 30 pour l utilisation en mode autonome Sélectionnez 0 pour utiliser le banc solaire avec des pièces de monnaie Appuyez sur START pour enregistrer le nombre de votre choix Le paramètre 1 s affiche en haut de l écran et le nom du paramètre START TIME défile en bas de l écran Appuyer sur START 1x Le nombre 1 apparaît en haut de l écran et le numéro du paramètre en cours s affich...

Page 95: ...r sortir du mode de configuration Le message LUXURA IT S YOUR BODY s affiche à l écran Le paramètre 1 s affiche en haut de l écran et le nom du paramètre START TIME défile en bas de l écran Le paramètre principal P1 s affiche en haut de l écran et le nom du paramètre principal UNIT défile en bas de l écran Appuyer sur START 1x Appuyez tour à tour sur les touches suivantes STOP STOP PLUS STOP MIN R...

Page 96: ...HOUR COUNTER RESET défile 1x en bas Après cela le message RESET LAMP HOUR COUNTER s affiche en bas de l écran Le nombre 4 apparaît en haut de l écran et OFF s affiche en bas Utilisez les touches MIN et PLUS pour changer OFF en ON Appuyez sur START pour réinitialiser le compteur horaire Appuyez sur STOP 2x pour sortir du mode de configuration Le message LUXURA IT S YOUR BODY s affiche à l écran Con...

Page 97: ...défile en bas de l écran Utilisez les touches MIN et PLUS pour naviguer jusqu aux principaux paramètres suivants P1 Unit P2 Display P3 Qsens P4 Xsens P5 Facial P6 Body fan P7 Audio P8 Coin voir également Vue d ensemble du menu Configuration Utilisez les touches MIN et PLUS pour naviguer jusqu aux différents paramètres à l intérieur du paramètre principal Appuyez sur START 1x pour sélectinner un pa...

Page 98: ... sur START pour enregistrer le numéro de votre choix Si vous appuyez sur STOP 1x vous allez supprimer tous les changements que vous avez effectués et vous revenez à la sélection du paramètre Le paramètre 1 s affiche en haut de l écran et SAVED défile en bas afin de confirmer que la configuration a été enregistrée Vous retournez ensuite automatiquement à la sélection du paramètre Le paramètre P1 s ...

Page 99: ...faut Yes P7 Audio Sous menu En option 1 Volume chaîne 1 0 52 valeur par défaut 26 2 Volume chaîne 2 0 52 valeur par défaut 26 3 Volume chaîne 3 0 52 valeur par défaut 26 4 Volume chaîne 4 0 52 valeur par défaut 26 5 Volume chaîne 5 0 52 valeur par défaut 26 6 Volume chaîne 6 0 52 valeur par défaut 26 7 Volume chaîne 7 0 52 valeur par défaut 26 8 Volume chaîne 8 0 52 valeur par défaut 26 9 Volume M...

Page 100: ...iquides dans le banc solaire Pour tous travaux à effectuer sur le banc solaire vous devez débrancher l alimentation Lors de la mise en service du système et si il y a de l air dans la conduite vous devez purger le système Vous verrez comment purger le système en lisant la rubrique mise en route dans cette description du produit Le liquide résiduel du flacon peut être évacué simplement via les égou...

Page 101: ...aît en haut de l écran et OFF s affiche en bas Appuyez sur la touche PLUS pour changer OFF en ON Appuyez sur START pour démarrer l initialisation Le message INITIALIZING QSENS défile à l écran Appuyezsur STOP lorsquelesdeuxbecslesplusbasproduisentunevaporisation constante de brume d eau Le système est à présent purgé Le nombre 1 apparaît en haut de l écran et OFF s affiche en bas Appuyez sur STOP ...

Page 102: ...rde Attention sil vous plaît Symbole de mise en garde Le lit solaire doit être déconnecté de la source d alimentation Symbole de mise en garde Débrancher à la prise Symbole de mise en garde Interdit pour l usage domestique Symbole Lit solaire Symbole paroi solaire verticale Symbole Toit de lit solaire Symbole Bronzeur facial ...

Page 103: ...verts par cette garantie Nos appareils de bronzage sont fabriqués avec le plus grand soin et sont de la plus haute qualité Tous les Luxura satisfont aux normes internationales IEC EN et portent le label de qualité Kema Nous offrons une garantie d usine de 1 an Vous bénéficiez sur votre nouveau banc solaire d une garantie usine d 1 an à compter de la date d installation de votre banc Durant cette p...

Page 104: ...Produit Matériel de bronzage Modèle Type Moyens de conformité Les produits sont conformes à la Directive 89 336 CE de la Communauté européenne et à la Directive Basse Tension 2006 95 CE de la Communauté européenne Essai d épreuve compatibilité éléctromagnétique Réalisé par Laboratoire Hapro Fleerbosseweg 33 4420 AC Kapelle Pays Bas Normes utilisées EN 61000 6 3 2001 EN 55022 1998 EN 61000 6 1 2001...

Page 105: ...105 FRANÇAIS ...

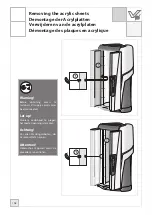
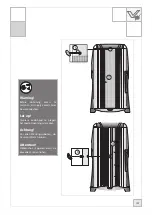
Page 106: ...s plaques en acrylique Warning Before obtaining access to terminals all supply circuits must be disconnected Let op Alvorens onderhoud te plegen het toestel spanningsvrij maken Achtung Vor allen Wartungsarbeiten das Gerät vom Netz trennen Attention Débranchez l appareil avant de procéder à son entretien ...

Page 107: ...erminals all supply circuits must be disconnected Let op Alvorens onderhoud te plegen het toestel spanningsvrij maken Achtung Vor allen Wartungsarbeiten das Gerät vom Netz trennen Attention Débranchez l appareil avant de procéder à son entretien ...

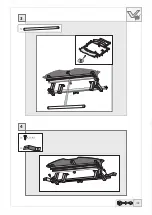
Page 108: ...108 Tanning unit assembly Montage des Bräunungsgerätes Montage bruiningsapparaat Assemblage de l unité de bronzage 1 2 3 2 ...

Page 109: ...109 3 4 ...

Page 110: ...110 5 6 8x 5 mm ...

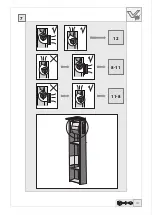
Page 111: ...111 7 11 8 8 11 12 ...

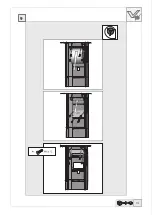
Page 112: ...112 8 ...

Page 113: ...113 9 ...

Page 114: ...114 10 ...

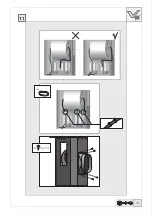
Page 115: ...115 11 ...

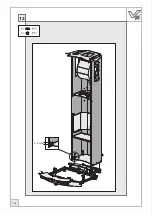
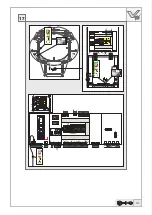
Page 116: ...116 12 5 mm ...

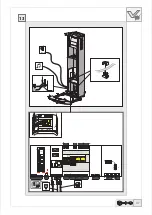
Page 117: ...ABB A26 30 10 2T1 1L1 3L2 5L3 13NO 4T2 6T3 14NO 2 2 3 3 4 4 5 5 A1 A2 A2 ABB A26 30 10 2T1 1L1 3L2 5L3 13NO 4T2 6T3 14NO 2 2 3 3 4 4 5 5 A1 A2 A2 X19 X18 1 2 3 4 5 6 7 8 9 1 0 1 1 1 2 Xpr1 2 1 3 2 1 3 2 1 3 2 1 3 K2 K1 2 3 1 11 10 9 8 7 6 5 4 3 2 1 12 11 10 9 8 7 6 5 4 3 2 1 12 11 10 9 8 7 6 5 4 3 2 1 11 10 9 8 7 6 5 4 3 2 1 6 5 4 3 2 1 2 1 1 2 3 4 5 6 7 8 9 10 1 2 3 4 5 1 2 3 4 5 6 3 2 1 5 4 6 7 ...

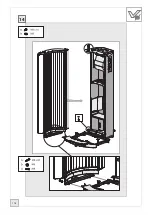
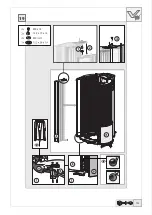
Page 118: ...118 14 ...

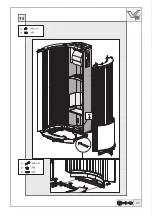
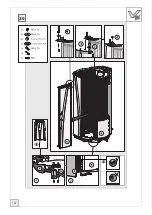
Page 119: ...119 15 ...

Page 120: ...3 2 1 12 11 10 9 8 7 6 5 4 3 2 1 12 11 10 9 8 7 6 5 4 3 2 1 11 10 9 8 7 6 5 4 3 2 1 6 5 4 3 2 1 2 1 1 2 3 4 5 6 7 8 9 10 1 2 3 4 5 1 2 3 4 5 6 3 2 1 5 4 6 7 8 9 1 2 3 4 5 6 7 1 2 3 4 1 2 3 4 5 6 7 8 9 10 11 1 2 3 4 1 2 3 4 1 2 1 2 PE PE Tc Tc Tb Tb Lc Lc Lb Lb X1 N3 N3 N2N2 N1 N1 N1 L1 L1 PE 1 3 La F1 F2 K3 1 0 6 2 8 4 7 3 Option K6 1 0 6 2 8 4 7 3 F a 1 F a 2 F a 3 F a 4 4 3 2 1 X5 X6 X9 X7 X8 Xp...

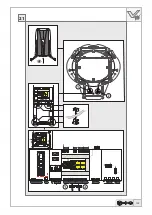
Page 121: ...7 8 9 10 1 2 3 4 5 1 2 3 4 5 6 3 2 1 5 4 6 7 8 9 1 2 3 4 5 6 7 1 2 3 4 1 2 3 4 5 6 7 8 9 10 11 1 2 1 2 PE PE Tc Tc Tb Tb Lc Lc Lb Lb X1 N3 N3 N2 N2 N1 N1 N1 L1 L1 PE 13 La F1 F2 K3 1 0 6 2 8 4 7 3 Option K6 1 0 6 2 8 4 7 3 4 3 2 1 X5 X6 X9 X7 X8 Xpr2 ABB A26 30 10 2T1 1L1 3L2 5L3 13NO 4T2 6T3 14NO 2 2 3 3 4 4 5 5 A1 A2 A2 ABB A26 30 10 2T1 1L1 3L2 5L3 13NO 4T2 6T3 14NO 2 2 3 3 4 4 5 5 A1 A2 A2 X19...

Page 122: ... 7 6 5 4 3 2 1 12 11 10 9 8 7 6 5 4 3 2 1 11 10 9 8 7 6 5 4 3 2 1 6 5 4 3 2 1 2 1 1 2 3 4 5 6 7 8 9 10 1 2 3 4 5 1 2 3 4 5 6 3 2 1 5 4 6 7 8 9 1 2 3 4 5 6 7 1 2 3 4 1 2 1 2 PE PE Tc Tc Tb Tb Lc Lc Lb Lb X1 N3 N3 N2 N2 N1 N1 N1 L1 L1 PE La F1 F2 K3 1 0 6 2 8 4 7 3 Option K6 1 0 6 2 8 4 7 3 4 3 2 1 X5 X6 X9 X7 X8 Xpr2 SENS SENS SENS SENS SENS SENS SENS SENS SENS SENS SENS SENS SENS SENS SENS SENS ...

Page 123: ...123 19 15 2 x 19 x 15 ...

Page 124: ...124 20 ...

Page 125: ...3 2 1 12 11 10 9 8 7 6 5 4 3 2 1 12 11 10 9 8 7 6 5 4 3 2 1 11 10 9 8 7 6 5 4 3 2 1 6 5 4 3 2 1 2 1 1 2 3 4 5 6 7 8 9 10 1 2 3 4 5 1 2 3 4 5 6 3 2 1 5 4 6 7 8 9 1 2 3 4 5 6 7 1 2 3 4 1 2 3 4 5 6 7 8 9 10 11 1 2 3 4 1 2 3 4 1 2 1 2 PE PE Tc Tc Tb Tb Lc Lc Lb Lb X1 N3 N3 N2N2 N1 N1 N1 L1 L1 PE 1 3 La F1 F2 K3 1 0 6 2 8 4 7 3 Option K6 1 0 6 2 8 4 7 3 F a 1 F a 2 F a 3 F a 4 4 3 2 1 X5 X6 X9 X7 X8 Xp...

Page 126: ...126 22 ...

Page 127: ...127 23 SENS SENS SENS SENS SENS SENS SENS SENS SENS SENS SENS SENS SENS SENS SENS SENS SENS SENS SENS SENS SENS SENS ...

Page 128: ...128 24 A B C SENS SENS SENS SENS SENS SENS SENS SENS SENS SENS SENS SENS SENS SENS SENS SENS ...

Page 129: ...7 8 9 10 11 1 2 1 2 PE PE Tc Tc Tb Tb Lc Lc Lb Lb X1 N3 N3 N2 N2 N1 N1 N1 L1 L1 PE 13 La F1 F2 K3 1 0 6 2 8 4 7 3 Option K6 1 0 6 2 8 4 7 3 4 3 2 1 X5 X6 X9 X7 X8 Xpr2 ABB A26 30 10 2T1 1L1 3L2 5L3 13NO 4T2 6T3 14NO 2 2 3 3 4 4 5 5 A1 A2 A2 ABB A26 30 10 2T1 1L1 3L2 5L3 13NO 4T2 6T3 14NO 2 2 3 3 4 4 5 5 A1 A2 A2 X19 X18 1 2 3 4 5 6 7 8 9 1 0 1 1 1 2 Xpr1 2 1 3 2 1 3 2 1 3 2 1 3 K2 K1 2 3 1 11 10 9...

Page 130: ...130 26 ...

Page 131: ... 2T1 1L1 3L2 5L3 13NO 4T2 6T3 14NO 2 2 3 3 4 4 5 5 A1 A2 A2 ABB A26 30 10 2T1 1L1 3L2 5L3 13NO 4T2 6T3 14NO 2 2 3 3 4 4 5 5 A1 A2 A2 X19 X18 1 2 3 4 5 6 7 8 9 1 0 1 1 1 2 Xpr1 2 1 3 2 1 3 2 1 3 2 1 3 K2 K1 2 3 1 11 10 9 8 7 6 5 4 3 2 1 12 11 10 9 8 7 6 5 4 3 2 1 12 11 10 9 8 7 6 5 4 3 2 1 11 10 9 8 7 6 5 4 3 2 1 6 5 4 3 2 1 2 1 1 2 3 4 5 6 7 8 9 10 1 2 3 4 5 1 2 3 4 5 6 3 2 1 5 4 6 7 8 9 1 2 3 4 5...

Page 132: ...132 28 29 4x 12 x 12 ...

Page 133: ...133 30 A A 4x 4x 4x A ...

Page 134: ...2 K1 11 10 9 8 7 6 5 4 3 2 1 12 11 10 9 8 7 6 5 4 3 2 1 12 11 10 9 8 7 6 5 4 3 2 1 11 10 9 8 7 6 5 4 3 2 1 6 5 4 3 2 1 2 1 1 2 3 4 5 6 7 8 9 10 1 2 3 4 5 1 2 3 4 5 6 3 2 1 5 4 6 7 8 9 1 2 3 4 5 6 7 1 2 3 4 1 2 1 2 PE PE Tc Tc Tb Tb Lc Lc Lb Lb X1 N3N3 N2 N2 N1 N1N1 L1 L1 PE La F1 F2 K3 1 0 6 2 8 4 7 3 Option K6 1 0 6 2 8 4 7 3 4 3 2 1 X5 X6 X9 X7 X8 Xpr2 ...

Page 135: ...135 32 7x 4x ...

Page 136: ...136 33 34 ...

Page 137: ...137 34 35 11x 4x 35 ...

Page 138: ...138 36 37 2x 98 x 110 α β α β α β α β α β α β α β α β ...

Page 139: ...139 38 Royal Red Pearl White 38 39 42 ...

Page 140: ...140 39 2 x ...

Page 141: ...141 40 ...

Page 142: ...pr1 2 1 3 2 1 3 2 1 3 2 1 3 K2 K1 2 3 1 11 10 9 8 7 6 5 4 3 2 1 12 11 10 9 8 7 6 5 4 3 2 1 12 11 10 9 8 7 6 5 4 3 2 1 11 10 9 8 7 6 5 4 3 2 1 6 5 4 3 2 1 2 1 1 2 3 4 5 6 7 8 9 10 1 2 3 4 5 1 2 3 4 5 6 3 2 1 5 4 6 7 8 9 1 2 3 4 5 6 7 1 2 3 4 1 2 3 4 5 6 7 8 9 10 11 1 2 1 2 PE PE Tc Tc Tb Tb Lc Lc Lb Lb N3 N3 N2 N2 N1 N1 N1 L1 L1 PE 13 La F1 F2 K3 1 0 6 2 8 4 7 3 Option K6 1 0 6 2 8 4 7 3 4 3 2 1 X5...

Page 143: ...143 42 3x ...

Page 144: ...144 43 44 45 44 52 ...

Page 145: ...145 45 46 ...

Page 146: ...146 47 48 ...

Page 147: ...147 49 ...

Page 148: ...148 50 4x 4 0 x 12 ...

Page 149: ...149 51 ...

Page 150: ...150 52 ...

Page 151: ...151 53 ...

Page 152: ...152 Dimensions Abmessungen Afmetingen Dimensions ...

Page 153: ...x 25A Lamps 50 x 230 W Weight excl packaging 700 kg 50 SLi Voltage 230V 1N PE 50Hz Wattage 8535 W Fuse 1 x 40A Voltage 230V 3 PE 50Hz Wattage 14783 W Fuse 3 x 32A Voltage 400V 3N PE 50Hz Wattage 8518 W Fuse 3 x 16A Voltage 430V 3N PE 50Hz Wattage 9199 W Fuse 3 x 16A Lamps 42 x 120 W 8 x 80 W 4 x 400 W Weight excl packaging 650 kg 50 SLi High Intensive Voltage 230V 1N PE 50Hz Wattage 13061 W Fuse 1...

Page 154: ...154 ...

Page 155: ...155 Electrical diagrams Schaltpläne Elektrische schema s Schéma électrique ...

Page 156: ...1 X21 11 10 9 8 7 6 5 4 3 2 1 X18 12 13 11 10 9 8 7 6 5 4 3 2 1 X12 12 4T2 2T1 14NO 5L3 3L2 1L1 6T3 A1 A2 K2 13NO 4T2 2T1 14NO 11 10 9 8 7 6 5 4 3 2 1 X10 6 5 4 3 2 1 X15 11 10 9 8 7 6 5 4 3 2 1 X13 2 4 6 8 1 0 K3 F1 2 1 F2 2 1 4 3 2 1 X5 6 5 4 3 2 1 X20 1 2 3 4 5 X2 3 2 1 X9 3 2 1 X6 3 3 2 2 1 1 X7 X8 4 2 1 0 K6 3 2 1 X14 Fa 5 Fa 6 Fa 4 Fa 3 2 1 X4 X5 X6 X9 X7 X8 Xpr2 3 2 1 X22 4 S3 S2 4 3 2 1 X2...

Page 157: ...2 2 1 X31 2 1 X31 EB3 E57 E23 E24 E25 E26 E27 E28 E29 23 24 25 26 27 28 29 Ld15 Ld14 Ld13 Ld16 E30 E31 E32 E33 E34 E35 E36 30 31 32 33 34 35 36 Ld19 Ld18 Ld17 Ld20 L L 4 3 2 1 X10 5 9 8 7 6 10 11 7 6 5 4 X26 8 7 6 9 8 11 10 13 12 14 Ca7 12 11 10 9 15 16 17 PE 3 2 1 Frame 4 3 2 1 X26 5 9 8 7 6 10 11 12 2 1 X27 2 1 X27 EB2 E56 S4 S6 E9 E10 E11 E12 E13 E14 E15 9 10 11 12 13 14 15 Ld7 Ld6 Ld5 Ld8 C9 E...

Page 158: ... I51 B Lp N E52 I52 B Lp N 4 3 2 1 X37 5 6 8 7 4 3 2 1 X37 5 8 7 6 S10 M3 2 1 X39 2 1 X39 EB4 E58 4 3 2 1 X40 5 6 4 3 2 1 X40 5 6 LD1 D1 D2 D3 4 3 2 1 X12 5 9 8 7 6 4 3 2 1 X37 5 6 6 7 8 9 10 Ca13 11 12 13 14 15 8 7 9 10 12 11 10 16 17 PE 11 12 13 Frame 4 3 2 1 X37 5 9 8 7 6 10 12 11 13 E44 E45 E46 E47 E48 E49 E50 44 45 46 47 48 49 50 Ld29 Ld28 Ld30 L 4 3 2 1 X41 5 6 8 7 2 1 X43 E53 I53 B Lp N E54...

Page 159: ...me K8 Frame Br Gr G Bl Ca14 Br Gr G Bl Ca15 K9 Frame K10 Frame Br Gr G Bl Ca16 Br Gr G Bl Ca17 3 2 1 X9 M7 3 2 1 X22 3 Frame M8 3 2 1 X7 4 3 2 1 X21 Ls3 4 or 8 channel music input Xpr4 Key Cax Cable Xp3 Qsens board Xp4 Audio M5 Compressor M6 Water pump M7 Xsens pump M8 Lift Kx Water relais Xx Connector Ls3 Speaker Ldx Push in connector ...

Page 160: ...www hapro com 2008 Hapro International 18365 rev 06 ...

Reviews: