4
Congratulations on the purchase
of your Hapro sunbed. Your new
sunbed has been manufactured with
the utmost care and attention and
consists of high-quality parts. All Hapro
sunbeds have been developed to give you the
best possible tan, whilst complying with the
strictest applicable European standards.
Note:
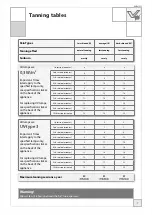
Please consult enclosed tanning schedule for advised tanning times.
Repairs may only be carried out by qualifi ed personnel.
Always disconnect the main power at the circuit breaker before servicing or repairing the unit.
Read this fi rst
1 Contact your authorised Hapro dealer
immediately if this unit does not
function as outlined in this manual.
2 Do not operate this unit in humid
spaces.
3 Always make sure the fuses can carry
the load. This unit has to be protected
by ground fault circuit interrupter
(GFCI) of 0.03A.
4 Always disconnect the power to the
unit at the wall breaker (isolator)
when servicing or cleaning the in-
side construction of the cabine.
Maintenance for which the procedure
is not described in this manual should
only be carried out by a qualifi ed
electrician. Never clean the electrical
components with fl uids.
5 Ensure that the canopy does not touch
the wall when opened.
6 Prevent the acrylic sheets from coming
into contact with sharp objects.
7 This unit may not be operated if:
•
the user is not wearing protective uv-
goggles
•
the blue or white facial glass is cracked
or broken
•
the acrylic panel in the canopy and/or
bench is missing
•
one or more of the fans in the unit are
not functioning properly
•
the timing mechanism is not
functioning properly
•
the temperature inside the cabin is
30°C or higher
8 To ensure maximum tanning
eff ectiveness, change the acrylic sheet
after every 1200 hours of operation.
9 To ensure maximum tanning
eff ectiveness, replace the lamps and
the facial tanning lamps according to
manufacturer´s instructions.
10 Check local regulations to fi nd out the
proper procedure for lamp disposal.
11 Note: only a special acrylic cleaner
may be used to clean the acrylic sheet.
Never use cleaners that contain alcohol,
as these can damage the acrylic sheet.
12 The UV-type of the tanning unit is
indicated on the specifi cation sticker.
13 Ultraviolet radiation from the sun
or UV appliances can cause skin or
eye damage. These biological eff ects
depend upon the quality and quantity
of the radiation as well as the skin and
eye sensitivity of the individual.
14 Excessive exposure may cause skin to
burn. Excessive repeated exposure to
ultraviolet radiation from the sun or
UV appliances may lead to premature
ageing of the skin as well as increase
risk of skin tumours.
15 The unprotected eye may develop
surface infl ammation and in some
cases, after a cataract operation
for example, damage may accur to
the retina after eccessive exposure.
Cataracts may develop after prolonged
exposures.
16 If the supply cord is damaged, it must
be replaced by the manufacturer or
service agent or a similarly qualifi ed
person in order to avoid a hazard.
17 To replace lamps and starters, remove
by turning a quarter turn to the left.
Placement of new lamps and starters
is done in the reverse to the above
mentioned procedure.
18 When installing the equipment, follow
the recommended minimum distances
listed in the “Dimensions / Placement”
chapter.
19 Clean the dust fi lters after every 50
hours of use. Regularly check the dust
fi lters.
20 Children should be supervised to
ensure that they do not play with the
tanning unit.
21 Non-users, especially children, must
not be present when the appliance is
being operated.
‘The information contained in this manual regarding assembly and operation should be
followed in full. Failure to do so may render the product warranty or liability on behalf
of the supplier null and void. If there is any uncertainty as to whether the instructions
contained in this manual have been followed properly and entirely, you should contact
the supplier of the sunbeds.
Contents
Read this first . . . . . . . . . . . . . . . . . . . . . . . . . . . . . . . . . . . . . . . . . . . . 5
Golden rules for sensible tanning in the tanning unit . . . . . . 6
Tanning tables . . . . . . . . . . . . . . . . . . . . . . . . . . . . . . . . . . . . . . . . . . . 7
Tanning Instructions displayed on the cubicle wall . . . . . . . . 8
Information on lamps . . . . . . . . . . . . . . . . . . . . . . . . . . . . . . . . . . . . 9
Decorative lighting. . . . . . . . . . . . . . . . . . . . . . . . . . . . . . . . . . . . . .10
Operation . . . . . . . . . . . . . . . . . . . . . . . . . . . . . . . . . . . . . . . . . . . . . .11
Qsens (optional) . . . . . . . . . . . . . . . . . . . . . . . . . . . . . . . . . . . . . . . .23
Symbols . . . . . . . . . . . . . . . . . . . . . . . . . . . . . . . . . . . . . . . . . . . . . . . .25
Warranty policy . . . . . . . . . . . . . . . . . . . . . . . . . . . . . . . . . . . . . . . . .26
Declaration of conformity . . . . . . . . . . . . . . . . . . . . . . . . . . . . . . .27
Removing the acrylic sheets . . . . . . . . . . . . . . . . . . . . . . . . . . . .106
Tanning unit assembly . . . . . . . . . . . . . . . . . . . . . . . . . . . . . . . . .108
Dimensions . . . . . . . . . . . . . . . . . . . . . . . . . . . . . . . . . . . . . . . . . . . .152
Technical data . . . . . . . . . . . . . . . . . . . . . . . . . . . . . . . . . . . . . . . . .153
Electrical diagrams . . . . . . . . . . . . . . . . . . . . . . . . . . . . . . . . . . . . .155
Summary of Contents for Luxura V10
Page 10: ...10 Decorative lighting ...
Page 35: ...35 DEUTSCH Dekorative Beleuchtung ...
Page 53: ...53 DEUTSCH ...
Page 61: ...61 NEDERLANDS Sierverlichting ...
Page 79: ...79 NEDERLANDS ...
Page 87: ...87 FRANÇAIS Eclairage décoratif ...
Page 105: ...105 FRANÇAIS ...
Page 109: ...109 3 4 ...
Page 110: ...110 5 6 8x 5 mm ...
Page 111: ...111 7 11 8 8 11 12 ...
Page 112: ...112 8 ...
Page 113: ...113 9 ...
Page 114: ...114 10 ...
Page 115: ...115 11 ...
Page 116: ...116 12 5 mm ...
Page 118: ...118 14 ...
Page 119: ...119 15 ...
Page 123: ...123 19 15 2 x 19 x 15 ...
Page 124: ...124 20 ...
Page 126: ...126 22 ...
Page 128: ...128 24 A B C SENS SENS SENS SENS SENS SENS SENS SENS SENS SENS SENS SENS SENS SENS SENS SENS ...
Page 130: ...130 26 ...
Page 132: ...132 28 29 4x 12 x 12 ...
Page 133: ...133 30 A A 4x 4x 4x A ...
Page 135: ...135 32 7x 4x ...
Page 136: ...136 33 34 ...
Page 137: ...137 34 35 11x 4x 35 ...
Page 138: ...138 36 37 2x 98 x 110 α β α β α β α β α β α β α β α β ...
Page 139: ...139 38 Royal Red Pearl White 38 39 42 ...
Page 140: ...140 39 2 x ...
Page 141: ...141 40 ...
Page 143: ...143 42 3x ...
Page 144: ...144 43 44 45 44 52 ...
Page 145: ...145 45 46 ...
Page 146: ...146 47 48 ...
Page 147: ...147 49 ...
Page 148: ...148 50 4x 4 0 x 12 ...
Page 149: ...149 51 ...
Page 150: ...150 52 ...
Page 151: ...151 53 ...
Page 152: ...152 Dimensions Abmessungen Afmetingen Dimensions ...
Page 154: ...154 ...
Page 155: ...155 Electrical diagrams Schaltpläne Elektrische schema s Schéma électrique ...
Page 160: ...www hapro com 2008 Hapro International 18365 rev 06 ...


