background image

installation & connection

20_

 installation & connection

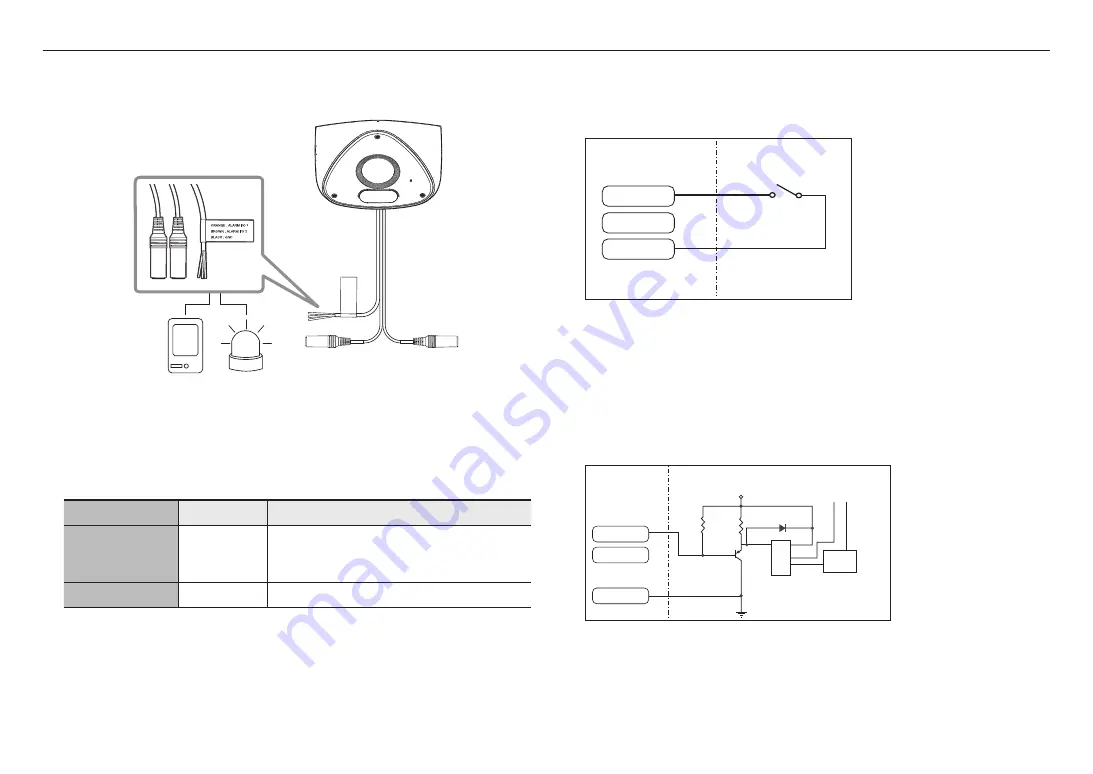
Connecting to the I/O port box

Connect the Alarm I/O cable to the corresponding port of the port box.

Sensor

Alarm

Alarm-related Connector


J


`

Make sure to connect the provided audio/alarm cable before use.

Color

Function

Description

ORANGE : ALARM #1 

BROWN : ALARM #2

ALARM I/O 1, 
ALARM I/O 2

These two ports are configurable from the web viewer, as they can be 
used as Alarm in or Alarm out

 Alarm I/O changes can be made through the Webviewer setup.

BLACK

GND

It is a ground terminal.

To connect to an external sensor

To use as an Alarm IN: Connect one of the [

ALARM I/O

] port and the other terminal to the [

GND

] port.

Alarm In Wiring Diagram(example)

Sensor

External connection

ALARM #1

ALARM #2

GND

Alarm cable

<If ALARM I/O 1 is set as an input terminal>

To connect to an alarm output

If devices (e.g., flashing light and siren) that exceed the voltage and current specifications are connected by 
using the open collector method, it may cause damage.
Refer to the alarm out connection diagram below case.

Alarm Out Wiring Diagram(example)

ALARM 
POWER

ALARM

RESISTOR

DIODE

RELAY

VCC

GND

TRANSISTOR

External connection

Alarm cable

ALARM #1

ALARM #2

GND

<If ALARM I/O 1 is set as an output terminal>

Summary of Contents for TNV-C7013RC

Page 1: ...NETWORK CAMERA User Manual TNV C7013RC...

Page 2: ...correctness of the contents in this document but no formal guarantee shall be provided Use of this document and the subsequent results shall be entirely on the user s own responsibility Hanwha Vision...

Page 3: ...ct using non compliant tools the product may be damaged 18 Do not install the product in a place where chemical substances or oil mist exists or may be generated As edible oils such as soybean oil may...

Page 4: ...Source as defined in UL60950 1 or PS2 as defined in UL62368 1 Unit is intended for installation in a Network Environment 0 as defined in IEC TR 62102 As such associated Ethernet wiring shall be limite...

Page 5: ...UP 21 21 Connecting the Camera Directly to Local Area Networking 21 Connecting the Camera Directly to a DHCP Based DSL Cable Modem 22 Using Device Manager 22 Automatically searching camera 22 Configur...

Page 6: ...ater The video play performance of the web viewer depends on the performance of the user s CPU and GPU RECOMMENDED MICRO SD SDHC SDXC MEMORY CARD SPECIFICATIONS Recommended capacity 16GB 1TB MLC or 3D...

Page 7: ...wer plug Torx L wrench 1 Used to assemble disassemble the dome cover and camera body Power Cable 1 Used to plug into the power port Audio Alarm cable 1 Used to connect with the audio and alarm port Ap...

Page 8: ...to protect the lens and the main unit b Camera body Body part where the camera lens and connection terminals are included c Mount Bracket Used to install the camera in a corner OPTIONAL ACCESSORIES FO...

Page 9: ...ne is embedded Item Description e Micro SD card slot Compartment for the Micro SD card f Reset Button The button restores all camera settings to the factory default Press and hold for about 5 seconds...

Page 10: ...es keep anyone else away from the installation site And put aside personal belongings from the site just in case If the product is installed with excessive force it may cause damage to the camera due...

Page 11: ...damaged Inserting a Micro SD card Slide the Micro SD card into the Micro SD card slot on the camera module in the direction of the arrow J Before installing the camera the Micro SD card should be ins...

Page 12: ...iate screws Install by referring to the TOP mark engraved on the mount bracket 1 3 Pull out network cable through the hole in the mount bracket Installing using pipe Install the dome cover SPG VAN13W...

Page 13: ...stallation camera body 1 Pull out the cable bushings from the camera body Installing the network cable IP66 2 1 Pull off the extruded part of the 1 hole cable bushing provided 2 2 Use the cap installe...

Page 14: ...bushing to be used 3 2 Route the network cable through the big hole of the cable bushing and connect to the network cable connector 3 3 When using the power Route the power cable through the small ho...

Page 15: ...cable bushing of the audio alarm cables into the camera body 6 Connect the audio alarm cable connector to the audio alarm cable port of the camera body 7 Using the fastening screws on the camera body...

Page 16: ...me cover Make sure to firmly tighten the fastening screws so that there is no water damage issue 3x TR20 Installing using pipe 9 1 Assemble the dome cover Install the dome cover SPG VAN13W after separ...

Page 17: ...ork and alarm audio cables etc 2 Wrap the black cable jacket Area A and the cable connection area with waterproof butyl rubber tape so that more than half of the butyl rubber tape is overlapped J If t...

Page 18: ...us Adjust the focus for a clearer image by turning the lens Adjust the focus after removing the lens protection cover CONNECTING WITH OTHER DEVICE Ethernet Ethernet Power Power Ethernet Connection Con...

Page 19: ...egory 5e Max Distance 100 m PoE Support IEEE 802 3af Connecting audio and alarm I O Network Speaker Microphone Speaker Microphone 1 Connect the MIC port of the camera with the microphone or LINE OUT p...

Page 20: ...ground terminal To connect to an external sensor To use as an Alarm IN Connect one of the ALARM I O port and the other terminal to the GND port Alarm In Wiring Diagram example Sensor External connect...

Page 21: ...automatically If there is no DHCP server available the IP address will be set to 192 168 1 100 To change the IP address use the Device Manager For further details on Device Manager use refer to Using...

Page 22: ...rator HTTP Port Used to access the camera using the Internet browser defaulted to 80 RTSP Port A port that controls real time streaming The initial value is 554 If using a Broadband Router IP Address...

Page 23: ...OK MANUALLY REGISTERING CAMERA If the camera cannot be found using search function the camera can be registered remotely by manually inserting IP information if the camera is connected to external net...

Page 24: ...t forwarding setting is an example of setting CISCO IP router The settings may differ depending on the connected Broadband Router model For more information refer to the user manual of the applicable...

Page 25: ...NET On a remote computer that is not in the Broadband Router s network cluster is not allowed users can access cameras within a Broadband Router s network by using the camera s DDNS URL 1 Before you c...

Page 26: ...ing system in support of the UPnP protocol 2 Click the camera name for search In the Windows operating system click the camera name searched from the network menu The login window is displayed Connect...

Page 27: ...using a memo pad or memorizing it LOGIN Whenever you access the camera the login window appears Enter the User ID and password to access the camera 1 Enter admin in the User name input box The adminis...

Page 28: ...NAS equipment TROUBLESHOOTING PROBLEM SOLUTION When an Windows 10 user accesses the web viewer through Chrome or Firefox the sound volume of microphone changes periodically This is what happens when...

Page 29: ...ury cadmium or lead above the reference levels in EC Directive 2006 66 If batteries are not properly disposed of these substances can cause harm to human health or the environment To protect natural r...

Page 30: ......

Reviews: