


Hansa C27EU O&M Manual
– OM-023 Revision A 16/10/19
© Hansa Chippers 2019
5
Note
: the body of the chipper is rather heavy and it may take significant force to rotate.
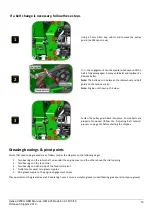
Feed roller control
The C27 is equipped with a feed roller which draws material into the machine. The feed roller is controlled via both the yellow
control bar which surrounds the inlet table and the capacitive touch button on the side of the inlet table. Pushing the control bar
in (towards the body of the chipper) stops the feed roller. Pulling it out (away from the body of the chipper) enables the feed roller.
When the control bar is in th
e ‘enabled’
position, touching the capacitive touch button will start the feed roller. When pressed
again, it will toggle between forward rotation and reverse rotation of the feed roller.
Automatic Feed Controller (AFC)
The feed roller is fitted with an electronic automatic feed control system which is designed to limit the feed rate of material into
the machine in order to prevent the engine from stalling.
This system eliminates the need to control the speed at which the branches are fed into the chipper manually. A sensor detects the
RPM of the rotor; once this speed drops to a pre-set level the feed roller stops and the branch stops feeding into the machine. The
engine then picks up in RPM and once it reaches a pre-set speed the feed-roller will start feeding again. The feed wheel will also
reverse back slightly after stopping (reducing the friction between the wood and knives), resulting in a quicker engine recovery.
The feed roller will only work once the engine is turned on and the engine has reached full throttle after engaging the rotor. If the
green LED light on the AFC controller is flashing this indicates the feed roller
isn’t turning. When this changes to a solid g
reen light
(when the engine reaches maximum throttle of 3000RPM) the feed roller will be operational.
The AFC has 19 different pre-set positions at which the feed will stop.
Adjusting the AutoTrip setting:
1.
Turn the ignition key into the ‘ON’ position. Alt
ernatively, this can be adjusted when the machine is in operation.
2.
The version number will initially be displayed on the LCD display, wait until this clears.
3.
Push the ‘Menu’ button once.
4.
Adjust the AutoTrip setting down using the ‘Menu’ button or up using the ‘Set’ button. There are 19 different positions at
which the feed will stop. At setting 1 the engine is dropping further in RPM, whereas at setting 19 the engine is only
dropping marginally in RPM before the feed roller stops. Adjust to a setting which is most suitable to you. Once adjusted
the screen will return to the Hour meter / Tachometer display after 5 seconds, saving the desired setting.
If there are any problems with the electronic automatic feed system, the chipper can be used with the auto-feed disabled. To
disable auto-feed, adjust the AutoTrip setting down to 0 or up to 20.
WARNING!
Be careful using the machine with auto-feed disabled as the machine can be stalled easily.
Hour meter / tachometer
The LCD display will toggle between the current engine RPM and machine hours every 5 seconds. Alternatively, the operator can
toggle between the two by pushing the ‘Set’ button.
Feed control bar
Stop feed
roller
Feed
direction
button
Enable feed
roller


