Hansa C27EU O&M Manual
– OM-023 Revision A 16/10/19
© Hansa Chippers 2019
13
Reinstall the knives:
Clean all mounting surfaces and remount the
knives in the reverse procedure. Torque the
knife clamping nuts up to 190 Nm.
After sharpening, the width of the knives will
have been reduced, therefore the gap between
the knives and anvil may require adjustment.
There should be 3 mm of clearance between the
knife and the anvil. If there is not enough
clearance, the knife edge may touch the anvil
through deflection when cutting heavy
branches and damage the sharp edge. Too much
clearance will allow small twigs and fibrous
materials to be dragged through without being
cut.
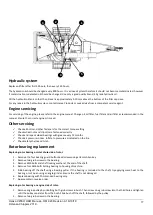
To adjust the gap between the knives and the
anvil, first loosen the locking nuts from the
adjustment bolts on the anvil mounting plate
using a 16 mm spanner. Now tighten or loosen
the two adjustment bolts. Tightening these
bolts will cause the anvil mounting plate to slide
further along the slotted holes. Ensure you
tighten the two bolts evenly to avoid setting the
anvil on an angle.
Once the correct anvil position has been set,
ensure the locking nuts on the adjustment bolts
are tightened. Additionally, ensure the clamping
nuts are torqued to 44 Nm.
Remove the rotor pin and turn the rotor slowly
by hand to check that it turns freely.
Close and secure the outlet chute.
WARNING!
Every time the knife clamping bolts are torqued up to 190 Nm and loosened off again, the life of the
bolts is reduced. The knife clamping bolts must be replaced at most after every six sharpens. Contact Hansa for
replacement bolts (m16x50 countersunk bolts of grade 12.9 or higher). Use only genuine Hansa bolts.
5
6
7
Locking nuts
Rotor disk
Clamping bolts
Knife
Countersink
clamping bolts
Adjustment bolts
Anvil
Rotor
disc
Knife
3 mm
clearance
Bearing
Top view: Knife and anvil set-up
Spring washers


