39
English
A
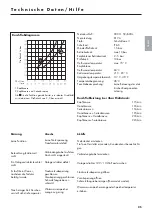
M o u n t i n g c o l u m n s
Join transformer with the mans supply after
the installation is completed and the shower
tray is earthed.
Perform connection
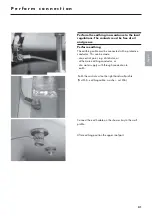
Hook the complete installation unit onto the pre-fixed
screws behind the wall posts. Drill the remaining holes
and fasten the installation unit.
Connect the supply hoses from the thermostat to the 3/4"
inlet elbows. Hot (marked red) left.
Feed the power supply cable through the prepared
holow pipe to the transformer. Do not connect to the
mains supply at this point. Check water supply con-
nection for leaks.
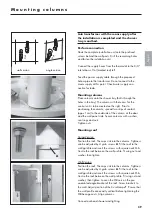
Mounting columns
Place columns onto the shower tray (bolts through the
holes in the tray). The column with the recess for the
control unit is to be erected on the right. Prior to
positioning the columns, spread two strips of sealant
(appx.1cm) to the underside of the column, at the door
and the wall panel side. Secure columns with washers,
seal rings and nuts.
Tighten nuts.
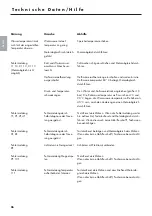
Mounting roof
Corner-Version:
Position the roof. The caps sink into the columns. Tightness
can be adjusted by 4 grub screws
A
.
Fit the roof to the
wall pprofile and insert the screws with square neck M6.
Centre the roof between the wall profile. fit wing nut and
washer, then tighten.
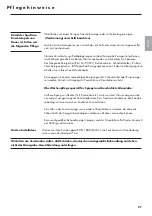
Wall-Version:
Position the roof. The caps sink into the columns. Tightness
can be adjusted by 4 grub screws
A
.
Fit the roof to the
wall pprofile and insert the screws with square neck M6.
Centre the roof between the wall profile. Fit wing nut and
washer, then tighten.
Loosen the M8 nuts on the pre-
assembled angle bracket of the roof. Screw brackets to
the wall. Adjust position of the Duschtempel
®
. Ensure that
the wall profile are exactly vertical before tightening the
M8 hexagon nuts. Align columns.
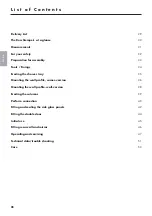
Connect ovehead shower and lighting
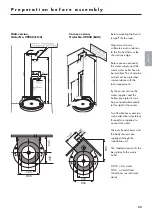
Hot
Hot
wall-version
angle-version

