


60
4. Carriage moving malfunction
4.1 Carriage moving failure
There are error messages displayed on the screen of the servo driver.
Deal with the issue according to the corresponding information.
Below is the list of information display on screen of the servo driver and the corresponding
indication and troubleshooting.
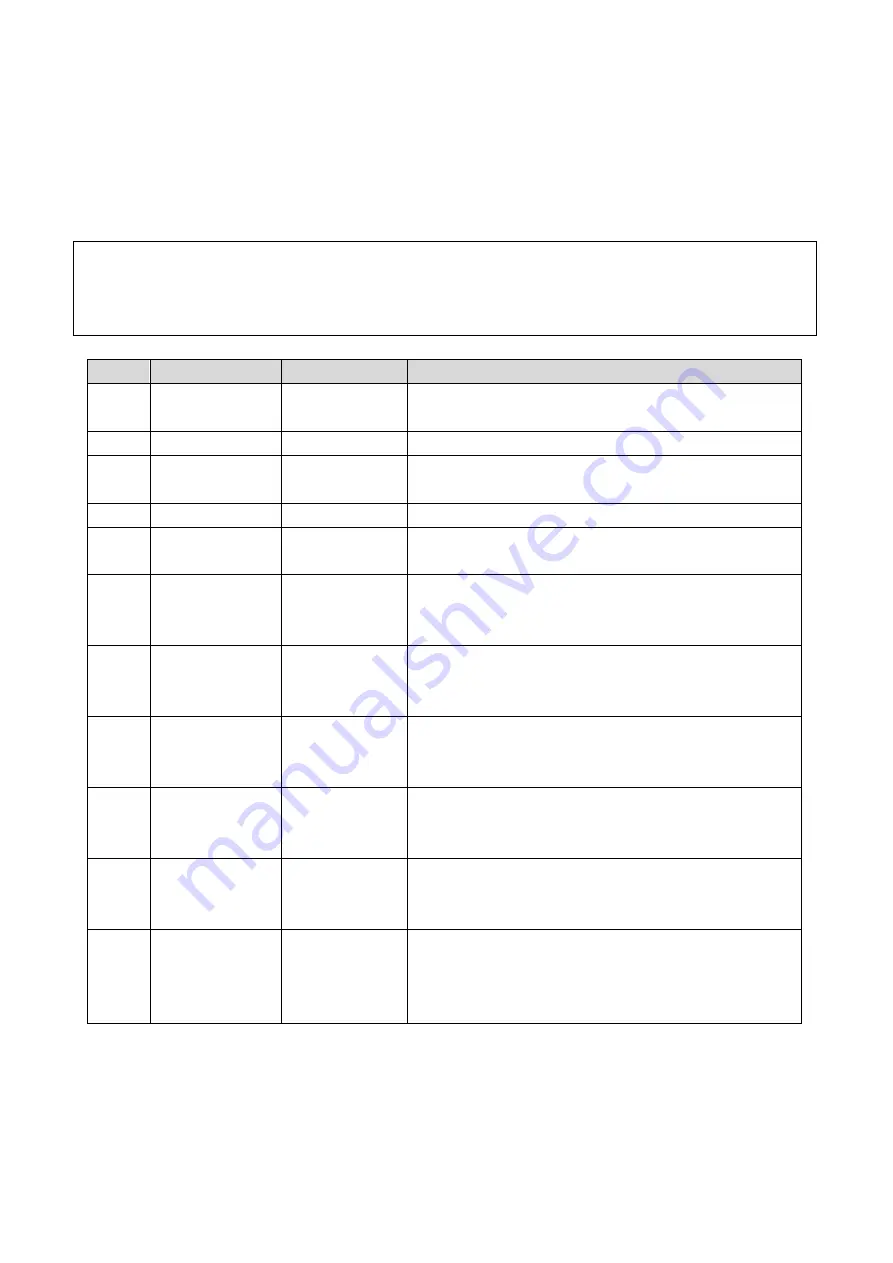
Order
Code
Indication
Troubleshooting
1
OC1 or OC2
Current
overload
Check and see power connection of the motor
2
OL1 or OL2
Overload
Check and see power connection of the motor
3
Hu
Voltage
overload
Verified that the power input is within the rated
values
4
Fb
Fuser break
Replace the servo driver
5
AH
Amplifier
overheat
Keep the environment maintain below 40
℃
Keep the servo driver away from any heat resource
6
EH
Encoder
overheat
Keep the environment maintain below 40
℃
Remove any item baffles the heat dissipating of the
servo driver
7
LuP
Main circuit
voltage
defected
Check if there is any power supply interruption
Verify the power input stably with rated values
8
¯PoF
Anti-crashing
& scram stop
activated
Check if any anti-crashing attachment or scram stop
activates, reset correspondingly.
9
¯Pn0
Media locating
attachment
enabled
Check the media locating attachment and turn it
down if ever enabled
10
=Pot
Y-directional
origin
indicating
Check the opt-electric sensor if the code displays in
the Y-directional non-origin position
11
=PP1
Pulse signal
transmitting
(the state of
running)
Indicates a normal state during X-directional moving
Indicates a normal state of non-origin position
Summary of Contents for HT2500UV
Page 1: ...1 HT2500UV Handtop Large Format UV Printer Operation Manual Original Instructions...
Page 17: ...17 5 6 Labels and logo on printer 1 11 2...
Page 18: ...18 3 4 7 5 10 6 9 8...
Page 19: ...19...
Page 20: ...20 1 2 3 4...
Page 26: ...26 Select OS version x64 for 64 bit windows Select the communication port...
Page 27: ...27 Select the printer model Select DPI...
Page 28: ...28 Select rows...
Page 30: ...30 Select additional task Confirm and install Wait for installation...
Page 31: ...31 Install the initiations Click finish to continue...
Page 32: ...32 Install the driver for PCIE card Accept...
Page 33: ...33 Continue Finish Normally we do not have to reboot computer after installation...
Page 36: ...36 Finish the connecting between sub tank to heads and fix the printhead...
Page 45: ...45 Reset the value of the zero position in the layout option...
Page 64: ...64 2 Certifications...
Page 66: ...66 4 Rating plate...
Page 68: ...68 ii CMYKLcLmWW...
Page 69: ...69 iii CMYKVW iv CMYkWW...
Page 70: ...70 v CMYKVVWW vi CMYKLcLm...
Page 71: ...71...


