


Document #101-0240
8
04/22/2013
V. MAINTENANCE
The plastic parts in the Hopper are formed of Lexan®. GE’s recommendation for cleaning the plastic parts is to
use normal household cleaners.
DO NOT USE; gasoline, high alkaline solutions, benzene acetone, carbon
tetrachloride, methyl ketone, muraitic acid, or electrical contact cleaner as THEY WILL DAMAGE THE
PLASTIC.
CAUTION: This Hopper DOES NOT NEED TO BE OILED. Oil causes dirt
to accumulate and certain oils may damage the plastic components. Any lu-
brication in the Hopper can result in a faulty payout.
It is recommended that the Hopper is cleaned on a monthly basis,but this may vary depending on circumstances
and usage. Disassembly of the Hopper is required for proper cleaning.
CAUTION: Disconnect all power to the machine and remove the Hopper
before attempting any service.
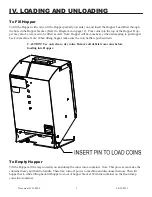
To remove the Hopper from the machine and clean it, follow the steps below:
1.
Empty all the coins from the Hopper.
2.
Disconnect all power from the machine.
3.
Unplug the Main Harness from the bottom of Hopper.
4.
Tilt the top of the Hopper backwards slightly, then lift up and forward to remove the Hop-
per Assembly from the cabinet.
5.
Use a Phillips screwdriver to remove (4 or 8) #8 x 1/4” self-tapping screws that hold the
cover on to the Outer Housing.
6.
Note: If applicable remove the hopper rod (handle) by removing the (2) 1/4 x 20 screws.
7.
Swing the Coin Baffle up and out of the Outer Housing.
8.
Remove the Coin Baffle from the Outer Housing .
9.
Sweep all debris out of the Hopper with a
CLEAN
paintbrush.
10.
Dampen a cloth and apply a household cleaner to all surfaces inside the Coin Bowl.
Scrub if required.
11.
Dampen a clean cloth and wipe up any remaining residue.
12.
Reassemble the Coin Hopper and re-install into the machine.
13.
Restore power to the machine.
Summary of Contents for Hopper HSH
Page 1: ...Document 101 0240 1 04 22 2013 Hamilton Hopper Manual ...
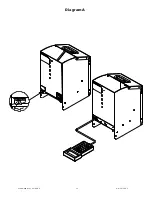
Page 12: ...Document 101 0240 12 04 22 2013 Diagram A ...
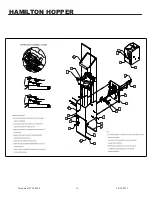
Page 16: ...Document 101 0240 16 04 22 2013 HAMILTON HOPPER ...
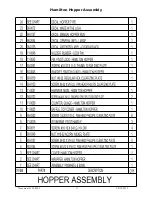
Page 17: ...Document 101 0240 17 04 22 2013 Hamilton Hopper Assembly ...
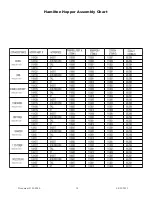
Page 18: ...Document 101 0240 18 04 22 2013 Hamilton Hopper Assembly Chart ...
Page 19: ...Document 101 0240 19 04 22 2013 Hamilton Hopper Wiring Harness ...
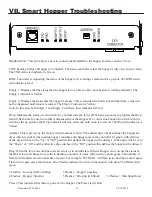
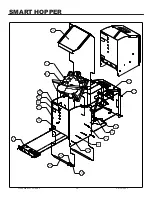
Page 20: ...Document 101 0240 20 04 22 2013 SMART HOPPER ...
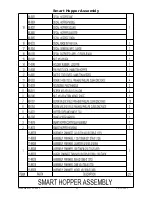
Page 21: ...Document 101 0240 21 04 22 2013 Smart Hopper Assembly ...
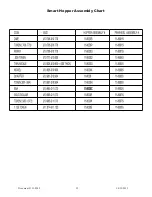
Page 22: ...Document 101 0240 22 04 22 2013 Smart Hopper Assembly Chart ...
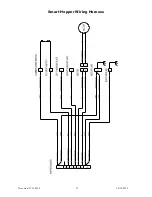
Page 23: ...Document 101 0240 23 04 22 2013 Smart Hopper Wiring Harness ...
Page 24: ...Document 101 0240 24 04 22 2013 HOPPER BOWL ...
Page 25: ...Document 101 0240 25 04 22 2013 Hopper Bowl Assembly ...