


6
2. Main Menu Screen
6-9
MONITOUCH Ope
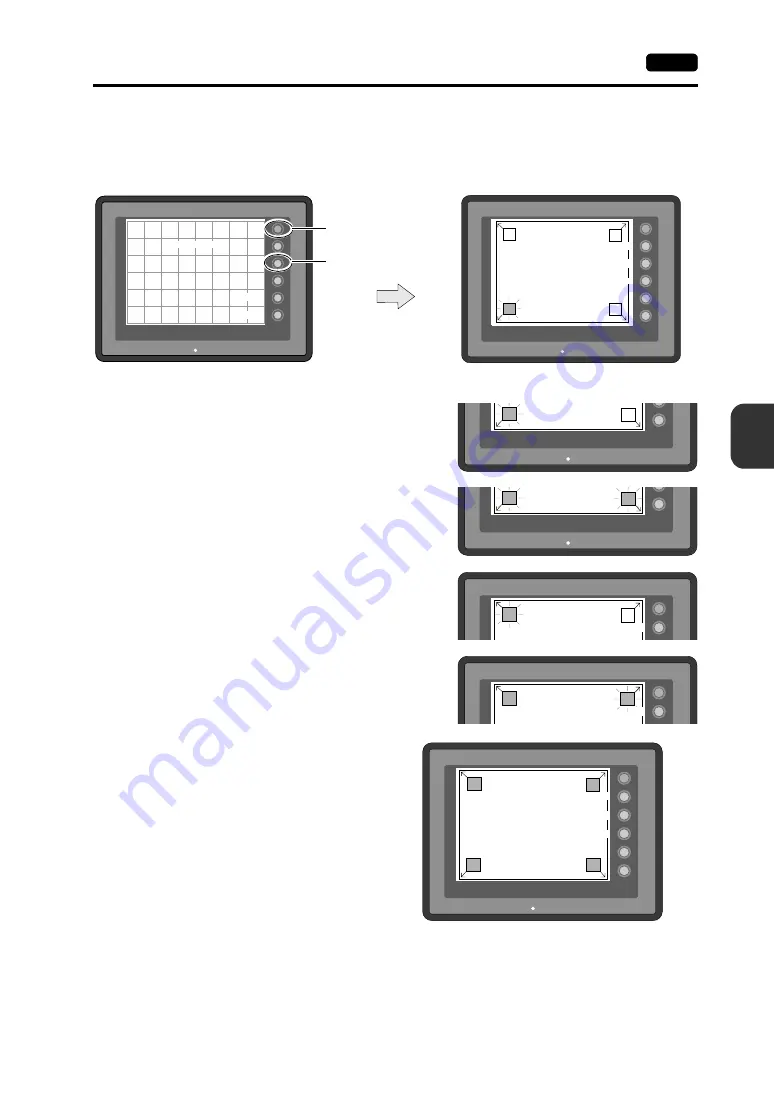
Touch Switch Adjustment
If a position different from the pressed position turns white on the touch switch test screen, follow the
steps described below to adjust the touch switch position.
1.
Hold down the [SYSTEM] switch and press the [F2] switch on the touch switch test screen.
2.
Press on “1” that is flashing at the corner on the
touch switch adjustment screen. When the finger
is released, a beep sounds and the position is set.
“2” flashes.
3.
Press on “2” that is flashing at the corner. When
the finger is released, a beep sounds and the
position is set. “3” flashes.
4.
Press on “3” that is flashing at the corner. When
the finger is released, a beep sounds and the
position is set. “4” flashes.
5.
Press on “4” that is flashing at the corner. When
the finger is released, a beep sounds and the
position is set.
6.
To re-set the positions, press the [F2] switch
and follow step 2 and later.
7.
Press the [F1] switch. A long beep sounds
and the positions are determined. The
touch switch test screen is displayed again.
8.
To cancel the setting, press the [F3] switch.
The touch switch test screen is displayed
again.
SYSTEM
F2
F3
F4
F5
F1
POWER
Touch Switch Adjustment
3
4
1
2
Fix
Reset
Return
X:
Y:
Touch the flickering corner.
The last position you touched
is the setting value.
SYSTEM
F2
F3
F4
F5
F1
POWER
X:
Y:
Erase
Return
SYSTEM
F2
F5
POWER
1
2
F5
POWER
1
2
SYSTEM
F1
Touch Switch Adjustment
3
4
Fix
SYSTEM
F1
Touch Switch Adjustment
3
4
Fix
SYSTEM
F2
F3
F4
F5
F1
POWER
Touch Switch Adjustment
3
4
1
2
Reset
Return
X:
Y:
Touch the flickering corner.
The last position you touched
is the setting value.
Fix
F1
F2
F3
Summary of Contents for MONITOUCH V606e
Page 1: ...V606e SYSTEM F2 F3 F4 F5 F1 POWER V606e...
Page 9: ...11 Features 2 Models and Peripheral Equipment 3 System Composition Overview...
Page 15: ...1 6 3 System Composition Please use this page freely...
Page 28: ...2 12 5 Modular Jack MJ1 Please use this page freely...
Page 29: ...31 Mounting Procedure 2 Power Supply Cable Connection Installation...
Page 48: ...61 Operational Procedures 2 Main Menu Screen MONITOUCH Operations...
Page 65: ...71 Error Messages 2 Troubleshooting Error Correction...
Page 72: ...81 Inspection and Maintenance 2 Warranty Policy Inspection and Maintenance...
Page 76: ...8 4 2 Warranty Policy Please use this page freely...


