


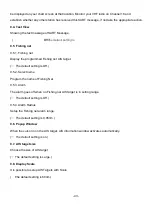


- 46 -
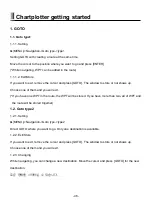
Chartplotter getting started
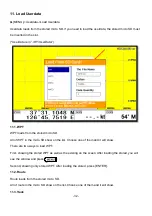
1. GOTO
1.1. Goto type1
1.1.1. Setting
▶
[
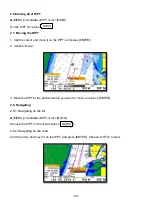
MENU]->Navigation->Goto type->type1
Setting GOTO with creating a route at the same time.
Move the cursor to the position where you want to go and press [ENTER].
(*While navigating, WPT can be added in the route)
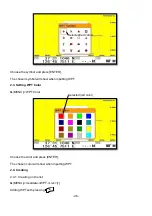
1.1.1.2. Exit/Store
If you want to exit, remove the cursor and press [GOTO]. The window to store or not shows up.
Choose one of them and you will exit.
(*If you have one WPT in the route, the WPT will be stored. If you have more than two, all of WPT and
the route will be stored together)
1.2. Goto type2
1.2.1. Setting
▶
[
MENU]->Navigation->Goto type->type2
Direct GOTO where you want to go. Only one destination is available.
1.2.2. Exit/Store
If you want to exit, remove the cursor and press [GOTO]. The window to store or not shows up.
Choose one of them and you will exit.
1.2.3. Changing
While navigating, you can change a new destination. Move the cursor and press [GOTO] for the new
destination.
로운
항해를
시작하실
수
있습니다
.
Summary of Contents for Smart10 Series
Page 8: ... 8 ...
Page 11: ... 11 2 Specification of the connectors 2 1 Metal connectors ...
Page 12: ... 12 2 2 Plastic connectors ...
Page 15: ... 15 3 3 Navigation Data Page 3 3 1 Navigation Data Type1 3 3 2 Navigation Data Type2 ...
Page 19: ... 19 ...
Page 25: ... 25 Fig 1 3 3 When finishing press to exit ...
Page 28: ... 28 Fig 1 6 3 ...
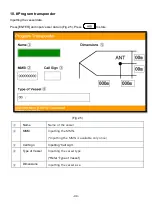
Page 39: ... 39 2 2 Detail Choose the AIS target and press ENTER 2 3 Goto Choose the AIS target and press ...
Page 45: ... 45 ...
Page 51: ... 51 2 9 Sorting MENU Userdata WPT List MENU Sorting the order of WPT on the list ...
Page 63: ... 63 The maximum range of Correction Offset is 5nm ...
Page 71: ... 71 ...
Page 79: ... 79 ...
Page 95: ... 95 ...
Page 98: ... 98 Smart10 Flush Mounting Smart7 8 Flush Mounting ...
Page 111: ... 111 ...


