background image


6-5 

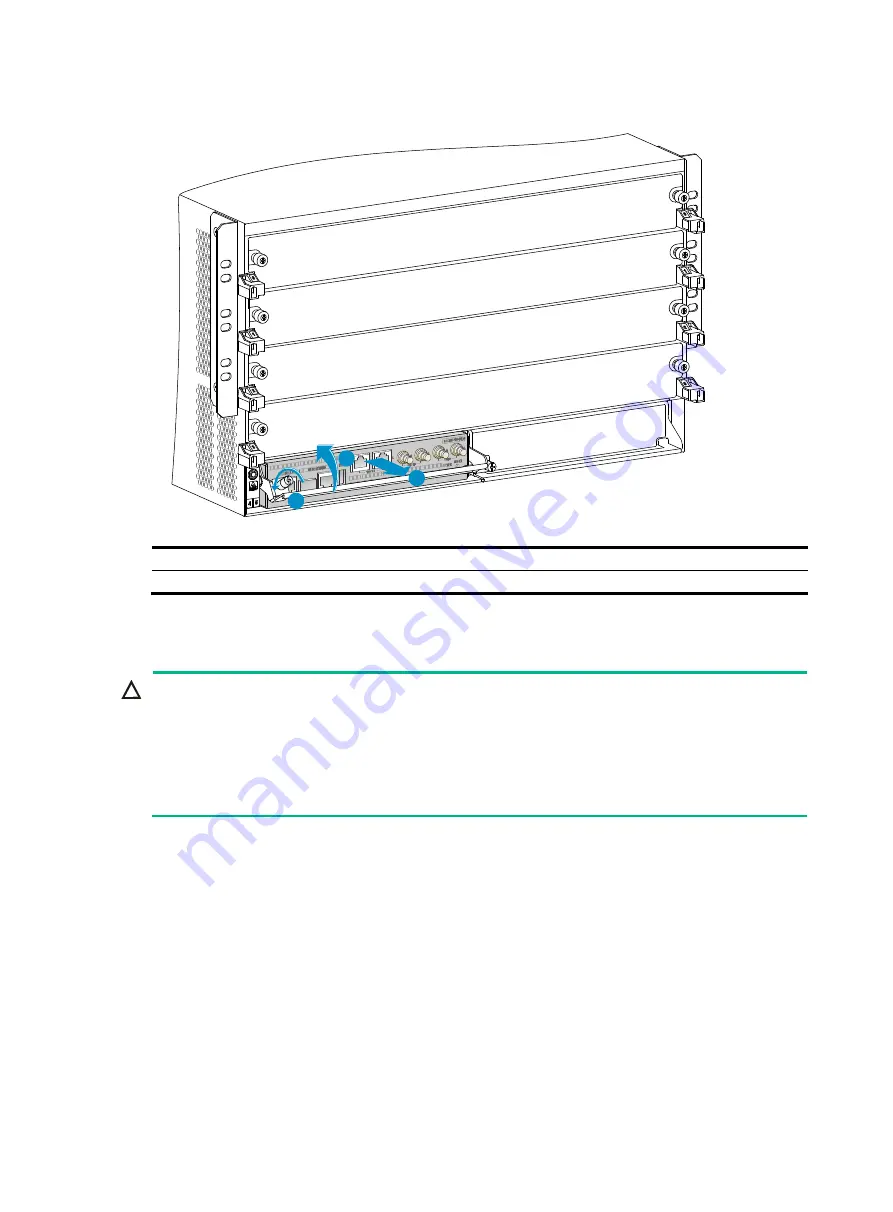
Figure 6-6 Removing an S12504R MPU 


(1) Loosen the captive screw 

(2) Pivot up the handle of the MPU 

(3) Pull the MPU slowly out of the slot along the guide rails 


Replacing a fabric module 


CAUTION: 

  Remove the fan tray before you remove a fabric module. Reinstall the fan tray immediately after 

you finish installing or replacing a fabric module on an operating device. After the fan tray starts 
operating, you can replace or install fabric modules whose slots are covered by the other fan tray.

  The smart speed adjustment feature increases the fan speed when only one fan tray is operating. 

Take noise protection measures such as wearing an earmuff or earplug. In addition, make good 
preparation before hot swapping a fabric module to minimize the operation time. 


To replace a fabric module: 

1. 

Prepare an antistatic mat to place the removed fabric module. 

2. 

Wear an ESD wrist strap, and make sure it makes good skin contact and is reliably grounded. 
For more information, see "Installing FRUs." 

3. 

Press the buttons on the ejector levers to release the ejector levers. Simultaneously rotate 
outward the ejector levers and pull the fabric module part way out of the slot. 

4. 

Holding the fabric module bottom with the right hand and the middle part with the left hand, pull 
the fabric module slowly out of the slot along the guide rails. 

5. 

Place the removed fabric module on the antistatic mat. 

6. 

Install a new fabric module. For the fabric module installation procedure, see "Installing FRUs." 

2

1

3

Summary of Contents for S12500R Series

Page 1: ...H3C S12500R Switch Router Series Installation Guide New H3C Technologies Co Ltd http www h3c com Document version 5W100 20200426...

Page 2: ...espective owners Notice The information in this document is subject to change without notice All contents in this document including statements information and recommendations are believed to be accur...

Page 3: ...resents arguments that you replace with actual values Square brackets enclose syntax choices keywords or arguments that are optional x y Braces enclose a set of required syntax choices separated by ve...

Page 4: ...s Convention Description Represents a generic network device such as a router switch or firewall Represents a routing capable device such as a router or Layer 3 switch Represents a generic switch such...

Page 5: ...ardware model configuration or software version It is normal that the port numbers sample output screenshots and other information in the examples differ from what you have on your device Documentatio...

Page 6: ...y recommendations 1 1 Electricity safety 1 1 Handling safety 1 1 ESD prevention 1 2 Laser safety 1 2 Examining the installation site 1 2 Weight support 1 2 Temperature 1 2 Humidity 1 3 Cleanliness 1 3...

Page 7: ...Clear the work area of possible electricity hazards such as ungrounded power extension cables missing safety grounds and wet floors Locate the emergency power off switch in the room before installati...

Page 8: ...aser product Examining the installation site The device must be used indoors To ensure correct operation and long lifespan of your device the installation site must meet the requirements in this secti...

Page 9: ...n electrostatic adsorption which causes poor contact of metal components and contact points In the worst case electrostatic adsorption can cause communication failure Table 1 3 Dust concentration limi...

Page 10: ...Calculate the system power consumption The system power consumption varies by card type and density For more information about system power consumption calculation see H3C S12500R Switch Router Serie...

Page 11: ...equirements Reserve a minimum of 1 2 m 3 94 ft of clearance between the rack and walls or other devices Make sure the rack has enough space to accommodate the device For information about device dimen...

Page 12: ...on accessories Product code Description Quantity Applicable device models 2150A08S S12516R mounting brackets 1 pair S12516R 2150A0AX S12508R mounting brackets 1 pair S12508R 2150A0BW S12504R mounting...

Page 13: ...00R models 2114A09Q S12500R power module filler panel S12516R 16 S12508R 8 S12504R 4 All S12500R models 2150A0AB S12500R cable management bracket S12516R 32 S12508R 16 S12504R 8 All S12500R models 260...

Page 14: ...1 8 Product code Description Quantity Applicable device models 28050001 ESD wrist strap 1 All S12500R models 04042967 Console cable 1 All S12500R models...

Page 15: ...tion preparations 2 1 Installing the device in a rack 2 2 Device dimensions and rack requirements 2 2 Attaching slide rails to the rack 2 4 Installing cage nuts for attaching mounting brackets 2 11 Mo...

Page 16: ...e The rack is sturdy and reliably grounded No obstruction inside or outside the rack interfere with installation of the chassis The heaviest device is placed at the bottom of the rack The rack can pro...

Page 17: ...2 2 Installing the device in a rack Device dimensions and rack requirements Figure 2 1 S12516R dimensions 1 Fan tray handle 2 Mounting bracket 3 Cable management bracket...

Page 18: ...with the LSXM104XFAN fan trays 1 Fan tray handle 2 Mounting bracket 3 Cable management bracket Figure 2 4 S12504R dimensions with the LSXM104XFANH fan trays 1 Fan tray handle 2 Mounting bracket 3 Cab...

Page 19: ...ear to the cable management bracket front end 875 mm 34 45 in from the rear side of the mounting bracket front ear to the fan tray handle at the rear of the chassis S12504R Height 264 mm 10 39 in 6 RU...

Page 20: ...9 69 to 31 50 in 2 RU S12504R 120 kg 264 55 lb LSVM1BSR10 630 to 850 mm 24 80 to 33 46 in N A IMPORTANT M4 or M6 screws are required for attaching the slide rails to the rack As a best practice use a...

Page 21: ...he standard hole within the same RU A total of eight cage nuts are required with two cage nuts for each rack post 4 Align the installation holes on the front end of the slide rail with the cage nuts o...

Page 22: ...lide rails Attaching the LSTM2KSGD0 slide rails for the S12508R 1 Read the signs on the slide rails to identify the right and left slide rails and their front and rear ends Figure 2 8 Right slide rail...

Page 23: ...s within 2 RU at the same height on the rack posts as shown by callout 2 in Figure 2 9 Each rack post requires six cage nuts a Insert the lower ear of a cage nut into the corresponding installation ho...

Page 24: ...Attaching the LSVM1BSR10 slide rails for the S12504R 1 Read the signs on the slide rails to identify the right and left slide rails and their front and rear ends Figure 2 10 Right slide rail 1 Sign 2...

Page 25: ...1 Each rack post requires four cage nuts a Insert the lower ear of a cage nut into the corresponding installation hole b Compress the upper and lower ears of the cage nut to lead the upper ear through...

Page 26: ...k the cage nut installation holes for the S12516R S12508R and S12504R respectively 2 Install cage nuts into the marked square holes in the front rack posts For the S12516R and S12508R cage nuts are no...

Page 27: ...arking cage nut installation holes for attaching mounting brackets for the S12508R Figure 2 14 Marking cage nut installation holes for attaching mounting brackets for the S12504R 1RU 2RU 4RU 2RU 1RU 2...

Page 28: ...t the chassis until the device bottom is a little higher than the slide rails on the rack 3 Pace the device on the slide rails and slide the device into the rack along the slide rails until the mounti...

Page 29: ...ndle 2 Slide the chassis into the rack 3 Use M6 screws to secure the mounting brackets to the rack Figure 2 16 Mounting the S12508R in the rack 1 Chassis handle 2 Slide the chassis into the rack 3 Use...

Page 30: ...Grounding the device CAUTION Reliably grounding the device is crucial to lightning protection and EMI protection Ground the device reliably before you use it Use the grounding cable yellow green grou...

Page 31: ...nding holes at the rear of the chassis A grounding sign is provided with the grounding holes as shown by callout 2 in Figure 2 18 3 Use grounding screws to attach the two hole grounding lug of the gro...

Page 32: ...Installing a filler panel in a fabric module slot 3 10 Removing a filler panel from a fabric module slot 3 11 Installing fan trays 3 12 Installing fan trays for the S12516R and S12508R 3 13 Installin...

Page 33: ...is and the component packages for future use Attaching an ESD wrist strap The device is provided with an ESD wrist strap To minimize ESD damage to electronic components wear the ESD wrist strap and ma...

Page 34: ...l from being drawn into the chassis when fan speed is high use both hands to grasp the filler panel by its two sides during filler panel installation and removal on an operating device IMPORTANT Capti...

Page 35: ...the slot to avoid touching other components in the chassis 3 As shown by callout 3 in Figure 3 2 pull the ejector levers of the MPU outward when most part of the MPU is inserted in the slot 4 Push th...

Page 36: ...by callout 3 in Figure 3 3 orient the MPU lettering on it upright Holding the MPU by the front panel with one hand and supporting the bottom with the other push the MPU steadily into the slot along th...

Page 37: ...alled on unused service module slots To prevent a filler panel from being drawn into the chassis when fan speed is high use both hands to grasp the filler panel by its two sides during filler panel in...

Page 38: ...characters on the service module Holding the service module by the front panel with one hand and supporting the bottom with the other push the service module steadily into the slot along the guide rai...

Page 39: ...asten the captive screws on the service module Installing cable management brackets The cable management brackets are installed on the two sides of the service module slots As a best practice install...

Page 40: ...device first remove the fan tray that covers the slot of the fabric module Install the fan tray immediately after the replacement or installation After the fan tray starts operating you can replace o...

Page 41: ...le with the side marked Up up Hold the fabric module front panel near the ejector levers with one hand and support the module bottom with the other Place the module bottom on the guide rails at the ch...

Page 42: ...rient the filler panel with the side marked Up up Hold the filler panel front panel near the ejector levers with one hand and support its bottom with the other Place the filler panel bottom gently on...

Page 43: ...ller panel from a fabric module slot 1 As shown by callout 1 in Figure 3 9 loosen the captive screws on the ejector levers 2 As shown by callout 2 in Figure 3 9 rotate outward the ejector levers Then...

Page 44: ...the fan tray CAUTION To avoid fan tray damage use both hands when installing or removing a fan tray To prevent dust from entering the chassis make sure each fan tray slot has a filler panel or fan tra...

Page 45: ...n 1 1 redundancy for the device As a best practice install a fan tray in each slot for redundancy and to reduce noises Installing fan trays for the S12516R and S12508R IMPORTANT The fan tray is high a...

Page 46: ...all a fan tray in the FAN2 slot orient the fan tray so that the LEDs are on the right side of the front panel 2 As shown by callout 1 in Figure 3 11 align the positioning pin on the fan tray with the...

Page 47: ...hole and pull out the filler panel along the guide rails 2 Correctly orient the power module If you install the power module in a left power module slot make sure the latch is above the handle as sho...

Page 48: ...a separate circuit breaker Turn off the circuit breaker before you connect the power cord Connecting an AC power cord 1 Connect the AC power cord connector to the AC input receptacle of the power modu...

Page 49: ...cting a DC power cord 1 Connect the DC power cord connector to the DC input receptacle of the power module 2 Fasten the screw on the connector to secure the connector to the receptacle 3 Connect the o...

Page 50: ...m the SFP SFP QSFP QSFP28 module if you are not to connect an optical fiber to the module Before you install an SFP SFP QSFP QSFP28 module remove the optical fiber if any from it To install an SFP SFP...

Page 51: ...es are hot swappable Choose cables based on ports and transmission distance SFP copper cable Short distance transmission between SFP ports QSFP copper cable Short distance transmission between QSFP po...

Page 52: ...parameters 4 2 Powering on the device 4 2 Configuring the device 4 3 Configuring authentication on a user interface 4 3 Configuring the basic access function 4 3 Configuration example 4 3 Verifying t...

Page 53: ...ce supports a maximum of 32 concurrent VTY users Accessing the device for the first time The first time you access the device you must use a console cable to connect a console terminal for example a P...

Page 54: ...s and grounding cables have been correctly connected The input power voltage meets the requirement of the device The console cable is correctly connected the terminal or PC used for configuration has...

Page 55: ...flat user management Environments that do not need granular privilege management Username and password Complex to configure secure and hierarchical user management Environments where multiple user ro...

Page 56: ...ress 172 16 1 0 and the next hop IP address 192 168 0 2 Sysname ip route static 172 16 1 0 255 255 255 0 192 168 0 2 Configure VLANs Create VLAN 10 and enter its view Sysname vlan 10 Sysname vlan10 As...

Page 57: ...fiber connectors when connecting optical fibers Before you connect the device to the network verify that all its basic network settings are correct Connecting the device to the network through an opt...

Page 58: ...es Hardware Reference NOTE For the QSFP QSFP28 CXP module you do not need to differentiate between the transmitter TX and receiver RX ports For other types of transceiver modules the TX port on one en...

Page 59: ...No display on the configuration terminal 5 1 Garbled display on the configuration terminal 5 2 System failures during operation 5 2 Power module failure 5 2 Fan tray failure 5 3 MPU failure 5 4 Servi...

Page 60: ...Reference The MPUs and service modules provide port status LEDs with which you can detect port failures For more information about port status LEDs see H3C S12500R Switch Router Series Hardware Refere...

Page 61: ...1 Execute related commands to locate the fault 2 If a configuration error is found re configure the device or restore the factory default settings For more information see H3C S12500R Switch Router S...

Page 62: ...power module of the same model in the same slot and connect it to the same power source If the new power module can operate correctly the old power module has failed Contact your sales agent or local...

Page 63: ...number is marked on the ejector lever pillow blocks at the left and right sides of the slot You can see the fabric module slot numbers through the openings in the fan trays as shown by callout 3 and...

Page 64: ...ded lines of the RUN and ALM LED pairs correspond to the fabric module slots from left to right Figure 5 1 Corresponding relations between the LEDs on the S12504R fan trays and fabric module slots 1 L...

Page 65: ...For more information see MPU failure or Service module failure 2 Verify that the cable is connected correctly For how to correctly connect a cable see Connecting your device to the network 3 Verify t...

Page 66: ...me of the device Serial number of the chassis on the label at the right of the rear panel Software version which you can view by using the display version command Maintenance agreement or warranty car...

Page 67: ...1 Replacing a module 6 3 Replacing an MPU or service module 6 3 Replacing a fabric module 6 5 Replacing a fan tray 6 6 Replacing a transceiver module 6 7 Replacing an SFP SFP QSFP QSFP28 transceiver m...

Page 68: ...ol before touching them CAUTION Provide a circuit breaker for each power module Before replacing a power module turn off its circuit breaker To install the removed power module in the chassis again in...

Page 69: ...he connector out of the power module 5 Press the latch on the power module to the handle direction and pull the power module part way out of the slot 6 Holding the power module handle with one hand an...

Page 70: ...makes good skin contact and is reliably grounded For more information see Installing FRUs 3 Use a Phillips screwdriver to loosen the captive screws on the MPU or service module as shown by callout 1 i...

Page 71: ...6 4 Figure 6 5 Removing a service module 1 Loosen the captive screw 2 Rotate the ejector levers outward 3 Pull the service module slowly out of the slot along the guide rails...

Page 72: ...rmuff or earplug In addition make good preparation before hot swapping a fabric module to minimize the operation time To replace a fabric module 1 Prepare an antistatic mat to place the removed fabric...

Page 73: ...ing an earmuff or earplug In addition make good preparations before the hot swapping to minimize the operation time Ensure electricity safety when you hot swap a fan tray CAUTION To prevent dust from...

Page 74: ...ore information see Installing FRUs Figure 6 8 Removing a fan tray S12516R 1 Loosen the captive screws on the fan tray 2 Pull the fan tray slowly out of the chassis Replacing a transceiver module WARN...

Page 75: ...ering the port Replacing an SFP QSFP QSFP28 QSFP to SFP copper cable CAUTION The bend radius of the cable must be a minimum of eight times the cable diameter If the cable cannot be removed or installe...

Page 76: ...ixing labels 7 3 Affixing a label to a network cable 7 3 Affixing a label to a power cord 7 4 Affixing a generic label 7 5 Affixing a label to a device 7 6 Guidelines 7 6 Examples 7 6 Engineering labe...

Page 77: ...abel to identify the peer end of the cable on which the label is affixed As shown in Figure 7 1 write a network cable label as follows Write the position of the cable in Area 1 Write the position of t...

Page 78: ...eric label is bar shaped with fixed dimensions It is applicable to all cables A mark TO is located at the upper left corner in the right area of the label to identify the peer end of the cable on whic...

Page 79: ...about using a label printer see the user guide of the printer To write labels use black markers A marker has two nibs Be sure to use the smaller nib to write labels Affixing labels After printing or w...

Page 80: ...the recessed rectangular area on the identification plate You can stick the label to either side of the identification plate Be sure to affix the labels on the same side of the identification plates A...

Page 81: ...on the right side of the cable in vertical cabling Make sure the label is facing out as shown in Figure 7 7 Figure 7 7 Affixed labels Affixing a generic label The requirements for affixing a generic l...

Page 82: ...s or other positions that might affect cable installation when you stick a label or bundle a cable tie with a power cord identification plate Bundle cable ties at the same positions of power cords wit...

Page 83: ...r of the terminal or the NMS The information provided on the following labels is different subject to different devices that the twisted pair cables are connecting For example On a label for the twist...

Page 84: ...n top down and left right order with two digits for example 05 R Optical receiving interface T Optical transmitting interface N A MN B C D R T MN Rack number The meanings are the same as above If the...

Page 85: ...ipment room G01 01 01 01 T The peer end of the optical fiber is connected to Optical Transmitting Interface 01 on Slot 01 Chassis 01 in the rack on Row G Column 01 in the equipment room Figure 7 11 Ex...

Page 86: ...ly which is from the 8th connector on the second row of 48V bus bar in the cabinet on Row A and Column 1 in the equipment room B03 48V2 distribution box side The power cord is 48V2 DC supply which is...

Page 87: ...formation about the local end is not necessary Make sure labels are affixed in the correct direction After the cable ties are bundled onto the cable the identification plates with the labels must face...

Page 88: ...7 12 Figure 7 14 Example of a device label...

Page 89: ...i Contents 8 Appendix B Cabling recommendations 8 1 Routing cables 8 1 Routing power cords 8 2 General cabling requirements 8 2 Prerequisites 8 2 Cable management guidelines 8 2...

Page 90: ...Routing cables The cable management brackets are installed on the two sides of the service module section As a best practice route cables from the left and right sides of the device as shown in Figur...

Page 91: ...equently bent plugged and unplugged the curvature radius should be a minimum of 10 times the cable s outer diameter The curvature radius of a high speed cable for example SFP copper cable should be a...

Page 92: ...s or tips When you route cables through sharp sheet metal penetration points or along sharp edges of mechanical parts use bushings or take any other action to protect the cables from being cut or abra...

Page 93: ...the part Cables must be protected at points where they might rub or come in contact with sharp edges or heated areas Use high temperature cables near heat sources Securely fasten cables and take adequ...

Page 94: ...bundle diameter mm Space between bundles mm 10 80 to 150 10 to 30 150 to 200 30 200 to 300 Do not tie cables or bundles in a knot The metal parts of the crimped cold pressed terminal blocks such as ai...

Page 95: ...console cable 9 1 Removing the grounding cable 9 1 Removing the twisted pair cables and optical fibers 9 2 Repacking the FRUs 9 2 Repacking power modules 9 2 Repacking the modules 9 3 Repacking the f...

Page 96: ...ord loosen the screws on the power cord connector and then remove the connector from the power module 4 Perform the same step to remove the other power cords Removing the console cable 1 Pull the RJ 4...

Page 97: ...ed pair cables and optical fibers from the interfaces of the device NOTE After pulling out an optical fiber from an optical transceiver module cover the connector of the optical fiber with a dust cap...

Page 98: ...ller panel in the slot after you remove the chassis from the rack For information about how to remove a module and install a filler panel see Replacement procedures 4 Put the removed module into the a...

Page 99: ...minimum of four people to slide the chassis outwards along the slide rails When most part of the chassis is removed from the slide rails lift up the chassis by holding the handles at the chassis side...

Page 100: ...t base as shown by callout 3 in Figure 9 4 4 Cover the chassis with the packing bag from the top down and then tape the bag to the plastic cover of pallet base 5 Erect one paper angle bead along each...

Page 101: ...Figure 9 4 Attaching the L type bracket to the pallet base S12516R 1 L type bracket 2 Secure the L type bracket to the chassis 3 Use screws to attach the L type brackets to the wooden pallet base 2 2...

Page 102: ...9 7 Figure 9 5 Locating the foam cushion and the accessory box 1 Chassis front panel side 2 Seat the mounting brackets into the internal notches of the foam cushion 3 Accessory box...

Reviews: