32
TITAN 400 DC
EN
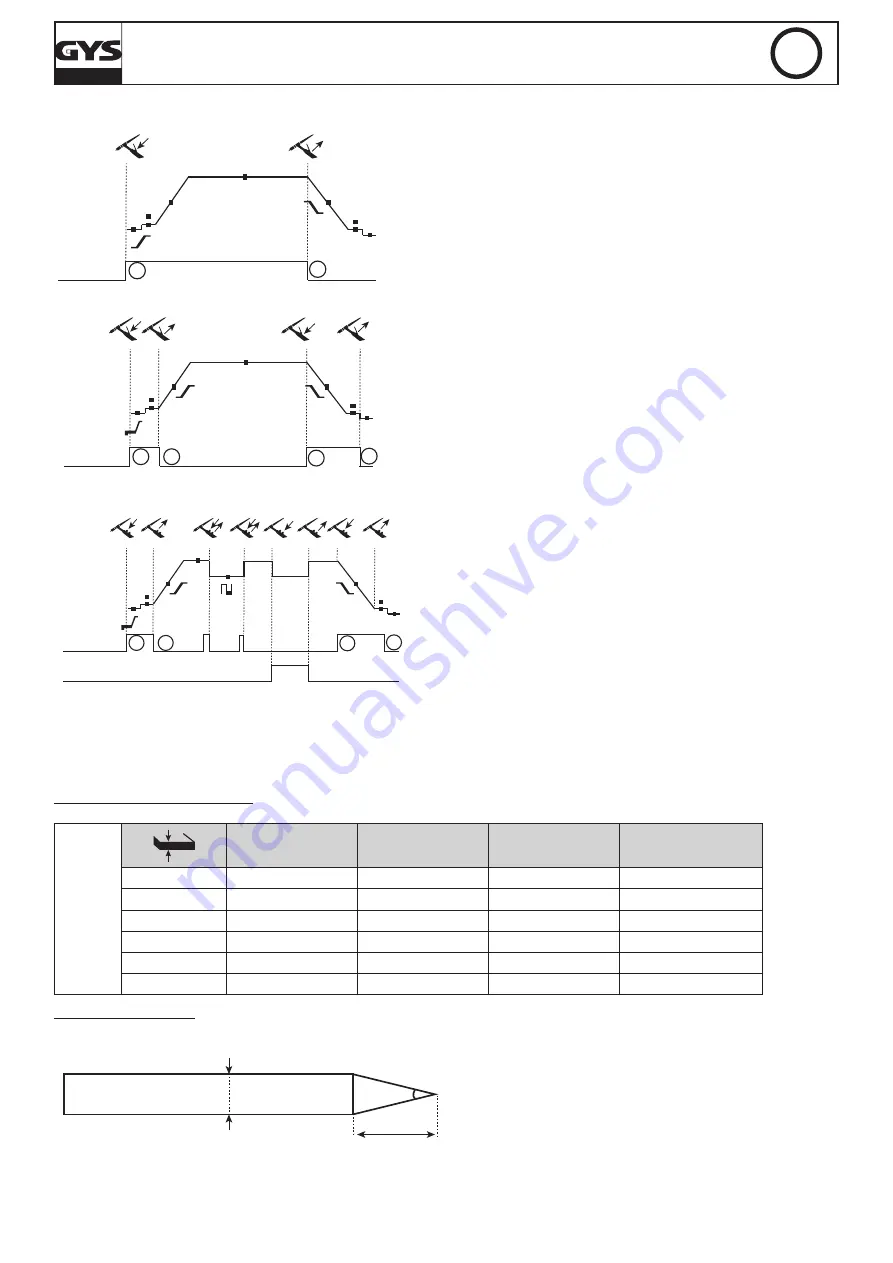
2T MODE
t
t
t
t
t
t
T2
T1
Main button
T3
T1
Main button
T2
T4
T3
T1
Main button
T2
T4
Secondary button
or
>0.5s
<0.5s
<0.5s
T1 -
The main button is pressed, the welding cycle starts (PreGas,
I_Start, UpSlope and welding).
T2 -
The main button is released, the welding cycle is stopped (DownS
-
lope, I_Stop, PostGas).
For the double button torch and in 2T mode only, the secondary button
works like the main button.
4T MODE
t
t
t
t
t
t
T2
T1
Main button
T3
T1
Main button
T2
T4
T3
T1
Main button
T2
T4
Secondary button
or
>0.5s
<0.5s
<0.5s
T1 -
The main button is pressed, the cycle starts at PreGas and stops
in the I_Start phase.
T2 -
The main button is released, the cycle continues in UpSlope and
in welding.
T3 -
The main button is pressed, the cycle switches to DownSlope and
stops in I_Stop.
T4 -
The main button is released, the cycle ends with PostGas.
Nb : for torches, double button and double button with potentiometer
=> command « up/welding current » and active potentiometer, com
-
mand «low » inactive.
4T MODE log
t
t
t
t
t
t
T2
T1
Main button
T3
T1
Main button
T2
T4
T3
T1
Main button
T2
T4
Secondary button
or
>0.5s
<0.5s
<0.5s
T1 -
The main button is pressed, the cycle starts at PreGas and stops
in the I_Start phase.
T2 -
The main button is released, the cycle continues in UpSlope and
in welding.
LOG : this mode is used during welding :
- A brief press of the main button (<0.5s), the current switches from I
welding current to I cold and vice versa.
- the secondary button is kept pressed, the welding current switches
from I welding current to I cold
- the secondary button is kept released, the welding current switched
from I cold to I welding current.
T3 -
A long press on the main button (>0.5s), the cycle switches to
DownSlope and stops in the I_Stop phase.
T4 -
The main button is released, the cycle finishes with PostGas.
For this mode it may be convenient to use the dual button torch option or dual button with potentiometer. The «up» command keeps the same func
-
tion as the single button or trigger torch. The «down» button can, when pressed, switch to the cold current. The potentiometer of the torch, where
available, can control of the welding current from 50% to 100% of the value displayed.
RECOMMENDED COMBINATIONS
TIG DC
Current (A)
Electrode (mm)
Shroud (mm)
Argon flow rate (L/min)
0.3 - 3 mm
3 - 75
1
6.5
6 - 7
2.4 - 6 mm
60 - 150
1.6
8
6 - 7
4 - 8 mm
100 - 200
2
9.5
7 - 8
6.8 - 10 mm
170 - 250
2.4
11
8 - 9
9 - 12 mm
225 - 330
3.2
12.5
9 - 10
-
275 - 450
4
15
10 - 13
ELECTRODE GRINDING
To optimise the welding process, it is recommended to grind the electrode prior to welding as described below:
d
L
a
a = Ø 0.5 mm
L = 3 x d for a low current.
L = 3 x d for a high current


