GVA GVAD212 Instruction Manual Download Page 8

  Menu setup 

Under photographing mode, press the menu button to open the main menu for video recording, press 
the W/T button to select a menu option and then press the shutter button to enter the sub-menu. In the 
sub-menu,  press  the  shutter  button  to  confirm  and  to  return  to  the  main  menu  (or  directly  press  the 
power button to return to the main menu), and press the W/T button to conduct selection. After returning 
to the main menu, you can press the power button to exit the menu. 
In menu selection, the selected menu option will be highlighted. 
 
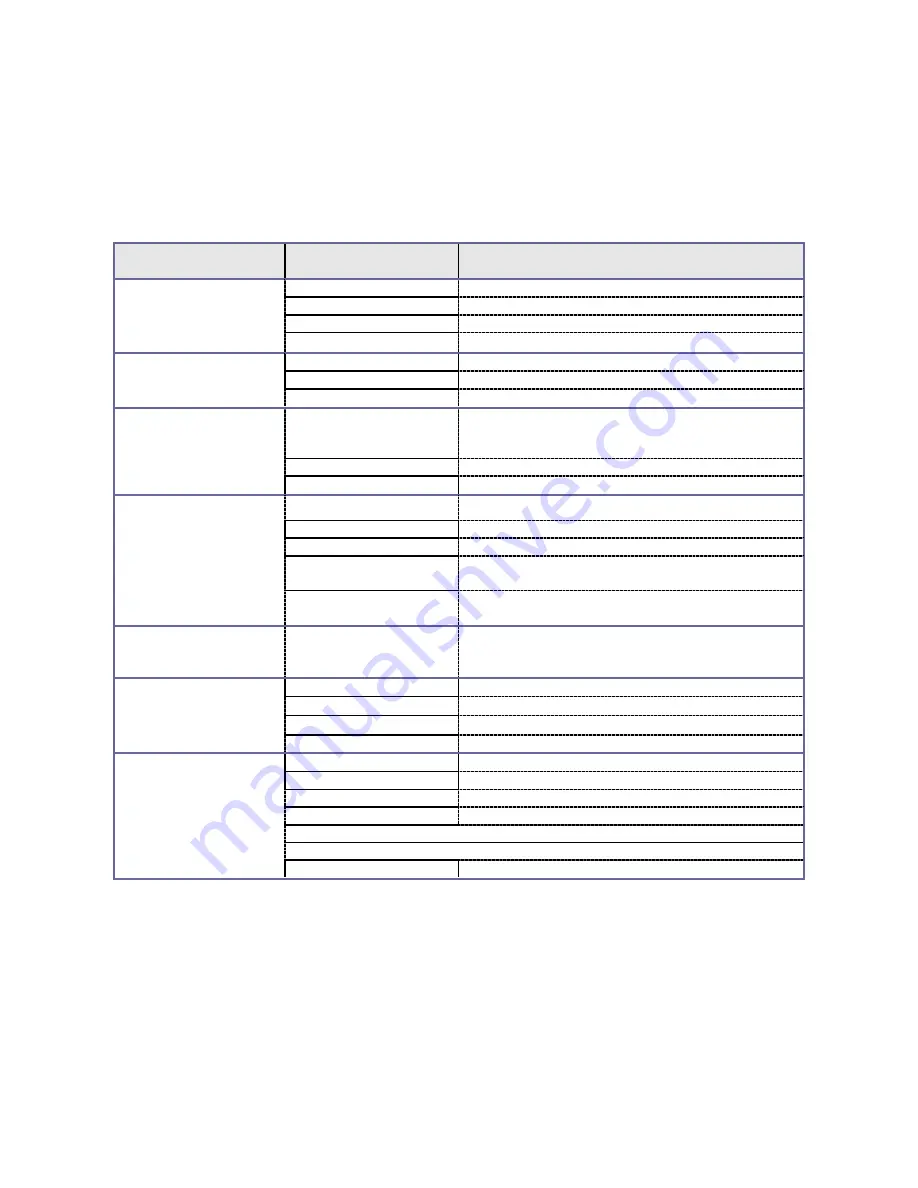
Options in photographing menu: 

Main menu 

Sub-menu 

Description 

Image resolution 

2592x1944 

5 million-pixel resolution 

2048x1536 

3 million-pixel resolution 

1280x960 

1.3 million-pixel resolution 

640x480 

0.3 million-pixel resolution 

Image quality 

Super Fine 

The best image quality 

Fine 

Better image quality 

Normal 

General image quality 

Metering mode 

Center-weighted 

metering 


Multi-spot metering 


Spot metering 


White balance 

Automatic 

Automatic white balance is suitable for most cases 

Daylight 

Suitable for daylight environment 

Cloudy 

Suitable for cloudy environment 

Fluorescent lamp 

Suitable  for  fluorescent  lamp  light  source 
environment 

Tungsten lamp 

Suitable 

for 

tungsten 

lamp 

light 

source 

environment 

Exposure 

Using  the  mode  key  to  adjust  the  exposure 
compensation 

Driver mode 

Off 

Using general single-frame shooting mode 

2s 

Using 2-second-delay self-timer mode 

10s 

Using 10-second-delay self-timer mode 

Burst 

Continuous shooting 

Special effects 

Normal 

Normal effect 

Black and white 

Black and white effect 

Sepia 

Old style photo effect 

Negative 

Negative effect 

Red 

Reddish effect 

Green 

Greenish effect 

Blue 

Bluish effect 

 
Attention: When you enter the exposure sub-menu to adjust the exposure compensation, and use the 
mode  button  to  adjust  the  exposure  compensation  value,  the  brightness  of  picture  on  the  screen  will 
change accordingly. After the setting is completed, press the shutter key to confirm and to return to the 
main menu, or press the power button to cancel the setting. 


Summary of Contents for GVAD212

Page 1: ...Instruction Manual Digital Camera GVAD212...

Page 2: ...has been used previously with other devices cameras ore is brand new the card may require to be formatted Please ensure you have all valuable records before formatting 1 Micro SD Micro SDHC memory car...

Page 3: ...0 x 480 30fps QVGA 320 x 240 30fps 4 digital zoom Accessories When unpacking the video camera you will see the following main accessories USB cable Installation CD User manual Getting to know your dig...

Page 4: ...t press to close menu Shutter button Take a photo Start pause video recording Start stop playing Switch over to setup menu confirm menu T button Digital zoom in Select file rightwards Switch over to t...

Page 5: ...the video recording mode and the playback mode in the playback mode you can press the mode button to switch over back to the photographing mode Video recording In the video recording mode you can pres...

Page 6: ...mode as MSDC mobile disk or PC CAM pickup head mode and then connect the USB port to the video camera the video camera will accordingly enter the mobile disk or pickup head mode Advanced Operations Ph...

Page 7: ...currently set exposure compensation value 5 Photo size Indicates the current photo resolution 6 9999 Number of photographabl e photos Indicates the number of remaining photographable photos 7 Card In...

Page 8: ...g Multi spot metering Spot metering White balance Automatic Automatic white balance is suitable for most cases Daylight Suitable for daylight environment Cloudy Suitable for cloudy environment Fluores...

Page 9: ...tion 5 00 00 1 Recording time Indicates the remaining recordable time in free state and the used recording time in recording state 6 Card Indicates that a memory card has been inserted and Indicates t...

Page 10: ...button to exit the menu In menu selection the selected menu option will be highlighted Options in video recording menu Main menu Sub menu Description Movie size 640X480 High resolution format 320X240...

Page 11: ...mat Language English Setting the menu language to English French Setting the menu language to French Spanish Setting the menu language to Spanish German Setting the menu language to German Italian Set...

Page 12: ...a menu option and then press the shutter button to enter the sub menu In the sub menu press the shutter button to confirm and to return to the main menu or directly press the power button to return to...

Page 13: ...nu option SPCA1528 PC Driver in the Start All programs menu where there will be a shortcut icon After the video camera is connected to a computer and enters the pickup head mode you can open the AMCAP...

Page 14: ...driver Click the Install Driver in the installation guide window and complete the installation step by step according to the instruction Please re start the computer after the driver is installed Aft...

Page 15: ...nstalled correctly No photographing and video recording can be conducted after the shutter button is pressed No memory card is inserted photographing or video recording can be conducted only after a m...

Page 16: ...hat we have supplied to the Seller for that purpose and c provide a copy of a proof of purchase to the Seller to whom you are returning the products The best proof of purchase is a tax invoice or rece...

Page 17: ...t have been paid to you on account of your claim of breach of the Warranty and by returning making the claim for breach of Warranty you agree to this proviso Subject to your rights under the Australia...

Reviews: