GVA GVAD212 Instruction Manual Download Page 11

11 


Setup menu 

Whether in video recording mode or in photographing or playback mode, press the menu to open the 
main menu, and then press the shutter button to enter the main menu of setup menu. Afterwards, press 
the W/T button to select a menu option and then press the shutter button to enter the sub-menu. In the 
sub-menu,  press  the  W  button  or  T  button  to  select  an  option,  and  then  press  the  shutter  button  to 
confirm (press the power button to directly return to the main menu for setup). After returning to the main 
menu, you can press the menu button to exit the menu. 
In menu selection, the selected menu option will be highlighted. 
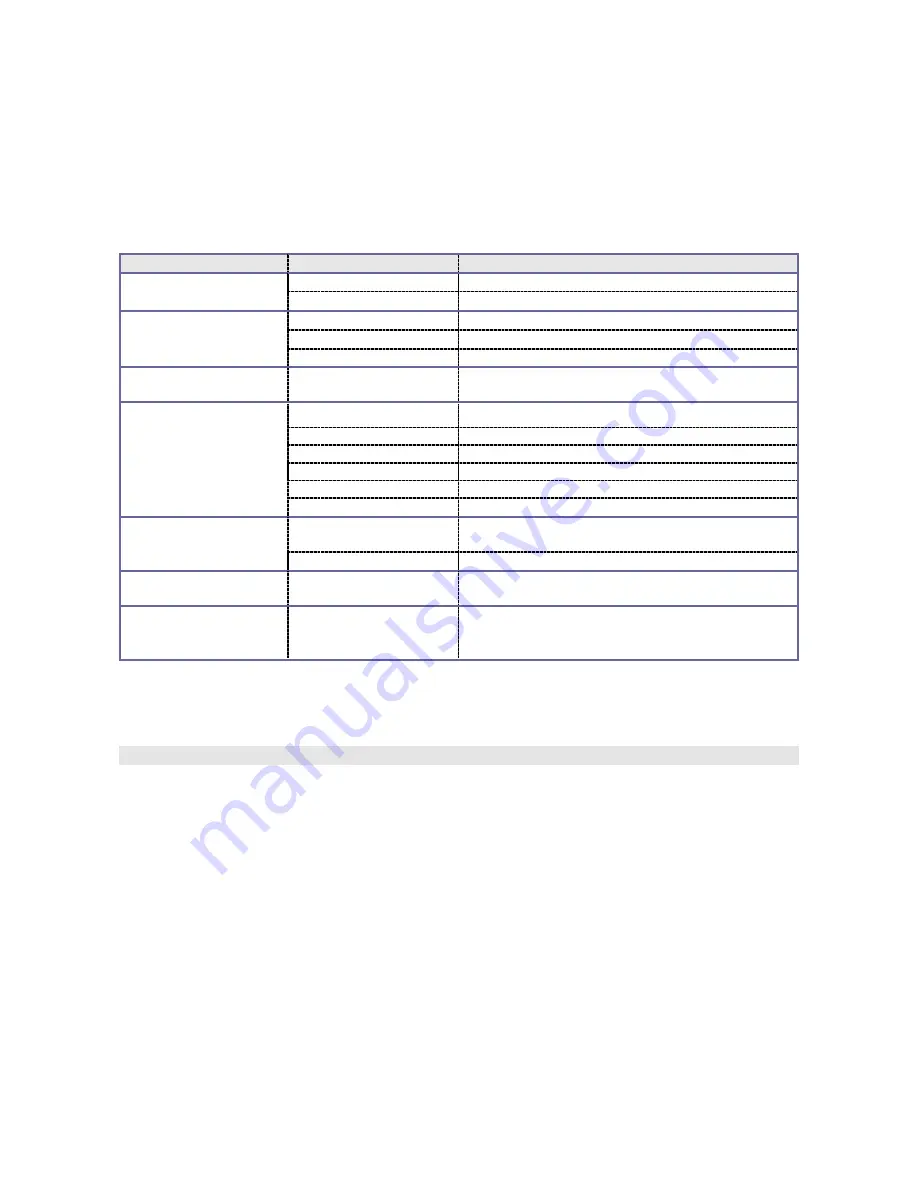
 

Main menu   

Sub-menu   

Description 

Power frequency 

50 Hz 

Setting the power frequency to 50 Hz 

60 Hz 

Setting the power frequency to 60 Hz 

Power Save Mode 

1 min 

Automatic shutdown after 1 minute in free state 

3 min 

Automatic shutdown after 3 minutes in free state 

5 min 

Automatic shutdown after 5 minutes in free state 

Date & time 

Setting date & time and date format 

Language 

English 

Setting the menu language to English 

French 

Setting the menu language to French 

Spanish 

Setting the menu language to Spanish 

German 

Setting the menu language to German 

Italian 

Setting the menu language to Italian 

Portuguese 

Setting the menu language to Portuguese 

USB mode 

Mobile hard disk 

(MSDC) 

Used as a mobile hard disk 

Pickup head (PCCAM) 

Used as a pickup head 

Format 

Y/N 

Formatting the memory card 

Reset to factory default 

Y/N 

Resetting to factory default 

For date & time setting, use the mode button to switch over the option to be set, and press the W button 
or  the  T  button  to  adjust  the  value.  Press  the  shutter  button  to  confirm,  or  press  the  power  button  to 
cancel the setting and to return to the main menu. 


Playback mode 


In the video recording mode, press the mode button to enter the playback mode. 
In the playback mode, press the T button to select a file forwards or press the W button to select a file 
backwards. 
After  the  video  recording  mode  is  selected,  press  the  shutter  button  to  start  playing;  at  this  moment, 
there is a playing timer displayed on the upper right corner of the screen. During playing, you can press 
the shutter button to stop the playing. 

Summary of Contents for GVAD212

Page 1: ...Instruction Manual Digital Camera GVAD212...

Page 2: ...has been used previously with other devices cameras ore is brand new the card may require to be formatted Please ensure you have all valuable records before formatting 1 Micro SD Micro SDHC memory car...

Page 3: ...0 x 480 30fps QVGA 320 x 240 30fps 4 digital zoom Accessories When unpacking the video camera you will see the following main accessories USB cable Installation CD User manual Getting to know your dig...

Page 4: ...t press to close menu Shutter button Take a photo Start pause video recording Start stop playing Switch over to setup menu confirm menu T button Digital zoom in Select file rightwards Switch over to t...

Page 5: ...the video recording mode and the playback mode in the playback mode you can press the mode button to switch over back to the photographing mode Video recording In the video recording mode you can pres...

Page 6: ...mode as MSDC mobile disk or PC CAM pickup head mode and then connect the USB port to the video camera the video camera will accordingly enter the mobile disk or pickup head mode Advanced Operations Ph...

Page 7: ...currently set exposure compensation value 5 Photo size Indicates the current photo resolution 6 9999 Number of photographabl e photos Indicates the number of remaining photographable photos 7 Card In...

Page 8: ...g Multi spot metering Spot metering White balance Automatic Automatic white balance is suitable for most cases Daylight Suitable for daylight environment Cloudy Suitable for cloudy environment Fluores...

Page 9: ...tion 5 00 00 1 Recording time Indicates the remaining recordable time in free state and the used recording time in recording state 6 Card Indicates that a memory card has been inserted and Indicates t...

Page 10: ...button to exit the menu In menu selection the selected menu option will be highlighted Options in video recording menu Main menu Sub menu Description Movie size 640X480 High resolution format 320X240...

Page 11: ...mat Language English Setting the menu language to English French Setting the menu language to French Spanish Setting the menu language to Spanish German Setting the menu language to German Italian Set...

Page 12: ...a menu option and then press the shutter button to enter the sub menu In the sub menu press the shutter button to confirm and to return to the main menu or directly press the power button to return to...

Page 13: ...nu option SPCA1528 PC Driver in the Start All programs menu where there will be a shortcut icon After the video camera is connected to a computer and enters the pickup head mode you can open the AMCAP...

Page 14: ...driver Click the Install Driver in the installation guide window and complete the installation step by step according to the instruction Please re start the computer after the driver is installed Aft...

Page 15: ...nstalled correctly No photographing and video recording can be conducted after the shutter button is pressed No memory card is inserted photographing or video recording can be conducted only after a m...

Page 16: ...hat we have supplied to the Seller for that purpose and c provide a copy of a proof of purchase to the Seller to whom you are returning the products The best proof of purchase is a tax invoice or rece...

Page 17: ...t have been paid to you on account of your claim of breach of the Warranty and by returning making the claim for breach of Warranty you agree to this proviso Subject to your rights under the Australia...

Reviews: