background image

91834765

0317

ECM: 1203452

www.grundfos.com

The name Grundfos, the Grundfos logo, and be think innovate are registered trademarks owned by Grundfos Holding A/S or Grundfos A/S, Denmark. All rights reserved worldwide.

© Copyright Grundfos Holding A/S

Summary of Contents for DMX 221

Page 1: ...DMX 221 Dosing pump Installation and operating instructions GRUNDFOS INSTRUCTIONS ...

Page 2: ...nection with mains plug 14 2 3 3 Making electrical connection without mains plug 14 3 Starting up the product 14 3 1 Preparing the pump for startup 15 3 2 Safety instructions and requirements for startup 15 3 3 Starting up the pump 16 3 4 Stopping and starting dosing 17 3 5 Deaerating the pump during operation 17 3 6 Adjusting the zero point 18 3 7 Adjusting the dosing flow via the stroke length 1...

Page 3: ...0 9 5 1 Dimensional sketch 50 9 5 2 Weights 52 9 6 Dosing curves 53 10 Disposing of the product 53 10 1 Disposing of hazardous or toxic materials 54 10 2 Disposing of the product 54 11 Pump options and variants 54 11 1 Diaphragm leakage sensor 55 11 1 1 Function of the electronic unit for optical sensor 56 11 1 2 Mounting the electronic unit for optical sensor 56 11 1 3 Electrical connection 56 11...

Page 4: ... in addition to the instructions in this manual AR control unit http net grundfos com qr i 91834764 Servomotor http net grundfos com qr i 95721057 VFD supplier manual https www nord com Related information 11 1 Diaphragm leakage sensor 11 2 Pumps with VFD 1 1 Qualification and training The persons responsible for installation startup and service must be appropriately qualified for these tasks If t...

Page 5: ...ON is struc tured in the following way SIGNAL WORD Description of the hazard Consequence of ignoring the warning Action to avoid the hazard A blue or grey circle with a white graphical symbol indicates that an action must be taken If these instructions are not observed it may result in malfunction or damage to the equipment 1 3 Symbols on the product Information provided directly on the pump must ...

Page 6: ...um Collect and dispose of all chemicals in a way that is not harmful to persons or the environment Make sure the pump is suitable for the dosing medium Observe sections Installation tips and Operating conditions If you have questions contact your Grundfos service partner Design your dosing system with monitoring and control functions to safeguard the entire sys tem Make sure the pressure at the ou...

Page 7: ...e 7 Pressure loading valve 8 Pulsation damper outlet side 9 Measuring glass 10 Injection unit 11 Isolating valve p1 Pressure at the inlet valve p2 Pressure at the outlet valve 2 1 2 1 Installation with ball valve and non return valve For easy deaeration of the dosing head we recommend that you install a ball valve 12 with a bypass line immediately after the outlet valve In order to prevent backflo...

Page 8: ...n with pressure relief valve To protect the dosing pump and outlet line from excessive pressure we recommend that you in stall a pressure relief valve 6 in the outlet line 6 2 1 2 4 Installation on a tank When dosing non degassing media with a viscosity similar to that of water the pump can be mounted on a tank Observe the maximum suction lift For sedimenting media we recommend that you install an...

Page 9: ...fect The pressure at the outlet valve p2 must always be at least 1 bar higher than the pressure at the inlet valve p1 If this is not the case for example in an installation with open outflow or with floo ded suction siphon effect may occur To avoid the siphon effect install a pressure loading valve 7 in the outlet line and an isolating valve 11 directly before the inlet valve 7 p2 p1 11 DMX 221 9 ...

Page 10: ...inlet line with small diameter dosing medium with high density or viscosity large pump To protect the inlet line against pressure peaks we recommend that you install a properly sized pulsation damper 4 directly before the inlet valve of the pump 4 2 1 2 8 Installation with pulsation damper on the outlet side In a dosing system pressure peaks can occur in the outlet line in case of one of the follo...

Page 11: ... a spanner and four M6 screws available The screws are not included in the scope of deliv ery 1 Place the pump horizontally on a wall bracket or a tank 2 Fix the pump with the four screws Tighten the screws gently in order not to damage the housing DMX 221 11 ...

Page 12: ...C Integral relief valve optional connection for the overflow line WARNING Chemical hazard Death or serious personal injury For pumps with an integral relief valve connect an overflow line to C Related information 2 1 1 Installation requirements 2 2 2 1 Connecting hoses Hoses are to be connected to the valves with a connection piece DMX 221 12 ...

Page 13: ...ipple or nozzle 3 Secure the hose with the connection counterpart or a hose clip 4 Screw the union nut onto the valve and tighten it Related information 2 1 1 Installation requirements 2 2 2 2 Connecting pipes Pipes are to be connected to the valves with a connection piece DMX 221 13 ...

Page 14: ...gs against corrosion and humidity Isolate the power supply electrically from the signal inputs and outputs Observe the direction of rotation of the motor Provide the motor with a protective circuit breaker and set it to the rated motor current Three phase motors are factory set for star connection When the pump is used with a frequency converter make the connection according to the voltage of the ...

Page 15: ...elated information 3 2 Safety instructions and requirements for startup 3 3 Starting up the pump 11 1 4 Checking the diaphragm leakage sensor 3 2 Safety instructions and requirements for startup WARNING Chemical hazard Death or serious personal injury Observe the material safety data sheet of the dosing medium Wear protective clothing when working on the dosing head connections or lines Collect an...

Page 16: ... that air can escape and dosing medium can flow out Open the deaeration valve 17 if installed Open the relief valve if installed 4 Switch on the power supply 5 For pumps with AR control unit Press the start stop button and keep pressing it for continu ous operation during the deaeration process 6 Set the stroke length adjusting knob to 100 7 Let the pump run until the dosing medium is free of air ...

Page 17: ...ore relieving the pressure from the outlet side make sure escaping dosing medium cannot cause any harm to persons or equipment Collect and dispose of all chemicals in a way that is not harmful to persons or the environment 1 Relieve the counterpressure so that air can escape and dosing medium can flow out Open the deaeration valve 17 if installed Open the relief valve if installed 2 Switch on the ...

Page 18: ...eactivate the function 3 Start dosing 4 Set the dosing flow to 15 5 Turn the adjusting knob slowly towards the zero point until the dosing flow stops The medium level stops falling in the transparent hose 6 Stop dosing 7 Unscrew the locking screw below the stroke length adjusting knob 8 Without changing the position of the adjusting knob remove the plug placed in the middle of the adjusting knob 9...

Page 19: ...e installation and operating instructions of the frequency converter Related information 11 2 Pumps with VFD 3 9 Opening and reactivating the integral relief valve Make sure the pump was installed and started up correctly Make sure the pump is running during this task WARNING Chemical hazard Death or serious personal injury Wear protective clothing when working on the dosing head connections or li...

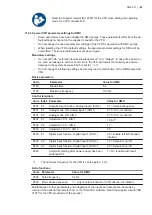
Page 20: ...the environment Fig 3 10 1 Setting the opening pressure of the relief valve using a pair of pointed pliers 1 Remove the cap from the relief valve 2 Close the isolating valve 3 When the relief valve opens read the pressure on the pressure gauge 4 Set the opening pressure of the relief valve To increase the opening pressure turn the knob clockwise using a pair of pointed pli ers until the desired pr...

Page 21: ...th the AR control unit Servomotor or VFD in addition to the instructions in this manual AR control unit http net grundfos com qr i 91834764 Servomotor http net grundfos com qr i 95721057 VFD supplier manual https www nord com Related information 11 1 Diaphragm leakage sensor 11 2 Pumps with VFD DMX 221 21 ...

Page 22: ... and the scope of delivery Make sure the product is suitably protected during transport and intermediate storage Keep the product in an upright position Do not throw or drop the product 4 2 Storing the product Close the vent plug when taking the pump out of operation for transport storage or service Store the pump in an upright position so that the grease cannot leak out Store the pump in a dry an...

Page 23: ...tion 5 1 1 DMX 221 components 1 2 3 4 5 6 7 8 9 10 9 Pos Description 1 Motor 2 Gears 3 Eccentric 4 Dosing diaphragm 5 Dosing head 6 Inlet valve 7 Outlet valve 8 Stroke length adjusting knob 9 AR control unit optional 10 Stroke sensor DMX 221 23 ...

Page 24: ...equency 5 1 3 AR control unit The AR control unit offers various operating modes control functions and monitoring functions The AR control unit has an IP65 plastic housing The AR control unit is available for pumps with single phase motors Observe the installation and operating instructions for the AR control unit Related information http net grundfos com qr i 91834764 5 1 4 Functional principle o...

Page 25: ...ified in section Technical data must not be exceeded The pump is not approved for operation in potentially explosive areas 5 2 2 Safety of the system in case of a failure in the dosing pump Design your dosing system with monitoring and control functions to safeguard the entire system WARNING Chemical hazard Death or serious personal injury Check on a monthly basis that dosing medium is not leaking...

Page 26: ...039 Made in Germany 1 5 6 12 3 7 9 11 2 4 10 Grundfos Water Treatment GmbH Reetzstr 85 D 76327 Pfinztal 8 Pos Description 1 Type designation 2 Product number 3 Model 4 Serial number 5 Flow rate l h at maximum counterpressure bar 6 Power consumption 7 Enclosure class 8 Voltage V 9 Frequency Hz 10 Marks of approval CE mark etc 11 Week and year code 12 Country of origin DMX 221 26 ...

Page 27: ...e motors No cable no plug 13 Motor variant E0 Motor with PTC sensor prepared for operation with frequency converter Example DMX 4 10 B PP E T X E1B3B3E0 Position 1 Type range Code Description DMX Motor driven diaphragm dosing pump Example DMX 4 10 B PP E T X E1B3B3E0 Position 2 Flow rate Code Description 4 7 etc Flow rate l h at maximum counterpressure Example DMX 4 10 B PP E T X E1B3B3E0 Position...

Page 28: ...id heated flange PVC R PVC dosing head with integral relief valve PV R PVDF dosing head with integral relief valve PV RL PVDF dosing head with integral relief valve and diaphragm leakage sensor PVC RL PVC dosing head with integral relief valve and diaphragm leakage sensor Example DMX 4 10 B PP E T X E1B3B3E0 Position 6 Gasket Code Description E EPDM V FKM T PTFE Example DMX 4 10 B PP E T X E1B3B3E...

Page 29: ...0 B PP E T X E1B3B3E0 Position 11 Connection inlet and outlet Code Description B1 PVC G 5 8 for 6 12 mm hose and for 12 pipe A SS G 5 8 female for threaded Rp pipe B3 PP or PVDF G 5 8 for 16 pipe B2 PVC G 5 4 for 13 20 mm hose and 25 pipe A1 SS G 5 4 female for threaded Rp pipe B4 PP or PVDF G 5 4 for 25 pipe 4 PE G 5 8 for 6 9 mm hose 6 PE G 5 8 for 9 12 mm hose B9 PVC G 5 4 for 19 27 mm hose S P...

Page 30: ...otor With certifi cate for the pump With certifi cate for the motor and the pump GM HP MP Standard motor E0 G0 H0 K0 Motor with PTC sensor prepared for operation with frequency converter E4 Motor single phase with on off switch FA GA HA KA VFD variable frequency drive FB GB HB KB VFD with IO extension board FC GC HC KC VFD with internal Profibus FD GD HD KD VFD with external Profibus FE GE HE KE V...

Page 31: ... storage or service 1 Flush the dosing head with water if possible 2 Stop dosing For pumps with AR control unit press the start stop button on the AR control unit and switch off the power supply to the pump For pumps without AR control unit switch off the power supply to the pump 3 Close the vent plug 4 Depressurise the pressure side of the dosing system 5 Close the isolating valves on the inlet s...

Page 32: ...utlet valve every 12 months every 8000 operating hours in case of fault Clean or replace the diaphragm of the integral re lief valve In case of fault Check the diaphragm leakage sensor Every 5 years or every 20000 operating hours Have the gear grease changed Only qualified persons authorised by Grundfos are allowed to change the gear grease Send the pump to Grundfos or an authorised service work s...

Page 33: ...sing Related information 7 3 Preparing for maintenance of the dosing diaphragm or the valves 7 3 Preparing for maintenance of the dosing diaphragm or the valves Only adjust the stroke length while the pump is running Close the vent plug when taking the pump out of operation for transport storage or service 1 Flush the dosing head with water if possible 2 While the pump is running set the stroke le...

Page 34: ...ction Safety instructions for maintaining the dosing diaphragm or the valves Observe section Preparing for maintenance of the dosing diaphragm or the valves Fig 7 4 1 Exploded view of inlet and outlet valves DN 8 Pos Description Spring loaded as an option DMX 221 34 ...

Page 35: ...cage DN 8 spring loaded Unscrew the ball cage with a pair of round pliers DN 20 Unscrew the ball cage with a pair of round pliers 3 Clean all parts and check that the parts are intact 4 Replace faulty parts with new ones 5 Replace the O rings with new ones The O rings must be correctly placed in the specified grooves 6 Re assemble the valve 7 Refit the valve in correct orientation The direction ar...

Page 36: ...the dosing head screws with the correct torque 11 After 6 10 operating hours or two days retighten the screws with the correct torque Related information 7 2 Safety instructions for maintaining the dosing diaphragm or the valves 7 3 Preparing for maintenance of the dosing diaphragm or the valves 9 3 1 Torque values 7 6 Cleaning or replacing the diaphragm of the integral relief valve Observe sectio...

Page 37: ...s or the environment Grundfos can refuse to accept the product for service if it is not cleaned from chemicals or if the Safety declaration is not provided 1 Clean the pump thoroughly before returning it Make sure there are no traces of toxic or haz ardous chemicals remaining on the pump If proper cleaning is not possible provide all relevant information about the chemical 2 Fill out the Safety de...

Page 38: ...ment Clean the foot valve Clean the tank from the sediment or shorten the in let line The inlet line is buckled Install the inlet line correctly Check for damage There are crystalline deposits in the valves Clean the valves The dosing diaphragm is broken Replace the dosing diaphragm 8 3 No dosing flow Cause Remedy There is air in the inlet line and the dosing head Wait until the pump has deaerated...

Page 39: ...t the high end of its performance range in an installation with fluctuat ing supply voltage Lower the counterpressure of the pump The density or the viscosity of the dosing medium varies Make sure the density or the viscosity of the dosing medium does not vary Use a stirrer 8 5 Permanent leakage from the integral relief valve Cause Remedy The outlet valve or the outlet line is blocked Clean the ou...

Page 40: ...ditions for operation Parameter Value Ambient temperature 0 40 C Maximum relative air humidity 70 at 40 C 90 at 35 C Ambient conditions for storage Parameter Value Ambient temperature 20 to 50 C Maximum relative air humidity 92 non condensing DMX 221 40 ...

Page 41: ...0 20 C Medium temperature for pumps with stainless steel dosing head Maximum counterpressure Medium temperature Up to 16 bar 10 to 70 C For SIP or CIP applications up to 2 bar maximum 15 minutes up to 145 C Medium temperature for pumps with PP dosing head Maximum counterpressure Medium temperature Up to 10 bar 0 40 C Medium temperature for pumps with PVDF dosing head Maximum counterpressure Medium...

Page 42: ... 5 6 DMX 25 3 5 6 DMX 7 2 16 6 8 DMX 8 10 6 8 DMX 14 10 6 8 DMX 18 10 6 8 DMX 26 10 6 8 DMX 39 4 5 6 DMX 60 3 5 6 DMX 13 7 16 6 8 DMX 16 10 6 8 DMX 16 12 6 8 DMX 27 10 6 8 DMX 27 12 6 8 DMX 35 10 6 8 DMX 50 10 6 8 DMX 75 4 5 6 DMX 115 3 5 6 Torque values for the screws of the integral relief valve Use a torque wrench with an accuracy of 4 to tighten the screws Pump type Torque Nm DMX with integral...

Page 43: ...pump housing PPE PA glass fibre reinforced Lower part of pump housing PP glass fibre reinforced Stroke length adjusting knob ABS AR control unit Material Upper part of AR housing PPE PS glass fibre reinforced Lower part of AR housing Aluminium DMX 221 43 ...

Page 44: ... 145 DMX 9 10 9 11 2 9 10 145 DMX 12 10 12 14 3 7 10 145 DMX 17 4 17 20 5 3 4 58 DMX 25 3 27 32 8 5 3 43 DMX 7 2 16 1 7 2 9 2 3 16 232 DMX 8 10 8 10 2 6 10 145 DMX 14 10 14 17 4 5 10 145 DMX 18 10 18 22 5 8 10 145 DMX 26 10 26 31 8 2 10 145 DMX 39 4 39 47 12 4 4 58 DMX 60 3 60 72 19 0 3 43 DMX 13 7 16 1 13 7 16 4 3 16 232 DMX 16 10 16 19 5 0 10 145 DMX 16 12 15 7 19 5 0 12 174 DMX 27 10 27 32 8 5 ...

Page 45: ...7 4 10 4 29 35 DMX 25 3 16 29 35 DMX 7 2 16 1 9 63 75 DMX 8 10 2 2 63 75 DMX 14 10 3 8 63 75 DMX 18 10 4 9 63 75 DMX 26 10 6 9 63 75 DMX 39 4 10 4 63 75 DMX 60 3 16 63 75 DMX 13 7 16 1 9 120 144 DMX 16 10 2 2 120 144 DMX 16 12 2 2 120 144 DMX 27 10 3 8 120 144 DMX 27 12 3 8 120 144 DMX 35 10 4 9 120 144 DMX 50 10 6 9 120 144 DMX 75 4 10 4 120 144 DMX 115 3 16 120 144 Outlet pressure Parameter Valu...

Page 46: ...water fully deaerated dosing head standard pump version Parameter Value Dosing flow fluctuation 1 5 within the control range 1 10 Linearity deviation 4 of the full scale value Adjustment from maximum to minimum stroke length within the control range 1 5 DMX 221 46 ...

Page 47: ...ead filled continuous operation For priming with wetted valves with inlet line and dosing head not filled the values have to be reduced by approximately 1 m Pump type Maximum primed suction lift 50 Hz 60 Hz m m DMX 4 10 4 4 DMX 7 10 4 4 DMX 9 10 3 3 DMX 12 10 3 3 DMX 17 4 1 1 DMX 25 3 1 1 DMX 7 2 16 4 4 DMX 8 10 4 4 DMX 14 10 4 4 DMX 18 10 3 3 DMX 26 10 3 3 DMX 39 4 1 1 DMX 60 3 1 1 DMX 13 7 16 4 ...

Page 48: ...X 9 10 1 200 DMX 12 10 1 200 DMX 17 4 1 200 DMX 25 3 1 200 DMX 7 2 16 1 400 DMX 8 10 1 400 DMX 14 10 1 400 DMX 18 10 1 200 DMX 26 10 1 200 DMX 39 4 1 100 DMX 60 3 1 100 DMX 13 7 16 1 200 DMX 16 10 1 200 DMX 16 12 1 200 DMX 27 10 1 200 DMX 27 12 1 200 DMX 35 10 1 100 DMX 50 10 1 100 DMX 75 4 1 100 DMX 115 3 1 100 1 Value 1 means 1 m flooded suction Related information 9 2 Dosing medium 9 3 5 Sound ...

Page 49: ...crewed on caps The specified enclosure class can only be ensured if the sockets are protected Motor data The motor data depends on the motor variant selected and is stated on the motor and pump nameplate Electrical data of pump electronics For pumps equipped with an AR control unit VFD or Servomotor separate installation and oper ating instructions including the electrical data of the electronics ...

Page 50: ...x 366 Pump type A3 C1 C4 D1 H2 H3 mm mm mm mm mm DMX 4 10 275 32 25 G 5 8 179 153 DMX 7 10 275 32 25 G 5 8 179 153 DMX 9 10 275 32 25 G 5 8 179 153 DMX 12 10 275 32 25 G 5 8 179 153 DMX 17 4 323 64 38 G 1 192 177 DMX 25 3 330 80 40 G 1 197 188 DMX 7 2 16 275 32 25 G 5 8 179 153 DMX 8 10 275 32 25 G 5 8 179 153 DMX 14 10 275 32 25 G 5 8 179 153 DMX 221 50 ...

Page 51: ...DMX 60 3 330 80 40 G 1 197 188 DMX 13 7 16 275 32 25 G 5 8 179 153 DMX 16 10 275 32 25 G 5 8 179 153 DMX 16 12 275 32 25 G 5 8 179 153 DMX 27 10 275 32 25 G 5 8 179 153 DMX 27 12 275 32 25 G 5 8 179 153 DMX 35 10 275 32 25 G 5 8 179 153 DMX 50 10 275 32 25 G 5 8 179 153 DMX 75 4 323 64 38 G 1 192 177 DMX 115 3 330 80 40 G 1 197 188 DMX 221 51 ...

Page 52: ...ng head Weight Weight kg kg DMX 4 10 5 7 DMX 7 10 5 7 DMX 9 10 5 7 DMX 12 10 5 7 DMX 17 4 7 5 12 DMX 25 3 8 13 DMX 7 2 16 5 7 DMX 8 10 5 7 DMX 14 10 5 7 DMX 18 10 5 7 DMX 26 10 5 7 DMX 39 4 7 5 12 DMX 60 3 8 13 DMX 13 7 16 5 7 DMX 16 10 5 7 DMX 16 12 5 7 DMX 27 10 5 7 DMX 27 12 5 7 DMX 35 10 5 7 DMX 50 10 5 7 DMX 75 4 7 5 12 DMX 115 3 8 13 DMX 221 52 ...

Page 53: ...ter inlet line with foot valve flooded suction 0 5 m zero point of pump for specified pressure standard pump version Abbreviation Description Q Dosing flow Q0 Zero point of the pump Q l h Dosing flow in litres per hour h Stroke length h Stroke length in percent of maximum stroke length Hz Frequency of the alternating current power supply in Hz 1 s bar Counterpressure at the pump outlet valve in ba...

Page 54: ...n DMX pumps do not pose any health risk to the person handling them To identify the specific materials check the type key on the product nameplate and read the explana tion in the section Type key Observe also the product recycling page on http www grundfos com products product sustaina bility dmx html Related information 5 3 2 Type key 10 2 Disposing of the product This product or parts of it mus...

Page 55: ...of a diaphragm leakage dosing medium will seep out into the dosing head flange and the light refraction in the optical sensor will change The sensor produces a signal that can trigger an alarm device or switch off the pump via one of the following devices AR control unit electronic unit for optical sensor Diaphragm leakage sensor with AR control unit Observe the installation and operating instruct...

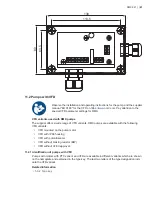
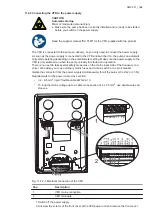
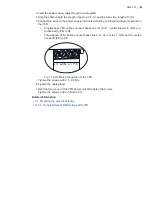
Page 56: ...unt the electronic unit on the wall close to the pump 1 Drill four Ø6 holes according to the drilling scheme 2 Unscrew the plastic screws in the cover of the electronic unit 3 Remove the cover with the plastic screws from the electronic unit 4 Mount the electronic unit on the wall by means of the four screws 5 Tighten the screws gently in order not to damage the electronic unit 6 Fit the cover to ...

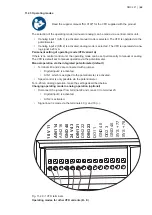
Page 57: ...n T2 as listed below and tighten the screws a Connect the green wire to GN b Connect the yellow wire to YE c Connect the white wire to WH See the wiring diagram below 6 Tighten the cable gland Connecting the relay outputs 7 Connect the contact outputs C1 and C2 according to the individual needs DANGER Electric shock Death or serious personal injury Switch off the power supply before connecting con...

Page 58: ... GND white D2 Alarm LED red The LED lights up if a diaphragm leakage is detected D5 Sensor LED red green The LED shows green light when the sensor is connected 13 Tighten the cable gland 14 Fit the cover to the electronic unit and fasten it with the plastic screws Related information 11 1 3 Electrical connection 11 1 3 3 Interference suppression of inductive loads Inductive loads on the electronic...

Page 59: ... Check that the sensor is in good condition Clean it with a cloth 3 Dip the sensor into water The electronic unit indicates that the diaphragm is leaky Proceed with the functional check The electronic unit does not indicate that the diaphragm is leaky or that a sensor is connected The sensor or the electronic unit is defective If the sensor is defective replace it with a new one If the electronic ...

Page 60: ... free Related information 11 1 4 Checking the diaphragm leakage sensor 11 1 6 Technical data of the electronic unit for optical sensor Parameter Value Maximum mains voltage deviation 10 Contact load 250 V 6 A maximum 550 VA Power consumption 1 15 VA Enclosure class IP65 Permissible ambient temperature 0 40 C Models Product number Mains voltage 96725701 230 V AC 91835310 115 V AC 11 1 6 1 Dimension...

Page 61: ...VFD variants DMX pumps are available with the following VFD variants VFD mounted on the pump motor VFD with IP66 housing VFD with potentiometer VFD without braking resistor BW VFD without ATEX approval 11 2 1 Identification of pumps with VFD Pumps with motors with PTC sensor and VFD are available in different variants which are shown on the nameplate and explained in the type key The last two lett...

Page 62: ...and operation There is no need to take special safety measures on the mains input side of the frequency con verter We advise you to use ordinary mains fuses and a main switch or a circuit breaker Isolate the connector from the power supply simultaneously for all the poles L1 L2 L2 or L1 N Requirements for the power cable cross section 0 2 4 6 mm2 rigid flexible cable AWG 24 10 To loop the mains vo...

Page 63: ... L1 to L1 neutral line N to L2 N pro tective earth PE to PE Three phase VFD variant connect phase lines L1 L2 L3 to L1 L2 N and L3 protec tive earth PE to PE L3 L2 N L1 PE Fig 11 2 2 2 Mains connection of the VFD Tighten the screws with 0 5 0 6 Nm 6 Tighten the cable gland 7 Refit the front cover of the VFD power unit and tighten the screws Tighten the screws with 3 5 Nm 20 Related information 3 1...

Page 64: ...ult set to manual operation via the potentiometer Manual operation via the integrated potentiometer default Terminals 43 and 22 are connected with a jumper Digital input 2 is activated AIN 1 which is assigned to the potentiometer is activated Speed control is only possible via the potentiometer For 4 20 mA analog operation make the settings described below Changing operating mode to analog operati...

Page 65: ... Maximum frequency 100 Hz Control terminals Code Index Parameter Value for DMX P400 02 Setpoint input function Analog input 2 AIN 2 01 Setpoint frequency P401 01 Analog mode ON Analog input 1 AIN 1 2 0 10 V monitored P401 02 Analog mode ON AIN 2 2 0 10 V monitored P402 01 Adjustment 0 AIN 1 1 36 V 1 P402 02 Adjustment 0 AIN 2 1 V P403 02 Adjustment 100 AIN 2 5 V P420 01 Digital input function Digi...

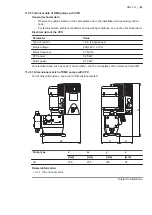
Page 66: ...the VFD Parameter Value Type of current 1 AC single phase Mains voltage 200 240 V 10 Mains frequency 47 63 Hz VFD power 0 25 kW Motor power 0 18 kW For electrical data such as current consumption see the nameplates of the motor and the VFD 11 2 5 1 Dimensional sketch of DMX pumps with VFD For all other dimensions see section Dimensional sketch Pump type x w y z mm mm mm mm all 376 276 128 97 Relat...

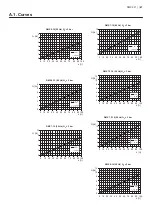
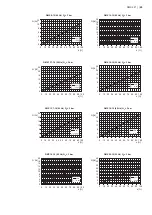
Page 67: ...100 h Q l h 3 bar 10 bar DMX 7 10 50 Hz Q 0 3 bar 0 2 4 6 8 10 0 10 20 30 40 50 60 70 80 90 100 h Q l h 10 bar 3 bar DMX 7 10 60 Hz Q 0 3 bar DMX 7 2 16 50 Hz Q 0 3 bar 0 2 4 6 8 10 12 0 10 20 30 40 50 60 70 80 90 100 h Q l h 3 bar 16 bar 0 2 4 6 8 10 12 0 10 20 30 40 50 60 70 80 90 100 h Q l h DMX 7 2 16 60 Hz Q 0 3 bar 3 bar 16 bar 0 2 4 6 8 10 12 0 10 20 30 40 50 60 70 80 90 100 h Q l h 3 bar 1...

Page 68: ...7 4 50 Hz Q 0 3 bar 0 4 8 12 16 20 24 0 10 20 30 40 50 60 70 80 90 100 h Q l h 3 bar 4 bar 1 5 bar DMX 17 4 60 Hz Q 0 3 bar 0 4 8 12 16 20 24 0 10 20 30 40 50 60 70 80 90 100 h Q l h 1 5 bar 3 bar 4 bar DMX 25 3 50 Hz Q 0 3 bar 0 5 10 15 20 25 30 35 0 10 20 30 40 50 60 70 80 90 100 h Q l h 1 5 bar 3 bar DMX 25 3 60 Hz Q 0 3 bar 0 5 10 15 20 25 30 35 0 10 20 30 40 50 60 70 80 90 100 h Q l h 3 bar 1...

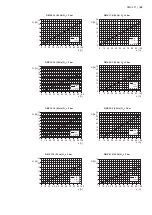
Page 69: ...50 Hz Q 0 3 bar 0 2 4 6 8 10 12 14 16 18 20 0 10 20 30 40 50 60 70 80 90 100 h Q l h 3 bar 10 bar DMX 14 10 60 Hz Q 0 3 bar 0 2 4 6 8 10 12 14 16 18 20 0 10 20 30 40 50 60 70 80 90 100 h Q l h 3 bar 10 bar DMX 18 10 50 Hz Q 0 3 bar 0 4 8 12 16 20 24 0 10 20 30 40 50 60 70 80 90 100 h Q l h 3 bar 10 bar DMX 18 10 60 Hz Q 0 3 bar 0 4 8 12 16 20 24 0 10 20 30 40 50 60 70 80 90 100 h Q l h 3 bar 10 ba...

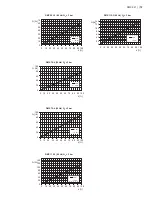
Page 70: ... 4 bar DMX 60 3 50 Hz Q 0 3 bar 0 20 40 60 80 100 0 10 20 30 40 50 60 70 80 90 100 h Q l h 1 5 bar 3 bar DMX 60 3 60 Hz Q 0 3 bar 0 20 40 60 80 100 0 10 20 30 40 50 60 70 80 90 100 h Q l h 3 bar 1 5 bar DMX 16 10 50 Hz Q 0 3 bar 0 4 8 12 16 20 24 0 10 20 30 40 50 60 70 80 90 100 h Q l h 3 bar 10 bar DMX 16 10 60 Hz Q 0 3 bar 0 4 8 12 16 20 24 0 10 20 30 40 50 60 70 80 90 100 h Q l h 3 bar 10 bar h...

Page 71: ... l h DMX 27 12 50 Hz Q0 3 bar 0 4 8 12 16 20 24 28 32 36 40 0 10 20 30 40 50 60 70 80 90 100 12 bar 3 bar h Q l h DMX 27 12 60 Hz Q0 3 bar 0 4 8 12 16 20 24 28 32 36 40 0 10 20 30 40 50 60 70 80 90 100 12 bar 3 bar DMX 35 10 50 Hz Q 0 4 bar 0 10 20 30 40 50 0 10 20 30 40 50 60 70 80 90 100 h Q l h 4 bar 10 bar DMX 35 10 60 Hz Q 0 4 bar 0 10 20 30 40 50 0 10 20 30 40 50 60 70 80 90 100 h Q l h 4 ba...

Page 72: ... 50 60 70 80 90 100 h Q l h 3 bar 4 bar DMX 75 4 60 Hz Q 0 3 bar 0 20 40 60 80 100 0 10 20 30 40 50 60 70 80 90 100 h Q l h 3 bar 4 bar DMX 115 3 50 Hz Q 0 3 bar 0 20 40 60 80 100 120 140 0 10 20 30 40 50 60 70 80 90 100 h Q l h 1 5 bar 3 bar DMX 115 3 60 Hz Q 0 3 bar 0 20 40 60 80 100 120 140 0 10 20 30 40 50 60 70 80 90 100 h Q l h 3 bar 1 5 bar DMX 221 72 ...

Page 73: ...the case of an electrical or functional fault please mark the cabinet Please give a short description of the fault Declaration We hereby declare that this product is free from hazardous chemicals biological and radioactive substances see pump nameplate Type designation Product number The product was used with the following dosing medium No dosing medium or water A chemical solution name Date and s...

Page 74: ...S Pumps Korea Ltd 6th Floor Aju Building 679 5 Yeoksam dong Kangnam ku 135 916 Seoul Korea Phone 82 2 5317 600 Telefax 82 2 5633 725 Latvia SIA GRUNDFOS Pumps Latvia Deglava biznesa centrs Augusta Deglava ielā 60 LV 1035 Rīga Phone 371 714 9640 7 149 641 Telefax 371 914 9646 Lithuania GRUNDFOS Pumps UAB Smolensko g 6 LT 03201 Vilnius Phone 370 52 395 430 Telefax 370 52 395 431 Malaysia GRUNDFOS Pu...

Page 75: ...03452 www grundfos com The name Grundfos the Grundfos logo and be think innovate are registered trademarks owned by Grundfos Holding A S or Grundfos A S Denmark All rights reserved worldwide Copyright Grundfos Holding A S ...

Reviews: