GROWSPAN
™
ROLLING PREMIUM HIGH TUNNELS
22
Revision date: 01.01.16
INSTALL THE CROSS BEAM PURLIN
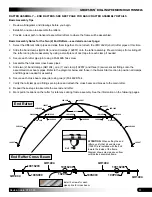
The cross beam purlin runs the length of the frame from end-to-end on the underside of each rafter cross beam. This
purlin is identical to all other purlins currently attached to the assembled frame. Position of the cross-beam purlin is slightly
off center to avoid conflicts with the end wall fittings attached to the end rafter cross beam braces. See the diagrams
below and in the Quick Start section.
Gather the parts:
• Pipe 1.315'' x 75'' swaged (#131S075) and Pipe 1.315'' x 73.5'' plain (#131P0735) – See Side Profile Diagrams in
Quick Start section if needed.
• 102547 Cross Connector–
NOTE:
The 102857 End Clamps are already attached to the cross beam of each end rafter.
See End Rafter Assembly on page 11 for review if needed.
• Lifts, ladders, tools, and assistants
Complete these steps:
1. Using the proper lifts (or ladders) and with assistance, repeat the purlin installation steps as described earlier in the
Frame Assembly instructions of this guide beginning with Step 5. Note that this time you will attach the purlin to the
cross beam brace
and not the rafter as stated in Step 5.
2. As the purlin is assembled and installed, ensure that it runs parallel with the other installed purlins. Secure each purlin
pipe splice with a Tek screw. Purlin will be slightly to the left or right of the center line of the cross beams.
3. Secure all end clamps and cross connector clamps
to the cross beam brace and to the cross beam purlin
.
4. Continue with the installation of the corner struts for the main frame.
A
A
B
B
Cross Beam
Purlin
Cross Beam Purlin
Cross Beam Purlin

