Grizzly T33300 Owner'S Manual Download Page 23

Let saw reach full speed before contacting 

workpiece. Doing so will reduce risk of kick-

back, help provide cleanest cut, and reduce 

stress on saw motor.

Keep fingers and hands away from saw 

blade and out of blade path during opera-

tion. Use clamps to hold workpiece in place.

Making blind plunge cuts without check-

ing cutting path for unseen objects could 

result in injury from kickback, electrocution, 

building damage or fire, gas explosions, 

or death. Whenever making a blind plunge 

cut into a standing structure (like a wall), 

always check cutting path for hidden wires, 

nails, and other metal objects by thoroughly 

scanning area with an electric stud finder or 

similar device. NEVER risk a blind plunge 

cut without first checking your cutting path.

Whenever operating saw in vicinity of live 

wires, always wear insulated gloves. Avoid 

unintentionally grounding yourself when 

operating saw by being in contact with elec-

trically-conductive materials (metal pipes, 

appliances, etc.).

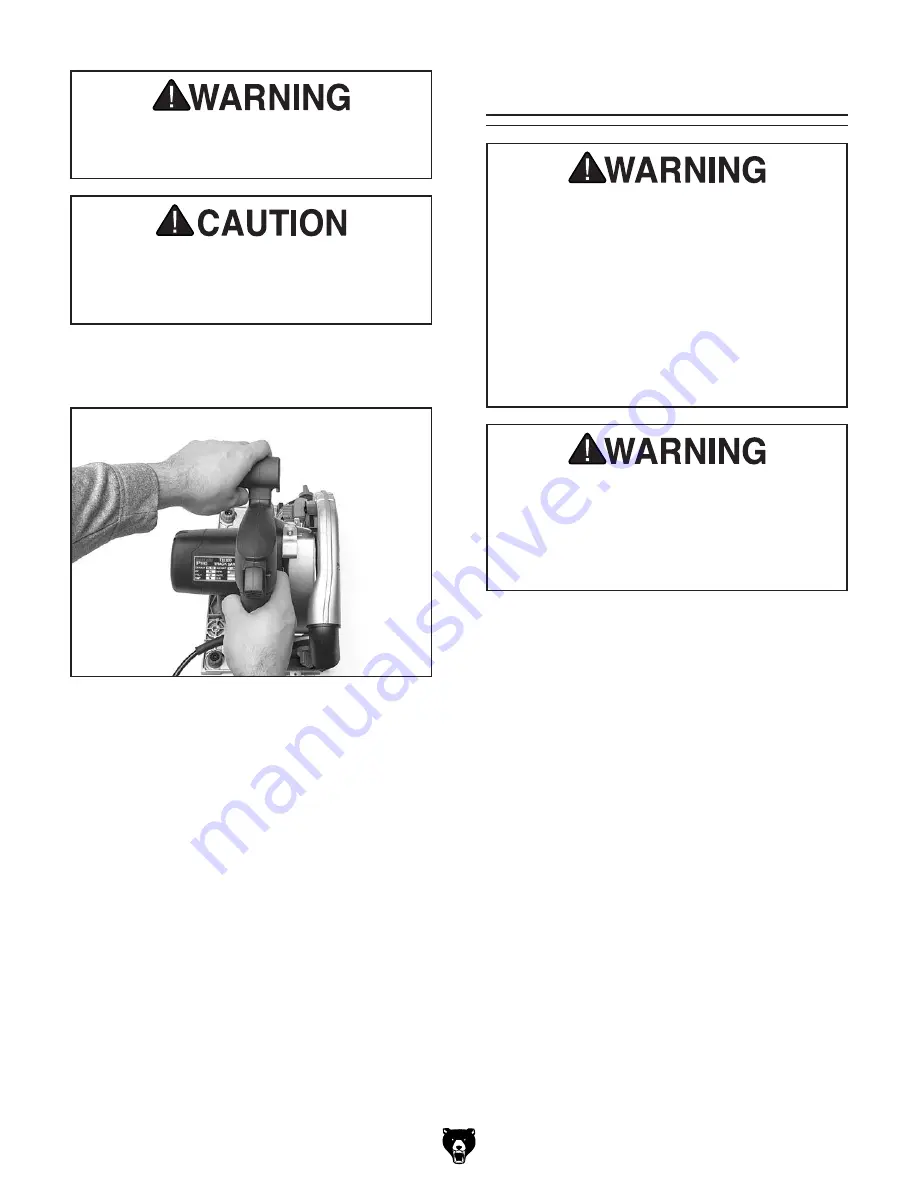
Figure 15. Proper hand positions.

Model T33300 (Mfd. Since 04/22)

-21-

3.  Hold  saw  firmly  with  one  hand  on  each 

handle (see 

Figure 15).

Plunge cuts are made by positioning the saw on 
the workpiece so that the blade begins cutting as 
soon  as  it  is  lowered.  Plunge  cuts  work  well  for 
removing  an  area  within  the  workpiece  without 
sawing through the outer perimeter.

To make plunge cuts:

1.  Mark  desired  start  and  stop  cut-points  on 

workpiece.

2.  Set depth of cut (see Setting Cutting Depth 

on 

Page 19).

4.  Engage  plunge  release  and  extend  blade. 

Activate  saw  by  pulling  power  trigger  while 
holding plunge release.


Note: Holding ON/OFF trigger alone will not 
activate saw. For power to be activated, both 
plunge release and ON/OFF trigger must be 
pressed. After power has been activated, 
plunge release can be disengaged.

5.  Move  saw  forward  over  workpiece  in  an 

even, steady motion.

6.  When  finished,  release  ON/OFF  trigger  and 

allow  blade  to  come  to  a  complete  stop. 
Return saw to an upright position by lifting up 
on  handle  and  allowing  blade  to  retract  and 
lock in place.

Making Plunge Cuts

Summary of Contents for T33300

Page 1: ...actured since 04 22 COPYRIGHT APRIL 2022 BY GRIZZLY INDUSTRIAL INC WARNING NO PORTION OF THIS MANUAL MAY BE REPRODUCED IN ANY SHAPE OR FORM WITHOUT THE WRITTEN APPROVAL OF GRIZZLY INDUSTRIAL INC KS223...

Page 2: ...g grinding tool integrity and the usage of personal protective equipment The manufacturer will not be held liable for injury or property damage from negligence improper training machine modifications...

Page 3: ...15 SECTION 4 OPERATIONS 16 Operation Overview 16 Using Saw 17 Blade Selection 17 Changing Blades 17 Riving Knife Adjustment 18 Setting Cutting Depth 19 Setting Cutting Angle 20 Making Straight Cuts 2...

Page 4: ...What did you like about it Where could it be improved Please take a few minutes to give us feedback Grizzly Documentation Manager P O Box 2069 Bellingham WA 98227 2069 Email manuals grizzly com We are...

Page 5: ...osition on workpiece guide rail E Rail Adjustment Knob 1 of 2 Adjusts play in how saw slides along guide rail F Zero Stop Set Screw Sets zero stop point for calibrating bevel gauge G Bevel Gauge Lock...

Page 6: ...m blade reach for front rear and center points of blade M Saw Blade Included 48 tooth carbide tipped blade has 160mm diameter 20mm arbor and is 2 2mm thick N Spring Loaded Riving Knife Lowers into ker...

Page 7: ...ing operation Kickback An event in which the tool is propelled back towards the operator at a high rate of speed Parallel Being an equal distance apart at every point along two given lines or planes I...

Page 8: ...Weight 16 lbs Length x Width x Height 13 x 11 x 10 in Electrical Power Requirement 120V Single Phase 60 Hz Full Load Current Rating 9A Minimum Circuit Size 15A Connection Type Cord Plug Power Cord In...

Page 9: ...Aluminum Other Number of Dust Ports 1 Dust Port Size 1 1 2 in Other Specifications Country Of Origin China Warranty 1 Year Approximate Assembly Setup Time 10 Minutes Serial Number Location ID Label Fe...

Page 10: ...OUS ENVIRONMENTS Do not use tools in areas that are wet cluttered or have poor lighting Operating tools in these areas greatly increases risk of accidents and injury MENTAL ALERTNESS REQUIRED Full men...

Page 11: ...ts or flying debris Make sure they are properly installed undamaged and working correctly CHILDREN BYSTANDERS Keep children and bystanders at a safe distance from the work area Stop using machine if t...

Page 12: ...ckback Do not make freehand cuts STOPPING AND RESTARTING CUTS Allow blade to reach full speed before cutting Complete all cuts when possible If a cut must be interrupted let blade come to a complete s...

Page 13: ...d 2 protect your self in case it does occur Preventing Kickback Take these precautions to help prevent the most common causes of kickback Hold the saw firmly with both hands and position arms to help...

Page 14: ...ps The full load current is not the maximum amount of amps that the machine will draw If the machine is overloaded it will draw additional amps beyond the full load rating If the machine is overloaded...

Page 15: ...sure the cords are rated for outdoor use Outdoor use cords are marked with a W A or a W to signify their rat ing Always check to make sure that the extension cords are in good working order and free...

Page 16: ...so extremely helpful if you need to return your machine later NOTICE If you cannot find an item on this list care fully check around inside the machine and packaging materials Often these items get lo...

Page 17: ...ntil the information is understood Figure 5 Dust port location Model T33300 Mfd Since 04 22 15 To connect a dust collection hose 1 Fit 11 2 dust hose over dust port and secure in place with a hose cla...

Page 18: ...efore beginning any proj ects Regardless of the content in this sec tion Grizzly Industrial will not be held liable for accidents caused by lack of training 16 Model T33300 Mfd Since 04 22 SECTION 4 O...

Page 19: ...e material being cut The resulting cut will be cleaner and there will be less stress on the tool Always inspect saw blades closely before installation and never use saw blades with bent or missing tee...

Page 20: ...e blade and riving knife can be lowered safely down below the surface edge Tools Needed Qty Hex Wrench 5mm 1 Straightedge 12 1 To adjust riving knife 1 Engage plunge release and lower blade until rivi...

Page 21: ...k for straightness IMPORTANT NEVER use warped or dam aged riving knife when making a cut or kick back may occur 2 Secure lock knob Note Cutting depth shown on scale is the depth WITHOUT the optional g...

Page 22: ...t cutting angle 1 Loosen front and rear bevel gauge knobs see Figure 13 There are generally two types of cuts made with this saw straight cuts and plunge cuts Straight cuts are made with the blade alr...

Page 23: ...ally conductive materials metal pipes appliances etc Figure 15 Proper hand positions Model T33300 Mfd Since 04 22 21 3 Hold saw firmly with one hand on each handle see Figure 15 Plunge cuts are made b...

Page 24: ...FF trigger while holding plunge release Note Holding ON OFF trigger alone will not activate saw For power to be activated both plunge release and ON OFF trigger must be pressed After power has been ac...

Page 25: ...ed rubber lip that serves as a splinter guard The first time the track saw is used with the rail the saw blade will cut the edge of that lip to provide a zero clearance effect which will help minimize...

Page 26: ...the outer rail of the guide rail and provide a stable stopping point along the length of the guide rail which is espe cially useful when making plunge cuts Using Adjustable Stops Using Stabilizer Adju...

Page 27: ...Protector 4 T20502 Face Shield Crown Protector 7 T20503 Face Shield Window T20451 Kirova Clear Safety Glasses T20456 DAKURA Safety Glasses Black Clear T28175 R3 SAFETY Stealth Safety Glasses Figure 24...

Page 28: ...saw blade and riving knife for dam age dullness or excessive wear Inspect base plate for defects and flatness Verify fasteners on moving parts are secure Weekly Check Clean vacuum dust buildup from t...

Page 29: ...e bends close other branches 4 Remove replace brushes Page 28 5 Test repair replace 6 Clean motor let cool and reduce workload 7 Test repair replace Tool has vibration or noisy operation 1 Motor or co...

Page 30: ...saw is flush against carpenter s square or block This saw uses two carbon brushes to transmit electrical current inside the motor Replace both carbon brushes at the same time when the motor no longer...

Page 31: ...m motor wires by carefully pulling apart terminal connectors see Figure 31 IMPORTANT DO NOT pull on wires Only Grasp Here When Disconnecting Terminals 7 Install replacement brushes in holders with wir...

Page 32: ...44 45 46 47 48 49 50 51 52 53 54 55 56 57 58 59 60 61 62 63 64 65 66 67 68 69 70 71 71 71 72 72 73 73 74 74 75 75 76 76 77 78 79 80 82 11 83 84 85 30 Model T33300 Mfd Since 04 22 SECTION 8 PARTS Main...

Page 33: ...R TRIGGER 61 PT33300061 INNER ARBOR FLANGE 19 PT33300019 PLUNGE RELEASE TRIGGER 62 PT33300062 PHLP HD SCR M4 7 X 14 20 PT33300020 RESET TORSION SPRING 63 PT33300063 RIVING KNIFE SPRING EXTENSION 21 PT...

Page 34: ...094107 ADJUSTABLE STOP BODY 102 PT24872102 BOTTOM FOAM STRIP 108 PT25094108 ADJUSTABLE STOP KNOB BOLT 103 PT24872103 RAIL TRACK BODY 109 PT25094109 F CLAMP 104 PT24872104 TOP BLUE PLASTIC STRIP 113 PT...

Page 35: ...cidental contingent special or consequential damages arising from the use of our products The manufacturers reserve the right to change specifications at any time because they constantly strive to ach...

Page 36: ......

Reviews: