


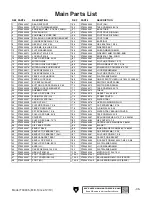


Model T30945 (Mfd. Since 12/19)
-31-
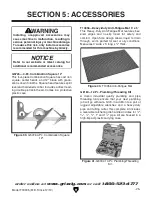
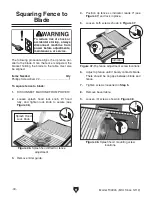
10. Use rip fence to align splash hood mounting
bracket to blade (see
Figure 49).
Figure 49. Bracket aligned with rip fence and
blade.
11. Tighten screws loosened in Step 9.
Adjusting Fence
The factory has made all the necessary adjust-
ments on your machine, but the rip fence may
get knocked loose during shipping or eventually
loosen over time.
If the rip fence will not securely lock to the table,
the cam in the locking mechanism may need to be
tightened. If you experience difficulty sliding the
fence across the width of the table, the fence set
screws may need to be adjusted.
Items Needed
Qty
Hex Wrenches 2, 3mm ................................1 Ea.
1. DISCONNECT MACHINE FROM POWER!
2. Remove miter guide from rip fence and
unlock and remove rip fence from table.
Tightening Cam
4. Tighten cam by turning it towards lock lever
(see
Figure 50).
5. Test cam by locking rip fence to table. Tighten
cam screw to secure when satisfied.
1. DISCONNECT MACHINE FROM POWER!
2. Adjust set screws shown in Figure 51 to
adjust rip fence movement.
— Loosen set screws to allow rip fence
to glide more easily across table.
— Tighten set screws to cause rip
fence to glide less easily across table.
Adjusting Fence Set Screws
3. Test adjustment by unlocking rip fence and
sliding it along table width. Adjust set screws
until satisfied.
Figure 50. Cam and cam screw location.
Cam Screw
Cam
Figure 51. Rip fence adjustment set screws.
x 2
Blade
Rip Fence
Mounting
Bracket
3. Loosen cam screw shown in Figure 50.
Summary of Contents for T30945
Page 40: ......


