-40-
Model G0750GV (Mfd. Since 03/18)
Mounting Workpiece Between
Centers
1. DISCONNECT MACHINE FROM POWER!
2. Drill center holes in both ends of workpiece.
3. Install dead center in spindle with lathe dog
and chuck or faceplate, then install live center
or carbide-tipped dead center in tailstock.
4. Lubricate workpiece center holes, then mount
it between centers and hold it in place with
light pressure from tailstock center.
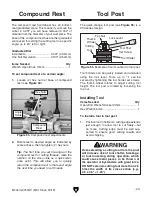
5. Seat center firmly into quill by rotating
quill handwheel clockwise to apply pres-
sure against workpiece (see the example in
Figure 48).
Figure 48. Example of a workpiece mounted
between the centers.
Only apply enough pressure to securely mount
the workpiece between centers. Avoid over-tight-
ening the center against the workpiece, or it
may become difficult to remove later. Also, over-
tightening will result in excessive friction and heat,
which may damage the workpiece or center.
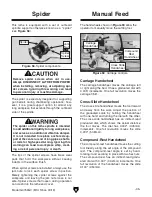
The drill chuck attaches to the tailstock quill
with the included B16 to MT#3 arbor, shown in
Figure 49. Matched tapers on the arbor and the
inside of the chuck create a semi-permanent
assembly when properly joined. The drill chuck
can accept tooling from
1
⁄
16
" –
1
⁄
2
".
Drill Chuck & Arbor
To assemble drill chuck and mount it in
tailstock quill:
1. Use mineral spirits to thoroughly clean drill
chuck, arbor and quill barrel, and dry all
surfaces before assembly.
2. Place drill chuck face down on a workbench.
3. Insert short tapered end of arbor into socket
in back of drill chuck and tap it with a rubber
or wooden mallet.
The procedure for mounting and removing
the chuck and arbor from the tailstock quill is
the same as for a center. Refer to
Mounting
Center in Tailstock and Removing Center
from Tailstock.
Figure 49. Chuck components.
Drill Chuck
Arbor
Chuck Key
Items Needed
Qty
Rubber or Wooden Mallet ................................. 1
Mineral Spirits .................................... As Needed
Summary of Contents for G0750GV
Page 116: ......


