NOTE: The forward limit of the balance range is 3/8" forward
of the recommended balance point The aft limit of the balance
range is 1/4" aft of the recommended balance point
NOTE: You should make your first flights with the model balanced
at the recommended balance point Later you may want to experi-
ment by shifting the balance toward the forward or aft limit of the
recommended range Moving the balance forward results in a
model that is more resistant to stalls and spins but also may act
sluggish and require more speed for takcoff and landing Moving
the balance aft makes the model more agile with a lighter and
snappier "feel" If your model flies unpredictably and is highly
sensitive to elevator control, it is probably tail-heavy If your model
seems to fly like an arrow, but you are unable to raise the nose when
making a normal landing, it is probably nose-heavy In any case,
do not balance your model outside the recommended range
D 3 Place a d r o p o f o i l o n t h e f r o n t a n d r e a r b e a r i n g s o f
your Goldfire motor, then "Break-in" your electric motor by
running it without the propeller for at least 1/2 hour For
best results, use a lower voltage or mostly discharged battery
pack during this break-in process This will insure that the
motor will provide full power for your first flight, and will
extend the overall life of the motor
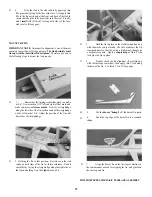
D 4. With the prop hub adaptor attached to the motor
shaft, slide the propeller onto the shaft of the prop hub
adaptor NOTE: Do not install the prop backwards' The
rounded side of the prop blades must be facing forward
Insert the 6-32 socket head cap screw through the alumi-
num spinner, and tighten the cap screw securely with the
hex key, but do not overtighten!
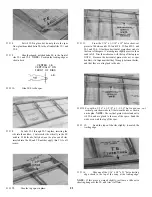
D 5. Check for wing twist as follows:
FINAL HOOKUPS AND CHECKS
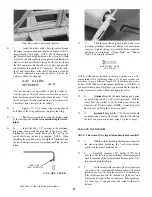
D 1. Make sure the control surfaces move in the proper
direction as illustrated in the following sketch :
D 2. Adjust your pushrod hookups as necessary to
provide the following control surface movements*:
Elevator = 3/8" up, 7/16" down
Rudder = 1-1/4" Lt., 1-1/4" Rt
Ailerons = 3/16" up, 3/16" down
*NOTE: These control surface "throws" are approximate and
provide a good starting point for the first flights with your ElectroS-
treak You may wish to adjust the throws slightly to provide the
smoothness or quickness that you prefer
NOTE: Even if you have built your wing on a perfectly flat surface
and used utmost care, it is possible that your wing may have a twist
due to uneven shrinking of the covering material You must check
for this condition and correct it before the first flight!
If you do not own a wing Incidence meter, we recommend that you
purchase or borrow one from another modeler With the wing
mounted to the fuselage, use the incidence meter to check the angle
of your wing at the tips and at the root (alongside the fuselage) If
the incidence meter reveals a wing twist of more than 1/4 degree,
you must grasp the wing at the tip and twist it slightly, while
reheating the covering material Keep checking, twisting and
reheating until the wmg twist is removed.
PRE-FLIGHT
CHARGE THE BATTERIES
Follow the radio battery charging procedures in
your radio instruction manual You should always charge
your transmitter and receiver batteries the night before you
go flying, and at other times as recommended by the radio
manufacturer Read the battery charging procedure in the
Appendix at the end of this book to familiarize yourself with
the procedure for charging the motor battery.
TEST THE MOTOR OPERATION
D 1. Make sure the motor switch (if you have installed
a switch) is in the "off position.
D 2. Make sure no one in the area is operating a radio
on your frequency, then turn on the transmitter and receiver
(in that order), and pull the throttle stick back Check to
make sure that the micro switch (if you have installed a
micro switch) is in the "off position. Turn off the receiver
and transmitter (in that order)
D 3. Remove the wing, insert the charged 7 cell motor
battery, and plug the battery connectors together Replace
the wing
D 4 Position yourself behind the wmg, and grasp the
airplane firmly
32


