GREAT PLANES Electro Streak Instruction Manual Download Page 3

3. You must use a proper R/C radio that is in first class

condition, the correct size motor and correct components
(wheels, etc) throughout your building process.

4 You must properly install all R/C and other compo-

nents so that the model operates properly on the ground.

5 You must test the operation of the model before the

first and each successive flight to insure that all equipment is
operating and you must make certain that the model has remained
structurally sound.

6. You must fly the model only with competent help

from a well experienced R/C pilot if you are not already an
experienced and knowledgeable R/C pilot at this time.

Note: We, as the kit manufacturer, can provide you with

a top quality kit and great instructions, but ultimately the quality
and flyability of your finished model depends on how you build
it, therefore, we cannot in any way guarantee the performance of
your completed model, and no representations are expressed or
implied as to the performance or safety of your completed model

Remember: Take your time and follow directions to

end up with a well-built model that is straight and true.

KEEP IT LIGHT!

Because the electric motor and motor battery are rela-

tively heavy, and because electric motors do not produce as much
thrust as glow engines (when compared to their weight), it is

essential that the basic structure of the airplane be kept as light
as possible In doing so, you will help insure that the finished
airplane will not be too heavy to fly well.

One way to prevent excess weight build-up is to use

only as much glue as needed for good glue joints Do not apply
extra "fillets" of glue thinking that it will make your plane
stronger' All that extra glue adds ounces to the weight of your
plane, and will detract from the performance.

In order to help you build a light airplane, many parts

in this kit are made from soft balsa Because the wood is soft, it
does not die cut cleanly and it dents easily Therefore, you will
have to do a little more sanding on the edges of the die cut parts
before using them, and you may have to fill a few more dents and
"dings". The soft balsa is also more fragile, so use a little extra care
to avoid damaging the parts.

We will give you tips throughout this book on how to

keep the structure light, and we urge you to follow them.
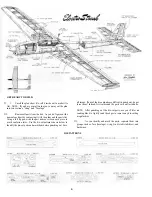
RADIO SELECTION

Because the ElectroStreak is optimized for light weight,

you must use a radio system with "micro" servos and a 225 mAh

flight pack battery Our prototype uses a Futaba radio with three
S33 servos and a Robart HQ500 electronic speed control The

radio equipment you choose must be small and lightweight.

SPEED CONTROL SELECTION

You must equip your ElectroStreak with some type of

motor control to enable you to turn the motor on and off with the

transmitter The best way to accomplish this is by installing an

electronic speed control, which provides fully proportional
control of the motor speed You should choose a speed control
that is capable of handling at least 25 Amps of continuous current.

It is not necessary to have fully proportional speed

control in this airplane Instead, you may prefer the simplicity
(and cost savings) of a simple on-off switch, activated by a 4th
micro servo To accomplish this you may purchase a micro
switch or toggle switch (from an electronics supply store, such as
Radio Shack) and mount it to the "throttle" servo using double-
stick tape.

NOTE: Many electronic speed controls have a built-in safety
feature which acts like a circuit breaker in case of an overload due
to a short circuit or a stalled propeller, however, if you are using
a simple switch system, you should install a 20 or 25 amp fuse in
your switch harness to protect the electrical components and to
prevent fire or explosion in the event of an overload

BATTERY SELECTION

In order to give the ElectroStreak sufficient power to

perform large acrobatic maneuvers, we strongly recommend that
you use a good quality 7 cell nicad battery pack for motor power.
The individual cells in the battery pack should be "low imped-

ance", which means that they are capable of delivering high

current to the motor (Sanyo SCR cells, for example)

If you choose a 7-cell 1200 mAh battery pack, it should

be a "flat" pack, such as the "Kyosho Turbo Racing Battery"

You can cut several ounces from the flying weight of

your ElectroStreak, thereby improving performance, by using a
7 cell 800 mAh battery pack The major disadvantage is that
flight times will be reduced to only 2 or 2-1/2 minutes (continu-
ous motor run).

BATTERY CHARGER SELECTION

You may use any of the commercially available battery

chargers that are designed for charging 7 cell nicad battery packs.
Some chargers have a "peak detector" which sense when the
battery is fully charged and automatically shut off at the right
time Some chargers operate from 110 volt house current, 12 volt
DC (automobile battery), 01 both For convenience, we recom-

mend a "fast charger" that will charge a 7-cell 1200 mAh battery
pack m approximately 20 minutes.

PROPELLER SELECTION

We tested several different propellers on the Electro-

Streak, and found the G rish Tornado 7x6 nylon prop to be a very

good all around choice An 8x4 prop provides a little more thrust
on takeoff, but the 7x6 gives more speed and better overall
performance Wood props break very often when this airplane is
"belly landed", so they are not recommended unless you are using
the landing gear.

3

Summary of Contents for Electro Streak

Page 1: ...components and flying gear motor batteries pushrods etc and to test the model and fly it only with experienced competent help in accordance with all safety standards and common sense as set down in th...

Page 2: ...OM YOUR ELECTRIC POWERED MODEL 35 PARTS LIST 39 INTRODUCTION Congratulations Thank you for purchasing the Great Planes ElectroStreak Tom Stryker s original design for this airplane was first featured...

Page 3: ...all and lightweight SPEED CONTROL SELECTION You must equip your ElectroStreak with some type of motor control to enable you to turn the motor on and off with the transmitter The best way to accomplish...

Page 4: ...modelers is using loo much CA glue Rather than squeezing the bottle it is usually sufficient to touch the tip of the applicator spout to the joint being glued and allow a few drops of CA to flow into...

Page 5: ...n each piece to avoid confusion later Use the die cut patterns shown below to identify the die cut parts and mark them before punching out Save all scraps Ifany ofthedie cutparts aredifficult topuncho...

Page 6: ...check to make sure they are exactly the same all the way around Sand the edges as necessary until the two fuse sides match It is especially important that the overall length be the same so sand the ta...

Page 7: ...ust be a 1 8 gap in front of F 3 D 13 Glue the 5 7 8 long triangles to the inside of the fuse sides along the bottom from the front ofF 3 forward to the front of the fuse sides Note that the triangle...

Page 8: ...16 x 3 x 15 balsa sheet into 6 pieces each having a length of 2 l 2 D 23 Trim the ends of the battery compartmentdoubler to fit between the rear of F 3 and the front of F 4 D 24 Mark the outline of t...

Page 9: ...ectric motor through the hole in F 2 Sand the hole as necessary for a snug fit Use a piece of sandpaper wrapped around a dowel NOTE If the motor label gives youproblems when fitting youmay want topeel...

Page 10: ...rim as necessary D 13 From the 1 16 x 3 x l5 hard balsa sheet cut five 2 1 2 lengths Edge glue these pieces together as shown Then sand smooth on both sides with yourT bar and 100 grit sandpaper D 10...

Page 11: ...t File the slot as necessary for a good fit D 22 At this time before you close up the front of the fuse make a final check of the motor fit through F 2 You should be able to readily slide the motor in...

Page 12: ...om die cutting scrap to fit snugly between the 1 8 x 1 8 balsa stringers at the aft end of the fuse Glue in place D D D 28 Glue the die cut 1 16 ply tail skid plate to the bottom ofthe fuse at the aft...

Page 13: ...fuselage top using an Xacto knife D INSTALL RUDDER CABLE GUIDES D D 3 Secure the nylon straps with 2 x 3 8 screws 2 x 3 8 SCREW DRILL HOLE FOR TAIL SKID D 1 Drill a 1 16 hole in the plywood tail skid...

Page 14: ...receiver area and smooth it out with a piece of waxed paper This Strengthens the balsa in the area where the receiver will be fastened with Velcro 2 Stick two servos together with the square of double...

Page 15: ...e rudder to a taper as shown in the detail drawing on the plan D D D D D D D D 2 Tape a piece of waxed paper over the separate STABILIZER drawing on the plan then lay the die cut 3 16 balsa stab cente...

Page 16: ...snip off a small piece of each comer See sketch at top of next column D 5 Fold the hingematerial back and forth a few times to condition the hinges D 3 Lay the fin and stabilizeron the plan and mark...

Page 17: ...at all the hinge locations in the fin rudder stabilizer and elevators 10 Assemble the rudder to the fin and the elevators to the stabilizer DO NOT GLUE andcheck the operationof the hinges TEMPORARILY...

Page 18: ...e nylon horn on the BOTTOM of the elevator Use the 2 56 x 3 8 screws and nylon nutplate to mount the elevator horn IM PORTANT Make sure the nutplate and screws of the elevator horn do not touch the ru...

Page 19: ...4 Adjust the position of the fin until it matches the straightedge D D 3 Hold the fin in place on the stabilizer and line it up with the marks you just made Check to make sure the fin is perpendicular...

Page 20: ...cessbalsathatremains along theedgesafter breaking them apart using a T bar with 100 grit sandpaper D 3 Before using the L E and T E pieces you must determine which pieces are to be used for the wing p...

Page 21: ...between theribs and that they are also glued to the nbs D D 14 From the 1 16 x 3 5 8 x 1 1 16 balsa pieces cut vertical grain shear webs to fit between the ribs as shown on the plan NOTE The vertical...

Page 22: ...eting and cap strips to the bottom of the wing panel in the same manner as the lop See Steps 16 22 D D 29 Trim the bottom sheeting even with ribs W l and W 8 then sand the ends smooth and straight wit...

Page 23: ...the LE atthe center as shown on theplan As you are sanding trial fit the wing in the wing saddle There shouldbe approximately 1 32 to 1 16 slop in the fit of the wing to the saddle to allow for fiber...

Page 24: ...and bonded to the balsa you may apply more thin CA a few drops at a time and spread it out with a piece ofwaxed paper D 7 After the glue has set trim the excess cloth at the trailing edge with a shar...

Page 25: ...emove the wing from the fuse and securely glue the fairing block to the wing You may then use some light weight balsa filler compound to fill any gaps and irregulari ties INSTALL AILERONS NOTE The ail...

Page 26: ...on horn mounting screws pass through the inboard aileron hinges we glued only these two hinges into the ailerons permanently mounted the horns temporarily and worked around these hinges when covering...

Page 27: ...it with a pliers D 3 Draw a line 1 inch long on both ends of the 1 4 x 1 4 x 17 1 4 balsa stick to mark the locations of the pushrod wire grooves D 7 Lay the wire on the fuse plan side view and notice...

Page 28: ...Screw them on all the way until the threads are protruding inside the clevis D 2 Make the single bend in each pushrod as shown on the wing plan At this time you should try to accurately predict what...

Page 29: ...ght to the other wing tip until it balances Place several drops of thick CA on the inside surface of Rib W 8 until it balances The receiver receiver battery motor battery and speed control may all be...

Page 30: ...talling the hinges make sure there is little or no hinge gap A large 1 32 or more hinge gap will reduce control surface effectiveness and may promote flutter D 3 Re install the nylon control horns Cut...

Page 31: ...num spinner nut and the 6 32 socket head cap screw Tighten the cap screw with the hex key supplied but do not overtighten Finger Tight not Wrench Tight is a good rule of thumb 6 32 SOCKET HEAD CAP SCR...

Page 32: ...ing control surface movements Elevator 3 8 up 7 16 down Rudder 1 1 4 Lt 1 1 4 Rt Ailerons 3 16 up 3 16 down NOTE These control surface throws are approximate and provide a good starting point for the...

Page 33: ...deler to check to see that you have the radio installed correctly and that all the control surfaces do what they are supposed to Read the APPENDIX in the back of this book and become familiar with the...

Page 34: ...with ease Adjust the control surface throws according to your preference When it s time to land make your approach low and shallow as this ship wants to just keep on flying If you find that it lands...

Page 35: ...ell suited for this application because it turns arelatively large 7x6 or 8x4 propeller at an RPM that provides sufficient thrust for this airplane Because it has a relatively low no load RPM compared...

Page 36: ...ing Youcan improve theperformance ofyourGoldfire by balancing the prop using an inexpensive prop balancer available at your local hobby shop 3 To takeoff from a hard surfaced runway the wheels of your...

Page 37: ...37 Use this three view drawing for planning your trim scheme...

Page 38: ...NOTES 38...

Page 39: ...16 x 3 16 x 4 Balsa Dihedral Block 7 16 x 7 16 x 4 Balsa Dihedral Block FUSELAGE PARTS 3 32 Balsa Shaped Fuselage Top Rear 1 16 x 3 x 15 Balsa Batt Compartment Doubler Bottom Front Sheeting 1 16 x 3...

Page 40: ...ING PARTS 1 16 Balsa Ribs 1 5 7 8 Tip 1 16 Balsa Ribs 2 3 4 6 SHEETING 1 16 x 3 x 24 Balsa LE Sheeting 1 16 x 3 x 18 Balsa Wing Center Sheeting HARDWARE Prop Adapter Hub Prop Adapter Spinner 1 32 x 1...

Reviews: