background image

Micro Star 400 v2

7

1. Assembling the model

The main mechanical system of the Micro Star 400 consists primarily of glass fibre reinforced
nylon, a material which offers important advantages for use in model helicopters over alterna-
tives such as aluminium, including high mass constancy combined with low weight, freedom
from fatigue effects, low-noise operation, and the ability to absorb vibration in the power train.
Since the model is supplied completely factory-assembled, completing it ready to fly simply in-
volves installing the radio control system components and the flight battery.
However, please note that you should check that all the parts have been assembled correctly by
comparing them with the instructions; the final adjustment of the gearbox and linkages must
also be carried out by the modeller himself.

Important:

Before you carry out any other work on the model, it is essential to check that the power system
operates smoothly and freely.

Shaft drive

:

 Loosen the screws which clamp the tail rotor housing to the tail boom and adjust the position of
the tail rotor unit until there is barely detectable meshing clearance between the bevel gears on
the drive shaft and the tail rotor shaft. Re-tighten the clamping screws and ensure that the tail
rotor shaft is exactly horizontal.
Now loosen the clamping screws which fix the front of the tail boom to the chassis. Adjust the
position of the tail boom until there is just perceptible meshing clearance between the crown
gear of the tail rotor drive gear and the motor pinion, then re-tighten the clamping screws.
Finally, loosen the motor retaining screws and tighten them again, so that the motor takes up
the optimum position between the main gear and the tail rotor drive system.

Belt drive

:

Check that the toothed belt is under tension, but still works smoothly and easily.

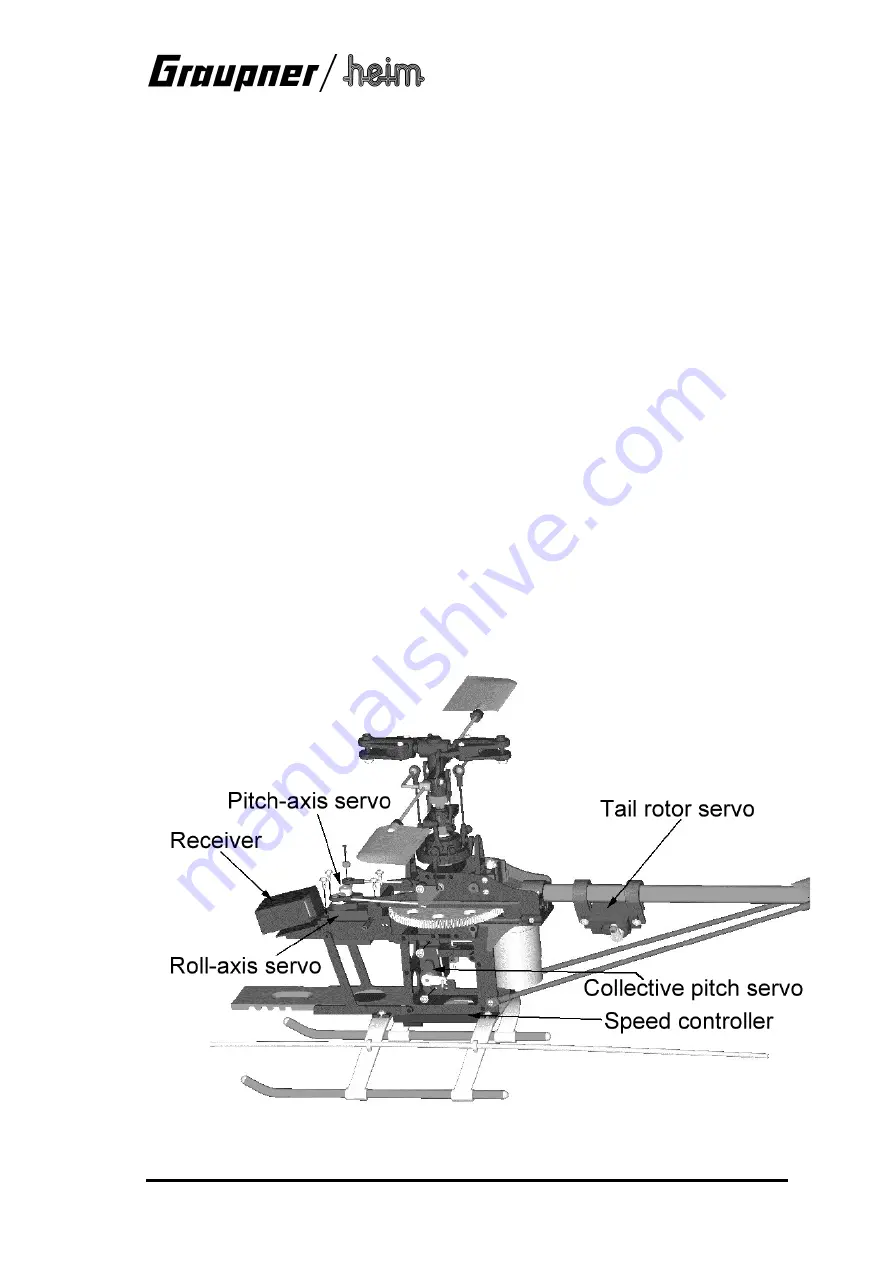
1.1 Installing the radio control system components

The arrangement of the radio control system components is shown in the illustration: The
servos are fixed to the chassis as shown in the drawing, using the screws supplied with them.

Summary of Contents for Micro Star 400

Page 1: ...model incl motor shaft driven tail rotor Warning The contents of this kit can be assembled to produce a working helicopter but the model is by no means a harmless plaything If assembled incorrectly o...

Page 2: ...ead Nevertheless a transmitter with special helicopter options mc 12 mc 24 obviously offers certain advantages The model s strong lightweight chassis consists of nylon components while the tail boom a...

Page 3: ...h are naturally subject to wear including gearbox components motor ball links etc and as a result it is absolutely essential to check and maintain the model regularly It is standard practice with full...

Page 4: ...parts for the task We have made every effort to point out to you the dangers inherent in operating this model helicopter Since neither we the manufacturer nor the model shop that sold you the kit have...

Page 5: ...nvested considerable effort in producing these instructions with the aim of ensuring that your model helicopter will fly reliably and safely Please take the trouble to follow the instructions step by...

Page 6: ...ontrol system equipped with special helicopter options or a micro computer radio control system such as the mc 12 mc 15 mc 19 mc mx 22 or mc 24 Servos C 121 micro servo Order No 5106 Gyro system PIEZO...

Page 7: ...smoothly and freely Shaft drive Loosen the screws which clamp the tail rotor housing to the tail boom and adjust the position of the tail rotor unit until there is barely detectable meshing clearance...

Page 8: ...ystem components including a receiver battery then switching on the transmitter and receiver Check that all sticks and trims are at centre The basic collective pitch setting is established by adjustin...

Page 9: ...Micro Star 400 v2 9 Adjust the position of the tail rotor servo until the tail rotor control lever is exactly at right angles to the tail boom when the servo is at neutral...

Page 10: ...connected to the system by a plug and socket This connection should be positioned for easy access even when the cabin is in place because the plug and socket serve as the ON OFF switch for the receiv...

Page 11: ...pitch is measured using the pitch gauge included in the kit The following table shows the recommended basic settings but the optimum values may well vary slightly according to your particular model a...

Page 12: ...ious sections no changes to the mechanical arrangements will be necessary The following adjustments can all be carried out at the transmitter 1 Servo direction Set the sense direction of rotation of a...

Page 13: ...otor control system and in order to achieve this effect the gyro elec tronics are connected between the tail rotor servo and the receiver The gyro systems recommended for the Micro Star 400 v2 either...

Page 14: ...ee clearly which blade is higher and which is lower The best method is to mark the blades with coloured tape as follows There are two alternative methods figure A shows the use of different colours on...

Page 15: ...lowing section therefore describes the procedure for assembling the model from its com ponent parts this may be important for subsequent maintenance and repair work 5 1 Assembling the model from compo...

Page 16: ...hing works smoothly and freely if not loosen the screws M by half a turn Belt drive version only Press the two bearings into the toothed belt drive bracket 4441 329 then fit the front belt pulley 4441...

Page 17: ...ttom then slide it into the washout unit and the slot in the main rotor shaft Slide the collective pitch pushrod 4441 334 into the main rotor shaft threaded end first and screw it into the slider P by...

Page 18: ...top collet Fit the collective pitch pushrod into the clamp of the collective pitch lever and tighten the clamping screw Ensure that full symmetrical control travel is available on both sides of the ce...

Page 19: ...hen screw the two housing shells together Install the bellcrank 4441 343 and the control bridge 4441 42 Each tail rotor blade 4441 41 is secured using an M2 screw with a ballrace fitted on it Fit the...

Page 20: ...wing check that they swivel freely The tail boom is installed as shown in the illustration below Undo the four retaining screws from the chassis and remove the bracket and front belt pulley Loosen the...

Page 21: ...10 It should be fixed in place either by lightly centre punching the outside of the tail boom on both sides of the bearing or gluing it in the boom Fit the rear flanged ballrace on the drive shaft 444...

Page 22: ...s directly on the chas sis this places the drive shaft in the correct position relative to the motor pinion Note The tail boom is located lower in the chassis than with the toothed belt version with t...

Page 23: ...replace the blades Internal blade damage may not be visible from the outside Never carry the model by the tail boom too firm a grip will easily deform the tail rotor pushrod 7 Some basic terms used i...

Page 24: ...the rotor This can cause what is known as a turbulent ring stage when the airflow over the blade airfoil breaks away The heli copter is then uncontrollable and will usually crash A high speed descent...

Page 25: ...der No 4495 4496 GRAUPNER GmbH Co KG D 73230 KIRCHHEIM TECK GERMANY Modifications errors and printing errors reserved ID 56503 12 05 Micro Star 400 v2 Summary of replacement parts Date of issue 12 200...

Page 26: ...or and pinion 1 4441 22 Main rotor shaft aluminium 1 4441 23 Main gear 1 4441 24 Hub and freewheel 1 4441 325 Bellcrank set pitch axis 1 4441 326 Battery holder aluminium 1 4441 329 Tail rotor drive b...

Page 27: ...landing gear 1 4441 410 Tail boom 10 mm CFRP 1 4441 420 Mechanics chassis CFRP aluminium 1 4441 122 Main rotor shaft steel 1 4441 125 Pitch axis bellcrank set aluminium 1 4441 130 Roll bellcrank set a...

Page 28: ...Micro Star 400 v2 4 Notes...

Reviews: