background image

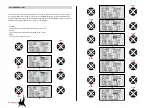
- If the optional sensors are attached, the telemetry voice functions of an attached optional 
sensors can be programmed. It is need to add the function for the optional sensor at SENSOR 
SELECT mode then VOICE TRIGGER article is created. Below is the example that VOICE TRIG-
GER article is created.

Press the direction button on transmitter home screen to go to receiver telemetry screen. 
Connect the optional sensors to receiver then press UP/DOWN button to check and program the 
desired optional sensors.

71

 20. The Programming Setup For Telemetry Sensors  

ENT

ESC

TEL

VIW

ENT

ESC

TEL

VIW

ENT

ESC

TEL

VIW

ENT

ESC

TEL

VIW

- RECEIVER
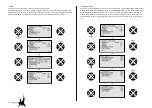
You may program the telemetry voice function of receiver, TEMP, STRENGTH, RX VOLT, LOW-
VOLT, Press DOWN buttons to go to RECEIVER line and press ENT button to access to RECEIV-
ER setup mode. All voice function of TEMP, STRENGTH, RX VOLT, LOWVOLT have been set to 
use. Press the direction button to select the desired line and press ENT button to unmark the box 
if you don’t want to use voice function for the desired line.

ENT

ESC

TEL

VIW

ENT

ESC

TEL

VIW

press

ENT

ESC

TEL

VIW

ENT

ESC

TEL

VIW

ENT

ESC

TEL

VIW

press

press

press

press

Summary of Contents for HOT TG/mz-12

Page 1: ...No S1002 OPERATING INSTRUCTION Prior to use please read this manual thoroughly Keep this manual in a convenient place for quick and easy reference...

Page 2: ...3 46P 46 47P 47P 47P 48P 48P 48 49P 49P 49P 49 50P 50 51P 51 52P 52 53P 53P 54P 54P 54 55P 55 57P 57 60P 60 63P 63P 64 67P 67 68P 68P 68 71P 71 73P 73 74P 8P 9P 9 10P 10P 11P 11 12P 12 13P 13 14P 14P...

Page 3: ...oduct features specifications running events and the newest product line up mz 12 HoTT Transmitter GR 16 Channel Receiver Manual 3 This is a sophisticated hobby product and NOT a toy It must be operat...

Page 4: ...PHONE DATA PIN CHARGE SOCKET TX HANDEL THRO TRIM NECKSTRAP LUG S4 SWITCH S2 SWITCH S1 SWITCH POWER SWITCH ELEV TRIM RUDD TRIM ANTENNA RF TRAINER SWITCH DIAL VOLUME S3 SWITCH THRO AILE STICK AILE TRIM...

Page 5: ...he transmitter 2 Unscrew the six Philips head screws that hold the transmitter s rear cover and remove the rear case 3 Using a Philips screw driver adjust the stick tension screw for the desired contr...

Page 6: ...ring in the throttle gimbal of mode 1 transmitter Tension spring Centering cam Centering cam 1 3 2 4 5 7 6 8 Unscrew the tension spring control bolt in the elevator gimbal of mode 1 transmitter Assemb...

Page 7: ...treme operating reliability and immunity to external interference thanks to optimized frequency hopping broad channel sequence Optional NiCd or NiMH 1 2 volt AA rechargeable 4 cell batteries can be us...

Page 8: ...transmitter before the receiver will operate Binding teaches the receiver the specific code of the transmitter so that it will only connect to it s correspond ing transmitter ENT ESC TEL VIW ENT ESC T...

Page 9: ...to the bind procedure 9 ENT ESC TEL VIW ENT ESC TEL VIW ENT ESC TEL VIW ENT ESC TEL VIW ENT ESC TEL VIW ENT ESC TEL VIW ENT ESC TEL VIW ENT ESC TEL VIW ENT ESC TEL VIW press press press press press p...

Page 10: ...h to clear then press the ENT button The popup message YES or NO appears on the screen Press the direction button to highlight YES then press the ENT button to clear the model The screen will return t...

Page 11: ...rake in the glider Tail type Use the Tail type functions to program the tail mix to match your airplane 4 tail types nor mal V tail delt flw 2elev sv appear are available Aile flap Use the Aile flap f...

Page 12: ...ottle stick s movement according to the programming Motor at C1 idel re The idle position of the throttle stick C1 is back toward the user if the throttle stick is not there the throttle warning messa...

Page 13: ...e re or idle fr is selected the cut off option is activated It turns off the internal combustion engine or the electric motor Press the ENT button to remove the highlight of the motor at C1 value then...

Page 14: ...not match to the others refer to the below table Press the direction button to select the aile flap line then press the ENT button to highlight the value Press the direction button to choose desired...

Page 15: ...ine then press the ENT button to highlight the value Press the direction button to select the desired value take off ther mal dist speed acro landing air tor test at quick2 and quick3 Press the ENT bu...

Page 16: ...odel type Press the ENT button to access the function The cursor is on the FLA value in the normal line then press the ENT and the direction buttons to highlight and adjust the desired value Press ENT...

Page 17: ...ally moved to the corresponding quick link value If the thermal quick link switch is ON the cursor is moved to the thermal quick link and the user can check the thermal quick link is ON If the speed q...

Page 18: ...ch min Use the pitch min function to reverse the servo direction in all of pitch elevator aileron and throttle channels the default value is rear Available settings are rear and front Aurtorotat You m...

Page 19: ...red posi tion and press the ENT button then adjusted value is applied The adjusted value is activated when the throttle stick is in that position NOTE the value of 150 is the throttle stick position w...

Page 20: ...n value Press the direction to select the desired value rear or front then press the ESC button to remove the highlight 20 Aurtorotat Press the direction button to select the autorotat line then press...

Page 21: ...ht Press the direction button to select the desired value then press the ENT button to remove the highlight Press the direction button to select the hyphen then press the ENT button The popup message...

Page 22: ...T button to remove the highlight The S2 S6 channels can be program in the same method with the S1 Cent Center Press the direction button to select the cent value in the S1 line then press the ENT butt...

Page 23: ...NT ESC TEL VIW ENT ESC TEL VIW ENT ESC TEL VIW ENT ESC TEL VIW ENT ESC TEL VIW ENT ESC TEL VIW ENT ESC TEL VIW ENT ESC TEL VIW ENT ESC TEL VIW press press press ENT ESC TEL VIW ENT ESC TEL VIW press p...

Page 24: ...channels Here is the example that the NO 3 switch is set Press the direction button to select the trv value then press the ENT button Both of value and value are simultaneously highlighted Press the...

Page 25: ...TEL VIW press press press press ENT ESC TEL VIW Cont sett Helicopter The basic setting of the Helicopter cont sett is NO 5 gyro NO6 Throttle Lim DV Digital volume Generally this function is seldom use...

Page 26: ...he maximum control response Negative exponential increase control sensitivity around neutral D R expo Press the direction button to highlight the D R expo then press the ENT button to access the funct...

Page 27: ...e servo outputs 1 to max 6 If you try to use more than 1 servos at the aileron or the elevator or the rudder the receiver output socket can be assigned as you intend Rx bind The receiver must be bound...

Page 28: ...Press the ESC button to remove the highlight then press the direction button to select the hyphen Press the ENT button then the popup message push desired switch onto position ON appears Move the swit...

Page 29: ...enter the binding mode Press the ENT button of the transmitter the system will be connected within a few seconds and the model name of the receiver is displayed on the screen after completing the bind...

Page 30: ...ch You can program the travel direction and range of the flap servos Brak aile When the air brake with the value of the motor at C1 being no or no inv is operated both aileron servos is simultaneously...

Page 31: ...to access the diff aile mixing then press the ENT button again to highlight the value Press the direction button to adjust the desired value then press the ESC button to remove the highlight Press th...

Page 32: ...ion button to select the ail flaps line and press the ENT button to highlight the value Press the direction button to adjust the desired value then press the ESC button to remove the highlight Press t...

Page 33: ...the ENT button The popup message push desired switch into position on appears Move the switch then the corresponding value appears The brak elev mixing is on off when the switch is moved Press the dir...

Page 34: ...ction button to select the brak flap line and press the ENT button to highlight the value Press the direction button to adjust the desired value then press the ESC button to remove the highlight Press...

Page 35: ...en the switch is moved Press the direction button to select other mixing Elev aile Press the direction button to select the elec aile line and press the ENT button to highlight the value Press the dir...

Page 36: ...irection button to select the flap aile line and press the ENT button to highlight the value Press the direction button to adjust the desired value then press the ESC button to remove the highlight Pr...

Page 37: ...n the high performance Gyro Tail lock or might be need to adjust the small value You can adjust the different value for each quick link Rudd thro This function is used to offset to fall down Helicopte...

Page 38: ...ed value Press the ESC button to return to the previous screen NOTE The default values of the point 2 and point 4 is remained not to be programmed so the deact is displayed at the value box You may ac...

Page 39: ...n to the previous screen NOTE The default values of the point 2 and point 4 is remained not to be programmed so the deact is displayed at the value box You may activate and adjust the desired value by...

Page 40: ...sired value Press the ESC button to return to the previous screen NOTE The default values of the point 2 and point 4 is remained not to be programmed so the deact is displayed at the value box You may...

Page 41: ...of Helicopter rotation is clockwise rudd thro function is only operated when rudd is moved to the right side and if the direction of Helicopter rotation is unclockwise rudd thro function is only oper...

Page 42: ...ton to select the swash lim mixing then press the ENT button to access the function off of the swash lim value is highlighted Press the direction button to adjust the desired the gain then press the E...

Page 43: ...the trv line Press the direction button to adjust the desired value Both values are adjusted simultaneously and appeared in the diagram 9 free mixer Aircraft and Helicopter The free mixer allows to se...

Page 44: ...SC TEL VIW ENT ESC TEL VIW ENT ESC TEL VIW ENT ESC TEL VIW ENT ESC TEL VIW ENT ESC TEL VIW ENT ESC TEL VIW ENT ESC TEL VIW ENT ESC TEL VIW ENT ESC TEL VIW ENT ESC TEL VIW ENT ESC TEL VIW press press p...

Page 45: ...o highlight the ASY from the SYM then press the ENT button to highlight the trv value in the right Move the stick of the master channel then you can select the trv value in the right side or left side...

Page 46: ...ow travel range of the swashplate and prevent from the mechani cal interference of the linkage Press the direction button to highlight the swqashp mix then press the ENT button to access the function...

Page 47: ...iMH and LiPo are available Batt warning When the transmitter voltage drops below the preset voltage the transmitter beeps the alarm to warn the low battery Touch sense The touch sense is used for adju...

Page 48: ...me method is used to access the function and adjust the value with Batt type programming Contrast The same method is used to access the function and adjust the value with Batt type programming ENT ESC...

Page 49: ...IW ENT ESC TEL VIW ENT ESC TEL VIW ENT ESC TEL VIW ENT ESC TEL VIW ENT ESC TEL VIW ENT ESC TEL VIW ENT ESC TEL VIW press press RF country The same method is used to access the function and adjust the...

Page 50: ...ume The same method is used to access the function and adjust the value with Batt type program ming ENT ESC TEL VIW ENT ESC TEL VIW ENT ESC TEL VIW ENT ESC TEL VIW ENT ESC TEL VIW ENT ESC TEL VIW ENT...

Page 51: ...the NO 1 channel indicating NO 1 channel is selected and the Hold the default mode is assigned Press the direction button to select the channel and press the ENT button to select the F S or the hold...

Page 52: ...the ENT button to select the T Teacher or P Pupil After completing to select the desired mode in all channels press the direction button to select the hyphen Press the ENT button then the popup messa...

Page 53: ...button to access the information you can check the displayed information 53 ENT ESC TEL VIW ENT ESC TEL VIW ENT ESC TEL VIW ENT ESC TEL VIW ENT ESC TEL VIW ENT ESC TEL VIW ENT ESC TEL VIW ENT ESC TEL...

Page 54: ...ry sensors This function allows you to get the data information on receiver 16 SETTING DATA VIEW 16 1 RX DATA VIEW 54 ENT ESC TEL VIW ENT ESC TEL VIW ENT ESC TEL VIW ENT ESC TEL VIW press Telemetry is...

Page 55: ...T button to highlight the value and press UP DOWN buttons to set the desired value Press ENT button to remove the highlight 16 2 RX SERVO REVERSE It is used to decide the direction of servo rotation P...

Page 56: ...ESC TEL VIW ENT ESC TEL VIW ENT ESC TEL VIW press press CENTER The value of servo center in the selected channel at OUTPUT CH can be programmed The center value depends on transmitter throttle and tri...

Page 57: ...y useful For example 4 aile 4 flap are used in aircraft 1 4 channels can be set to aile and 5 8 channels can be set to flap and then other channels can be set to elev or rudd Press the direction butto...

Page 58: ...efault value HOLD Press UP DOWN button to select the desired value then press ENT button to remove the highlight 58 ENT ESC TEL VIW ENT ESC TEL VIW ENT ESC TEL VIW ENT ESC TEL VIW ENT ESC TEL VIW pres...

Page 59: ...LAY This function allows you to set the time that failsafe takes to start under failsafe situation Press DOWN button to access to DELAY line then press ENT button to highlight the default value 0 75se...

Page 60: ...H ENT ESC TEL VIW FAIL SAFE ALL It is used when you change failsafe position value of all channels You need set all channels to FAIL SAFE to use this function Press DOWN button to access to FAIL SAFE...

Page 61: ...VE CH Slave CH in FREE MIXER can be selected Press DOWN button to access to SLAVE CH line then press ENT button to highlight the default value 00 Press UP DOWN button to select the desired channel the...

Page 62: ...ove the highlight 62 ENT ESC TEL VIW ENT ESC TEL VIW ENT ESC TEL VIW press ENT ESC TEL VIW ENT ESC TEL VIW ENT ESC TEL VIW press ENT ESC TEL VIW ENT ESC TEL VIW press ENT ESC TEL VIW press S TRAVEL Th...

Page 63: ...n CURVE 1 CH line then press UP DOWN buttons to select the desired channel The default setup is CH2 AILE CH3 ELEV CH4 RUDD Press ENT button to remove the highlight and press UP DOWN button to access T...

Page 64: ...ver power the max min tempera ture of receiver CH OUT TYPE of receiver Press UP DOWN buttons to select the desired line and press ENT button then the default value is highlighted Press UP DOWN buttons...

Page 65: ...TEMP Temperature warning If receiver temperature is out of the preset temperature transmitter repeats a beep warning Press DOWN buttons to access to ALARM TEMP and press ENT button then the default va...

Page 66: ...el is the last channel of receiver and you may change it SUMO Only the selected channel outputs the signal of all channels of receiver In case that 1 receiver is set to SUMO and the other receiver is...

Page 67: ...ENT button to access the func tion Press DOWN button to select one of RECEIVER GENERAL MODULE ELECTRIC AIR MOD VARIO MODULE GPS ESC and press ENT button to mark the box The marked function is activat...

Page 68: ...REPEAT is highlighted Press UP DOWN buttons to set the desired value and press ENT button to remove the highlight Press the direction button to highlight the hyphen mark then press ENT button The pop...

Page 69: ...d as TRIG on off that switch is designated as TRIG on off After all process the next voice function is accessed whenever the switch is on If the switch that has spring such as S2 is designated as TRIG...

Page 70: ...e box if you don t want to use voice function for the desired line ENT ESC TEL VIW ENT ESC TEL VIW ENT ESC TEL VIW press ENT ESC TEL VIW press ENT ESC TEL VIW ENT ESC TEL VIW ENT ESC TEL VIW press ENT...

Page 71: ...e desired optional sensors 71 20 The Programming Setup For Telemetry Sensors ENT ESC TEL VIW ENT ESC TEL VIW ENT ESC TEL VIW ENT ESC TEL VIW RECEIVER You may program the telemetry voice function of re...

Page 72: ...T ESC TEL VIW ENT ESC TEL VIW ENT ESC TEL VIW ENT ESC TEL VIW ENT ESC TEL VIW ENT ESC TEL VIW ENT ESC TEL VIW ENT ESC TEL VIW ENT ESC TEL VIW ENT ESC TEL VIW ENT ESC TEL VIW press press press press pr...

Page 73: ...10 EN 60950 1 2006 A11 2009 A1 2010 A12 2011 EN 301 489 1 V1 9 2 EN 301 489 17 V2 2 1 EN 300 328 V1 7 1 FCC Information Graupner SJ mz 12 Transmitter Contains FCC ID SNL 36204210 FCC 47 CFR PART 15C F...

Page 74: ...000 4 2 2008 KN 61000 4 3 2011 Caution This equipment s aerial must be at least 20 cm from any person when the system is in use We therefore do not recommend using the equipment at a closer range than...

Page 75: ...No S1002...

Reviews: