background image

6 – 2

6.1 Rotating the Coordinate Axes

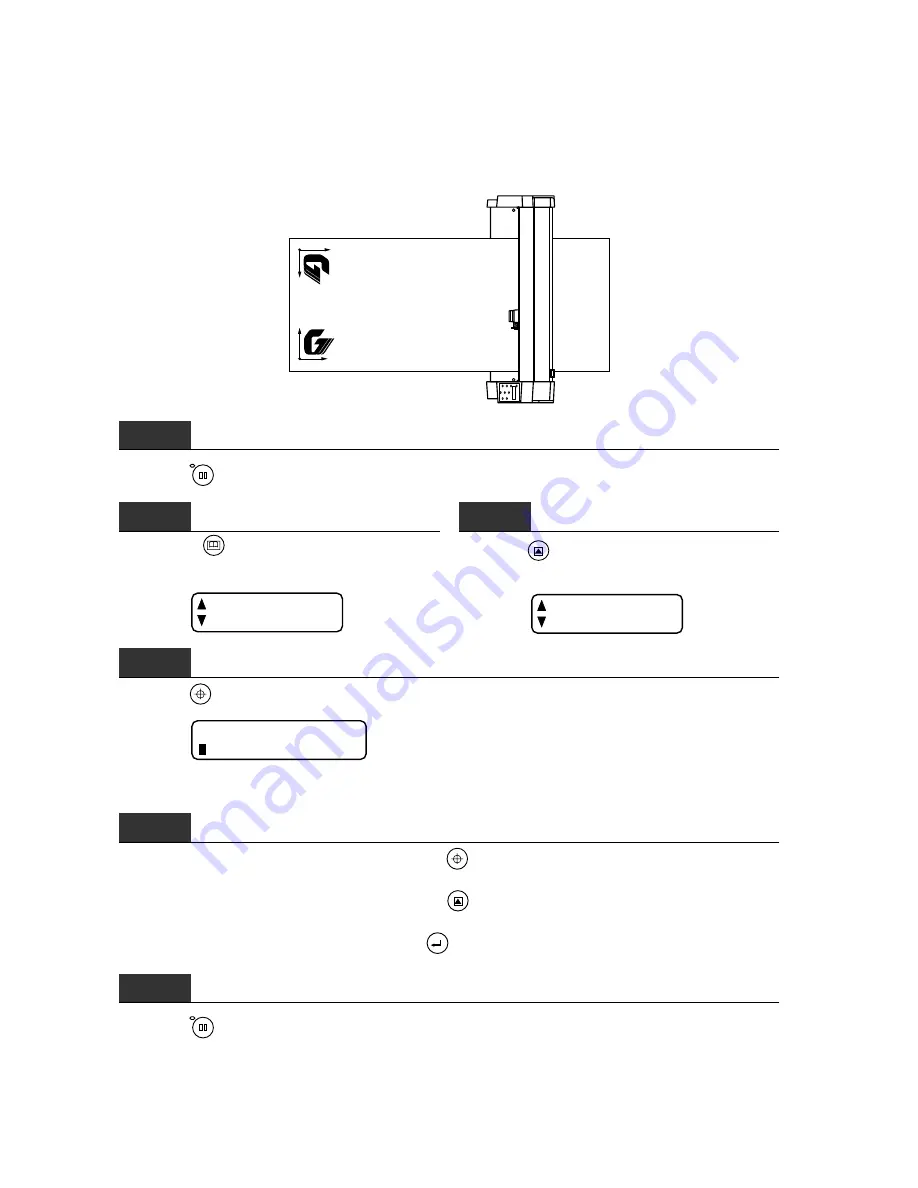
The ROTATE function allows you to rotate the initial cutting point and the coordinate system as shown
in the figure below. The ROTATE setting is retained in the cutting plotter’s internal memory, even while
the cutting plotter is turned off.

X

Y

Y

X

When the ROTATE setting is ON

When the ROTATE setting is OFF

Step 

1

Press the 

PAUSE

 key to enter the PAUSE mode.

Step 

2

Press the 

NEXT PAGE

 key until the menu below ap-

pears.

FILM
FUNCTIONS

Step 

3

Press the 

F2/TEST

 key (FUNCTIONS) to display

the menu below.

ROTATE
COPY

Step 

4

Press the 

F1/ORIGIN

 key (ROTATE) to display the menu below.

 ON     ROTATE

OFF

The flashing cursor indicates the currently selected ROTATE setting.

Step 

5

To switch the ROTATE setting to ON, press the 

F1/ORIGIN

 key (ON) to move the cursor to the ON

position.

To switch the ROTATE setting to OFF, press the 

F2/TEST

 key (OFF) to move the cursor to the OFF

position.

After selecting the desired setting, press the 

ENTER

 key to register your setting.

Step 

6

Press the 

PAUSE

key to cancel the PAUSE mode.

Summary of Contents for CE200-120

Page 1: ...CE2000 60 120 USER S MANUAL MANUAL NO CE2060 UM 151 CUTTING PLOTTER...

Page 2: ...ior written permission of Graphtec Corporation The specifications and other information in this manual are subject to change without notice While every effort has been made to provide complete and acc...

Page 3: ...DANGER This category provides information that if ignored is highly likely to cause fatal or serious injury to the operator WARNING This category provides information that if ignored is likely to cau...

Page 4: ...ting plotter Such action may cause electrical shock or a fire hazard due to current leakage Contact with the high voltage parts within the cutting plotter may cause electrical shock If the cutting plo...

Page 5: ...perform repair yourself Repair work by inexperi enced personnel is extremely dangerous Do not allow dust or metallic matter to adhere to the power plug A dirty power plug may result in electrical sho...

Page 6: ...xcessive mechanical vibration or electrical noise Such location may impair the performance of the cutting plotter When disconnecting the power cord or an interface cable do not pull on the cord cable...

Page 7: ...or lighting such as a fluorescent lamp or an electrical lamp provide a distance of at least one meter between the cutting plotter and the light source Closer proximity of such a light source may cause...

Page 8: ...ause harmful interference to radio communications However there is no guarantee that interference will not occur in a particular installation If this equipment does cause harmful interference to radio...

Page 9: ...d and used in accordance with the instruction manual may cause harmful interference to radio communications Operation of this equipment in a residential area is likely to cause harmful interference in...

Page 10: ...125 V NEMA 5 15 10 A UL498 817 62 Type SJT CSA22 2 No 18AWG 3 NO 42 21 49 300 V 10 A Europe CEE 7 VII TYPE H05VV F 250 V IEC320 3 1 0 mm2 10 A CEE13 UK BS1363 TYPE H05VV F 250 V BS4491 3 1 0 mm2 5 A B...

Page 11: ...1 3 4 2 Selecting the STEP SIZE or ORIGIN POINT 3 12 3 4 3 Selecting the Interface Conditions 3 13 4 PREPARING FOR A CUTTING OPERATION 4 1 Types and Features of Cutter Blades 4 2 4 2 Replacing the Cut...

Page 12: ...ANGLE 7 4 7 4 Selecting the STEP PASS 7 5 8 USING THE SPECIAL FUNCTIONS 8 1 Description of the Special Functions 8 2 8 2 Specifying the Special Functions 8 4 9 TROUBLESHOOTING PROCEDURES 9 1 Printing...

Page 13: ...1 1 INTRODUCTION 1 1 Overview 1 2 1 2 Standard Accessories 1 2 1 3 Assembling Your Plotter CE2000 120 1 3...

Page 14: ...lotter check that the standard accessories listed below are all present If an accessory is missing please promptly contact your sales representative or nearest Graphtec vendor CE2000 60 120 OPERATION...

Page 15: ...r 3 onto the R side foot 1 and L side foot 2 NOTE At such time loosely fasten the hexagon bolts 2 Place the CE2000 120 main unit onto the stand then secure it in place using hexagon bolts NOTE While a...

Page 16: ...1 4 7 8 6 E Ring 3 After passing each roll shaft 4 through a stopper 7 and plastic hexagon screw 8 mount each roll shaft as shown in the figure above to complete the assembly procedure...

Page 17: ...2 2 NAMES OF THE MAIN PARTS 2 1 Front View 2 2 2 2 Rear View 2 3 2 3 Control Panel 2 4...

Page 18: ...e medium forward or backward Push rollers Pushes the medium against the grit rollers Pen holder Holds the cutter pen and moves it up and down Medium set lever Raises or lowers the push rollers when lo...

Page 19: ...upply to the cutting plotter CE2000 120 AC power inlet Connects one end of the power cord to the cutting plotter Power switch Controls the on off status of the power supply to the cutting plotter Stop...

Page 20: ...Press this key when you wish to discontinue cutting or plotting or set functions at menus on the display panel ENTER After setting a cutting or plotting condition press this key to register the setti...

Page 21: ...er 3 3 3 3 Loading the Medium 3 4 3 3 1 Loading a Roll Medium 3 4 3 3 2 Loading Single Sheets 3 8 3 4 Selecting the COMMAND Mode and INTERFACE Conditions 3 11 3 4 1 Selecting the COMMAND Mode 3 11 3 4...

Page 22: ...rface cable Obtain a Graphtec authorized interface cable that is compatible with your computer and can be connected to either the computer s printer or serial port The interface cables are optional Ce...

Page 23: ...sure to ground the cutting plotter Step 3 Turn on the cutting plotter by pressing the side of its Power switch the control panel s POWER lamp lights Step 4 If no medium has been loaded the message be...

Page 24: ...he cutting plotter so it emerges from the front while making sure to remove any slack in the medi um s conveyance path NOTE Load the medium so that it passes over the media sensor Media sensor Step 3...

Page 25: ...Step 6 If the cutting plotter has already been turned on when the push rollers are lowered by raising the media set lever a menu for selecting the media mode appears Select the media mode ROLL 1 or RO...

Page 26: ...nd the side edges of the medium itself the medium may ride over the stoppers when the remaining supply of the medium runs low When using this type of medium be sure to replace it with a new roll right...

Page 27: ...oller on the right This message also appears if the left pinch roller is not positioned over a grit roller or is positioned over the wider grit roller on the right Check that the right pinch roller is...

Page 28: ...ware at the computer 3 3 2 Loading Single Sheets CE2000 60 Step 2 While using the front and rear medium alignment scales as guidelines load one sheet of the medium so that its leading and trailing are...

Page 29: ...ft push rollers to suit the width of the medium Position each push roller at its corresponding edge of the medium so that it is above the grit roller Move the push rollers so that they are positioned...

Page 30: ...wider grit roller on the right and that the left pinch roller is positioned over a grit roller other than the wider one on the right Step 4 If the cutting plotter has already been turned on when the...

Page 31: ...indicates the currently selected command mode Step 5 To select the GP GL command mode press the F1 ORIGIN key To select the HP GL command mode press the F2 TEST key When the cursor appears in front of...

Page 32: ...ft so change this setting if your application specifies a different origin position Step 1 At the menu shown in Step 3 press the NEXT PAGE key If the COMMAND setting is GP GL the menu below appears ST...

Page 33: ...y INTERFACE to display the menu below RS 232C COMMAND Step 4 Press the F1 ORIGIN key RS 232C to display the menu below RS 232C 960 N 8 H The parameter which can be changed is indicated by the blinking...

Page 34: ...Length 4 2 4 3 Mounting the Cutter Pen Plunger 4 5 4 4 Setting the Cutting Conditions 4 6 4 4 1 Selecting a Set of Cutting Conditions 4 7 4 4 2 Specifying the Cutting FORCE 4 8 4 4 3 Specifying the C...

Page 35: ...mm Max cutting distance approx 4 000 m CB15U 1 5 mm diameter PHP32 CB15N Capable of cutting thicker film than possible Supersteel 0 75 mm offset with the CB09UA blade Suitable for cutting film with a...

Page 36: ...dia blades Plunger for 0 9 mm dia blades Step 2 Turn the plunger cap in the counter clockwise direction to remove it from the plunger Step 3 Remove the blade from inside the plunger cap In the case of...

Page 37: ...ve the blade When the knob is turned the distance of one scale unit the blade moves about 0 1 mm A full turn of the knob moves the blade about 0 5 mm B A Step 2 First of all align the blade s tip with...

Page 38: ...below Step 1 Loosen the pen holder s screw and then mount the cutter pen plunger into the pen holder Be sure to press the plunger in firmly so that it contacts this surface Step 2 When the cutter pen...

Page 39: ...ype Thickness mm Blade used FORCE SPEED QUALITY Film for outdoor signs 0 05 to 0 08 CB09UA 10 to 14 30 or less 2 Film for point of 0 08 to 0 10 CB09UA 14 to 17 30 or less 2 purchase signs Transparent...

Page 40: ...COND Nos 1 through 4 To specify a set of cutting conditions you must first select the destination COND No By selecting a different COND No you can easily switch between pre defined cutting conditions...

Page 41: ...tatus and then press the F2 TEST key to display the menu below TEST CUT PEN SETTINGS Step 2 Press the F2 TEST key PEN SETTINGS again to display the menu below SPEED PEN FORCE Step 3 Press the F2 TEST...

Page 42: ...2 Press the F2 TEST key PEN SETTINGS again to display the menu below SPEED PEN FORCE Step 3 Press the F1 ORIGIN key SPEED to display the menu below SPEED 30 cm s At the above menu use the or key to ch...

Page 43: ...g conditions check that the cutting plotter is in READY or PAUSE status and then press the F2 TEST key to display the menu below TEST CUT PEN SETTINGS Step 2 Press the F2 TEST key PEN SETTINGS again t...

Page 44: ...e above menu use the or key to switch the QUALITY setting between 1 and 2 CE2000 120 NOTE The 2 setting can only be selected when the SPEED setting ranges from 1 through 30 cm s When the SPEED setting...

Page 45: ...or PAUSE status and then press the F2 TEST key to display the menu below TEST CUT PEN SETTINGS Step 3 Use the POSITION keys to move the cutter pen to the position from which you wish to initiate the...

Page 46: ...g the Initial Cutting Position Origin Point 5 2 5 2 Moving the Pen Carriage in 100 mm Steps 5 3 5 3 Clearing Data from the Internal Memory 5 3 5 4 Raising and Lowering the Pen 5 4 5 5 Feeding the Medi...

Page 47: ...e coordinate axes have been rotated movement of the origin point conforms to the figure below New origin Original origin When the Coordinate Axes are Rotated After Moving the Origin Point When the coo...

Page 48: ...Clearing Data from the Internal Memory This function clears the cutting plotter s internal memory of data that was sent from the computer Use this function when you wish to discontinue a cutting oper...

Page 49: ...raise or lower the pen Step 1 Press the PAUSE key to enter PAUSE status Step 2 Press the NEXT PAGE key until the menu below appears INTERFACE PEN UP DOWN At this menu press the F2 TEST key once to lo...

Page 50: ...he FEED operation The distance can be specified in a range of 1 m to 50 m Step 4 When the desired value is displayed press the ENTER key to initiate the FEED operation the film is advanced out of the...

Page 51: ...PAGE keys to display the menu below PEN UP SPEED OFFSET FORCE Step 4 Press the NEXT PAGE key until the menu below appears TEST LENGTH UNIT Step 5 At this menu press the F2 TEST key LENGTH UNIT to disp...

Page 52: ...6 2 Using the COPY Function 6 3 6 3 Enabling the AUTO PRE FEED Mode 6 5 6 4 Adjusting the Distance Precision 6 6 6 5 Aligning the Coordinate Axes 6 7 6 6 Specifying the Page Length 6 9 6 7 Specifying...

Page 53: ...PAGE key until the menu below ap pears FILM FUNCTIONS Step 3 Press the F2 TEST key FUNCTIONS to display the menu below ROTATE COPY Step 4 Press the F1 ORIGIN key ROTATE to display the menu below ON RO...

Page 54: ...cutter pen to the desired origin of the starting position for cutting plotting by the COPY operation Step 3 Press the PAUSE key to enter the PAUSE mode Step 4 Press the NEXT PAGE key until the menu b...

Page 55: ...ion as close as possible to the effective cutting area s origin If the cutting plotter receives another set of data during a COPY operation the COPY operation cannot be properly completed because the...

Page 56: ...ess the NEXT PAGE key once to display the menu below AUTO PRE FEED Step 4 Press the F1 ORIGIN key AUTO PRE FEED to display the menu below ON PRE FEED OFF Step 5 To enable the AUTO PRE FEED mode press...

Page 57: ...Step 3 Press the F1 ORIGIN key FILM to display the menu below AXIS ADJ DIST ADJ Step 4 Press the F2 TEST key DIST ADJ to display the menu below X 0 00 DIST Y 0 00 ADJ To correct the distance along th...

Page 58: ...ine indicating the X axis line are plotted near the boundaries of the effective cutting area the resulting AXIS ADJ settings may be outside of the effective cutting area such that the coordinate axes...

Page 59: ...he ENTER key to initiate calculation of the angle of the tilt of X axis and to re align the coordinate axes Step 7 Press the PAUSE key to cancel the PAUSE mode The AXIS ADJ function ADJ PT 2 any point...

Page 60: ...ge the numeric value of the digit selected by the cursor Step 6 When the displayed setting is satisfactory press the ENTER key to register your setting Step 7 Press the PAUSE key to cancel the PAUSE m...

Page 61: ...cify the cutting area the origin point is also repositioned in accordance with the movement of the cutting area The previously cut figure Cutting will only be done in this area Position of the L L set...

Page 62: ...T U R 0 0 Use the POSITION keys to move the carriage to the upper right corner of the desired cutting area When the carriage is satisfactorily positioned press the ENTER key If you wish to use the def...

Page 63: ...quare cursor indicates the currently selected EXPAND setting Step 5 To enable the EXPAND mode press the F1 ORIGIN key to move the blinking cursor to the ON position To disable the EXPAND mode press th...

Page 64: ...7 7 USING THE EXTENDED FUNCTIONS 7 1 Specifying the PEN UP SPEED 7 2 7 2 Specifying the OFFSET FORCE 7 3 7 3 Specifying the OFFSET ANGLE 7 4 7 4 Selecting the STEP PASS 7 5...

Page 65: ...ikely to become jammed Step 1 Press the PAUSE key to enter PAUSE mode Step 2 Press the NEXT PAGE key until the menu below appears INTERFACE PEN UP DOWN Step 3 Simultaneously press the ENTER and NEXT P...

Page 66: ...lar thickness Step 1 Press the PAUSE key to enter PAUSE mode Step 2 Press the NEXT PAGE key until the menu below appears INTERFACE PEN UP DOWN Step 3 Simultaneously press the ENTER and NEXT PAGE keys...

Page 67: ...tep 1 Press the PAUSE key to enter PAUSE mode Step 2 Press the NEXT PAGE key until the menu below appears INTERFACE PEN UP DOWN Step 3 Simultaneously press the ENTER and NEXT PAGE keys to display the...

Page 68: ...SS setting to 0 Step 1 Press the PAUSE key to enter PAUSE mode Step 2 Press the NEXT PAGE key until the menu below appears INTERFACE PEN UP DOWN Step 3 Simultaneously press the ENTER and NEXT PAGE key...

Page 69: ...8 8 USING THE SPECIAL FUNCTIONS 8 1 Description of the Special Functions 8 2 8 2 Specifying the Special Functions 8 4...

Page 70: ...and When the COMMAND setting is HP GL When the COMMAND setting is HP GL this function determines how the cutting plotter responds to the receipt of the OI command for requesting the model ID When 7550...

Page 71: ...n of the media sensors is enabled When OFF is selected the operation of the media sensors is disabled The default setting is ON 8 Enabling Disabling the HOME SENSORs This function enables or disables...

Page 72: ...n satisfactorily set turn off the cutting plotter Step 1 While holding down the key turn on the cutting plotter The menus for setting the special functions will appear at the display panel Step 2 Depe...

Page 73: ...2 9 2 Running a SELF TEST 9 4 9 3 Using the DUMP Mode 9 5 9 4 Cutting the Demo Pattern 9 7 9 5 The Plotter is Turned On But Doesn t Operate 9 8 9 6 Mechanical Error Messages and Their Causes 9 8 9 7 C...

Page 74: ...tep 4 Press the NEXT PAGE key until the menu below appears INTERFACE PEN UP DOWN Step 5 Simultaneously press the ENTER and NEXT PAGE keys to display the menu below PEN UP SPEED OFFSET FORCE Step 6 Pre...

Page 75: ...WN PEN DOWN PROGRAM PROGRAM 2mm BELOW 2mm BELOW 1 1 MODEL EMULATED MODEL EMULATED PEN UP MOVE PEN UP MOVE HOME SENSOR HOME SENSOR PAPER SENSOR PAPER SENSOR 7550 7550 DISABLED DISABLED ON ON ON ON HP G...

Page 76: ...below ap pears INTERFACE PEN UP DOWN Step 5 Simultaneously press the ENTER and NEXT PAGE keys to display the menu below PEN UP SPEED OFFSET FORCE Step 6 Press the NEXT PAGE key until the menu below ap...

Page 77: ...r of at least A4 size in the cutting plotter Step 3 Press the PAUSE key to enter the PAUSE mode Step 4 Press the NEXT PAGE key until the menu below ap pears INTERFACE PEN UP DOWN Step 5 Simultaneously...

Page 78: ...plotter off then back on again NOTE InDUMPmode allofthedatareceivedbythecuttingplotterfromthecomputerisprinted out as ASCII character codes or as two digit hexadecimal control codes Upon receipt ofaR...

Page 79: ...EN UP DOWN Step 5 Simultaneously press the ENTER and NEXT PAGE keys to display the menu below PEN UP SPEED OFFSET FORCE Step 6 Press the NEXT PAGE key until the menu below ap pears TEST LENGTH UNIT St...

Page 80: ...f the pen carriage is being obstructed The pen carriage was subjected to external pressure during cutting Film scraps stuck in the film s moving parts are impeding plotter operation Turn off the plott...

Page 81: ...y Configure the software to drive your plotter Ensure that the software s interface conditions are cor rectly set Ensure that the plotter s in terface conditions are set to match those of the soft war...

Page 82: ...er s in terface conditions are set to match those of the soft ware A command was received with an incorrectly specified delimiter The software configuration regard ing the output device has been chang...

Page 83: ...cified A command was executed with co ordinate data that exceeds the effec tive cutting plotting area The data being input exceeded the capacity of the plotter s download able character buffer polygon...

Page 84: ...s incom patible with the blade type being used The cutting SPEED is too high The blade is dull The QUALITY setting is too high The blade is extended too far The cutting FORCE is too high The retack sh...

Page 85: ...putersentcoordinatedata that exceeds the maximum effec tive cutting area The Parameter Priority setting is set to program mode The ENTER key was not pressed after changing the settings The plotter is...

Page 86: ...grit roller or is po sitioned over the wider grit roller on the right The Step Pass is too high Coordinate points are incorrectly specified The Offset Cut Pressure is too low The film is too flimsy Bl...

Page 87: ...APPENDIX APPENDIX A 1 Main Specifications A 2 A 2 Options and Supplies A 3 A 3 External Dimensions A 4 A 4 Menu Tree A 6...

Page 88: ...pen Compatible cutter type Supersteel blades Compatible pen type Water based fiber tip pens Compatible cutting media Marking film polyvinyl fluorescent or reflective film with a maximum thickness of...

Page 89: ...ter holder PHP32 CB09N 1 holder for the supersteel blade of 0 9 mm diameter PHP32 CB15N 1 holder for the supersteel blade of 1 5 mm diameter Cutter blade CB09UA 5 Set of 5 supersteel blades of 0 9 mm...

Page 90: ...A 4 227mm 226 5mm 278mm 280mm 851mm A 3 External Dimensions CE2000 60 CE2000 120 Dimensional precision 5 mm error 656 1189 1489 1333...

Page 91: ...A 5 CE2000 120 with optional basket 1494 1333 1189 820...

Page 92: ...NDITIONS CONDITIONS SELF TEST SELF TEST TEST TEST LENGTH UNIT LENGTH UNIT mm LENGTH mm LENGTH inch UNIT inch UNIT DUMP DUMP CUT DEMO CUT DEMO SPEED SPEED 30 cm s 30 cm s PEN FORCE PEN FORCE 14 14 CUTT...

Page 93: ...function 4 12 Cutting area setting the 6 9 Cutting conditions Setting procedure 4 7 Printing a list of 9 2 Cutting data 6 3 Cutting mat 2 2 Cutting results are unsatisfactory 9 12 D Data length 3 13...

Page 94: ...unction 6 10 Plunger cap cutter pen s 4 3 Power switch 2 3 Push rollers 2 2 3 4 Q QUALITY cutting 4 6 4 11 Setting procedure 4 11 R Roll medium loading a 3 4 ROTATE function 6 2 Rotating the coordinat...

Reviews:

Related manuals for CE200-120