CAUTION
: While it is possible for one person to assemble this grill, obtain assistance from another person
when handling some of the larger, heavier pieces.
22
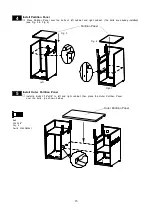
CAUTION:
Build your grill island before installing the LP Gas Tank and Partition Panel (Not included in this
unit). Refer to the heights listed
on step 6
for constructing your grill island.
Make sure a set of doors is
installed in your Island so that the Control Box can be accessed. An island unit is not included with the
purchase of your Grill Head.
Note: Press the Switch Button to turn on the LED Light Controller
before using the grill. Press it again to turn off the LED Light
Controller to save battery power when the grill is not in use.
Switch Button OFF
Switch Button ON
Cap of LED
Light controller
Pan Head Screw
3/16"x3/8"
Qty. 2
Part # S182G03061
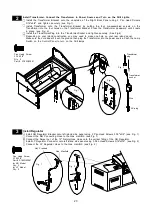
Set Grill Head into the Island. Install Control Box and Batteries
1
Raise the Grill Bowl and put the Control Box into the inside of the Island, then set Grill Bowl into the
Island. (the Island not included) (as shown below)
Open your Island Door, align the Control Box onto the right underside of the Grill Head. (as show below)
Install 2 Pan Head Screws 3/16"x3/8" and tighten securely.
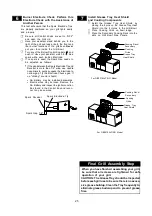
Remove Caps from Control Panel and Control Box. Place 1 AA battery into the slot of the Control Panel
and 4 AAA batteries into the slot of the Control Box as shown below.
Note:
The positive pole of the AA battery must face towards the cap. For the AAA batteries, 2 batteries
must have the positive pole facing towards the cap and 2 batteries must have the negative poles facing
away from the caps.
Position the caps onto the slots, and tighten securely.
Cap
AAA Batteries
Slot
-
+
Assembly Instructions for OB2610ALP/NG & OB3210ALP/NG
Under Grill
Head
AA Battery
Control Panel
Control Box
+
-

