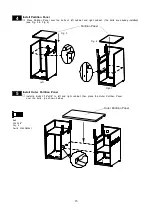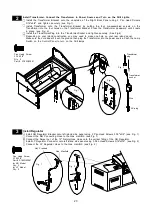
Install Control Box, Partition Panel, Tansformer and Batteries
Install Control Box:
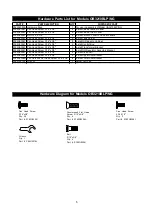
Align the holes in the Control Box bracket with the holes in the right cabinet using 2 Pan Head
Screws 3/16"x3/8" and tighten securely. (see Fig. 1)
Install Partition Panel:
Place Partition Panel with Transformer Bracket over the bolts of the right
cabinet.(similar to step 4)
Install Transformer:
Install Transformer onto the Transformer Bracket by putting the four pre-assembled screws
on the Transformer into the four holes on the Transformer Bracket. Press the Transformer downward until
the screws rest in place. (see Fig. 2)
Install Transformer-Plug into Transformer-Socket and tighten securely. (See Fig.3)
Plug the Transformer into the power source. Push the Lamp Switch on the Control Panel to turn on the Grill
lamps.
Install Batteries:
Place 1 AA battery into the slot of the Control Panel and 4 AAA batteries into the slot of
the Control Box as show below. Position the caps onto the slots, and tighten securely.
Note
: The positive pole of the AA battery must face towards the cap. For the AAA batteries, 2 batteries must
have the positive pole facing towards the cap and 2 batteries must have the negative poles facing away from
the caps.)
8
17
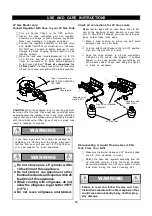
Note: Press the Switch Button to turn on the LED Light
Controller before using the grill. Press it again to turn
off the LED Light Controller to save battery power
when the grill is not in use.
Switch Button OFF
Switch Button ON
Cap of LED
Light controller
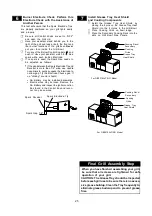
Pan Head Screw
3/16"x3/8"
Qty. 2
Part # S182G03061
AAA Batteries
Slot
Control Box
Fig. 2
Transformer-plug
Transformer-socket
Cap of LED
Light controller
Fig. 3
Fig. 1
- +
-
AA Battery
Lamp Switch
Control Panel
+
Ignitor Slot
Ignitor Cap
Transformer
AC-plug


