-12-
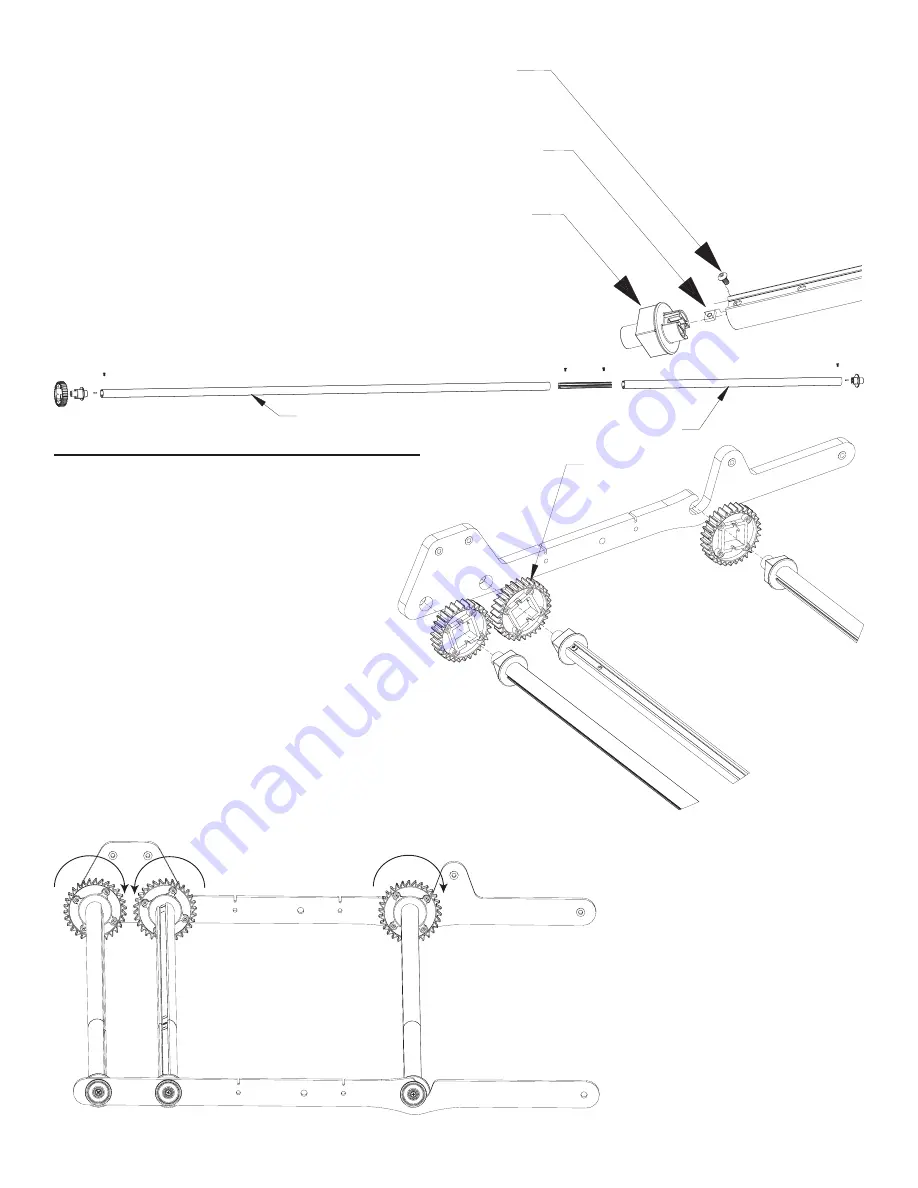
Queen Size Rail
64" Rail
34" Rail
#10 Socket Head Screw
#10 Square Nut
Square End Cap
Fig. 7-2
Fig. 7-3
Ratchet Wheel
7-3:
Next, secure the end cap to
the rail by inserting a #10 socket
head screw through the hole
in the rail and into the square
nut in the end cap, (tighten
completely).
7-4:
Follow the above instructions to put
the rest of the round end caps on the 64”
Rails.
7-5:
Follow the above instructions again,
this time attatching the square end caps to
the other end of the rails.
Step 8: Rail to Pole Mount End Assembly
Parts Needed:
3- Rail Assembly
1- Right Pole Mount End
1- Left Pole Mount End
3- Ratchet Wheel
3- Ratchet Stop
6- End Cap Shoulder
6- #8 x 7/8” Screw
3- ¼” x 1 ½” Truss Bolt
Fig. 8-1
8-1:
Slide your Ratchet Wheels onto the
square end caps that you attached to the
aluminum rails in step 7.
8-2:
The direction that the Ratchet Wheels point will allow
you to apply tension to your quilt fabric, if the teeth are installed
pointing backwards your frame won’t work correctly.
8-3:
Make sure that the teeth on (2) of the
Ratchets point clockwise, and on the other
ratchet the teeth need to point counter-
clockwise. (Fig 8-2 displays
the correct wheel direction,
and placement on the frame.)
8-4:
Next attach the rails to the Pole Mount Ends.
8-5:
Make sure that the ends
of the rails with the Ratchet
Wheels get attatched to the Left
Pole Mount End.
Fig. 8-2


